Application "Digital Exams"
Use the "Digital Exams" application to perform digital written exams on MyLEARN. Use the "Digital Exams" application,
- if you want to administer online exams via MyLEARN synchronously and at a specified and limited time frame (see Information on online exams).
- if you want to conduct Digital Written Exams on campus (see Information on Digital Campus Exams).
Download overview of differences between exams conducted with the application "Learning Activities" and "Digital Exams": Differences to an exam with learning activities.pdf
Download overview of guide-content with links: Digital Exams (EN) links.pdf
Depending on the location of the test, you proceed differently:
- If you use an online examination environment (cf. Guide: OPU), the application is already activated there.
- If you are using the online course environment of your course, you must first activate the "Digital Exams" application there yourself. To do this, click on "Applications" under "Administrate" and move the slider next to "Digital Exams".
Administrators and students/members see different content:
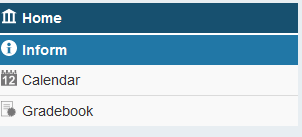
- Administrators see in the left side menu the section "Exams" with the addition "Exam administration" (see Screenshot) Clicking on it takes you to the exam administration menu. There you can create (import, recreate) questions and manage (recreate, unlock, assess) exams.
- Students do not see the "Exams" section in the left side menu . This only appears when an exam has been activated for them. From then on, students see the "Exams" area and below it the title of the unlocked exam (see Screenshot).
The following procedure is recommended for conducting an exam with the Digital Exams:
- Create and adapt exam questions and, if necessary, question pools. Publish the questions.
- Create an exam and add the exam questions.
Then, the following workflow kicks in:
Test run = Perform a test run of the exam with the selected exam settings. This allows you to see how all the exam settings you made work together.
Edit exam configuration = As long as the exam has not been published, you can still edit and adjust the exam configuration. After the exam has been published for the first time, the configuration can no longer be edited.
Publish exam = Here you manually publish the exam for all students. From now on students can see, open and edit the exam. If an automatic start time has been entered for the exam, this button does not need to be clicked.
Close exam = Close the exam manually for all students. From now on students will not be able to see the exam. If an automatic end time has been entered for the exam, this button does not need to be clicked.
Open Exam again = Re-open the exam manually for all students. Only students who have not yet actively clicked on "Submit" can open the exam and continue working on it now.
Create gradebook structure = Click this if you want to use the OPU grade book. This will transfer all questions of the exam into the grade book and the entered scores in the exam log of this exam will synchronize with the grade book. If you have several exams with the same questions (for example due to a BeAble time extension), then it is sufficient to create the grade book structure only once (cf. How do I grade the exams?.
Open student submission review = Opens the exam view for students (cf. Student Submission Review)
Close student submission review= Closes the exam view for students.
* per default
At the level of the individual questions
- Randomization of the order of answer alternatives
- Random selection of a defined number of answer alternatives
- Shuffling of partial questions within a short text interaction
- Random selection of a defined number of partial questions within a short text interaction
- Individualized questions by adding "substitution values" (currently SWA only)
- Optional plagiarism check for Upload interaction (Textfiles: pdf, rtf, doc, ...)
At the level of the exam
- Question names (titles) are hidden and replaced by neutral placeholders during the exam*
- Randomized question sequence
- Presentation of Questions in a strict sequence - no back navigation
- Limited number of questions, provided all questions are of equal value
- Use of random questions from question pools
- Deactivation of spell check in text fields
- Displaying the IP address of the students
- Do not allow cut & paste (copy & paste)
- Generate a digital signature with exam submission
For online exams in an OPU
- Automated online supervision
- Examination Statement*
For Digital Campus Exams (PC-Room)
- Safe Exam Browser*
- Privacy screens in front of each workstation
- Privacy screens on the PC monitors
- Display of the student's photo directly during the exam*
- Room invigilators*
For Digital Campus Exams (BYOD)
- (Optional) desktop recording incl. red framing of the test on the screen.
- Room invigilators*
Pre-Check of your Digital exam
In addition to asking questions about the Digital Exams, you can also request a pre-check of the exam via the Helpdesk: https://support.wu.ac.at/servicedesk/customer/portal/5/group/46. Use this option to make sure that all settings fit before performing the exam.
Question Management
You can either create new questions or copy questions into the exam.
To create a new question:
- Click on „Exam administration“ in the side menu.
- In the top menu, click on "New“, and select the desired question type from the dropdown list:
- Fill all mandatory fields and the optional fields as desired and click on "OK“.
- Click on "Preview" to test the question from a student perspective.
Use the clipboard to copy questions (cf.: Guide: how do I copy questions?). All question types with all settings can be copied from a digital exam. SC and MC questions can be copied from Learning Activities. However, scoring and grading scheme settings will be lost and must be re-entered. Transferring learning activities to digital exams allows you to use the exam server/paper exam and the OPU/digital exam together.
The following basic settings must be made for each question:
Page name
The name of the page is a unique name of the question, which is not displayed in the exam administration, e.g. "mc13a".
Title
Optional. The title is the name with which the question will be displayed in the exam administration. The title of the question is not displayed to students during the exam itself. However, students may see the title of the question in the grade book and in the exam review (when student submission review is opened). If you don't add a title the page name will be selected as the question's title.
Created by
The person who created the question is entered automatically. You can always adjust this entry or add further names within the scope of editing processes.
Minutes
Optional. Specify the expected duration of the question here. The sum of the minutes of all questions defines the time displayed in the countdown and is used as a starting point for calculating an extended time budget (e.g. for BeAble students). The number of minutes does not represent a time limit for the answerability of a question. Note: if neither minutes nor points are entered, there will be an error message when creating the grade book structure after the exam. The minutes display can be hidden during the exam.
Points
Optional. Set the maximum achievable points for this question here. Depending on the question type, the points are calculated automatically or have to be entered manually in the digital examination form by the assessors. Note: if you do not enter any points, then the indication of the minutes will be used as the point value. The points display can be hidden during the exam.
2 columns
With this setting you determine whether the information is displayed above the answer options (default setting) or next to the answer options. Check "2-column" to position the information to the left of the answer options (see screenshot: 2 columns activated, see screenshot: 2 columns deactivated).
Feedback
Feedback fields can be viewed by students as part of the review process. Use these fields to include sample solutions or rubrics with the questions.
Language
Default setting is en_US (English). The language setting is only relevant for the question if you want to offer two versions of the same question in an exam (once in English and once in German). The language setting (en or de) is part of the unique name of the page and should not be changed once the question has already been assigned to an exam.
Tags
Optional entry. Set tagsfor the question to be able to filter by them in the question administration. You can also edit the tags directly in the question administration.
For closed question types, the points are calculated automatically based on the selected scoring scheme. If there are conditions for the assessment, the sub-questions of short text questions are always weighted equally. For all other question types, the assessment can be precisely defined per question.
MC Interaction
- GGW (default): This is the "friendliest" scoring scheme. Each answer alternative has the same weighting and is interpreted as a single-choice question (yes/no question). The result is calculated as follows: (number of correctly answered alternatives - number of incorrectly answered alternatives / 2) / (number of correctly answered alternatives + number of incorrectly answered alternatives).
- wi2 (equivalent to "standard with partial points"): This scheme should be used when there are many answer alternatives. It is more difficult than GGW, but easier than exact and wi1, since it leads to a smaller reduction in score if there is only one wrong option in the MC question. Each question is assigned a maximum number of points (max). Furthermore, there is a number of correct (r) and incorrect (f) answer alternatives. For each correctly marked alternative max/r points are awarded and for each incorrectly marked alternative max/f points are deducted. No negative points are awarded. If a question has only one wrong alternative (and this was checked), only half of the points, i.e. max/2 and not max/f, are deducted. Example: For one question a maximum of 3 points can be awarded. The alternatives a,d and e are correct (and therefore b and c are wrong). For each correct alternative 3/3 (=1) points are awarded and for each wrong alternative 3/2 (=1.5) points are deducted.
- wi1 (new): like wi2 but stricter. If there is only one wrong answer choice and it is ticked, then 0 points are awarded.
- exact (equivalent to "No partial points"): Each question is assigned a maximum number of points. However, this number of points can only be achieved if all correct alternatives are ticked and all incorrect alternatives are not ticked. Otherwise, 0 points are awarded (all-or-nothing principle).
- Canvas (corresponds to the MC scoring scheme from Canvas): this scheme is suitable for questions where approximately half of the answer alternatives are correct (e.g. 2-3 correct answer alternatives out of 5 possible alternatives). The result is calculated as follows: (100 / number of correct alternatives) * number of correct marks by a student - (100 / number of correct alternatives * number of incorrect marks by a student).
- Mixed assessment (gemischte Bewertung): no longer exists in the digital exams. You can choose wi2 if there are at least two correct answer alternatives and exact if there is exactly one correct answer.
Example of a MC-Item with 5 answer alternatives and various scenarious: MC Scoring EN.pdf
Note: wi2/wi1 are swapped in this graphic (will be corrected soon) c.f. in German MC Scoring_DE22.pdf
Ordering Interaction
- exact (default, equivalent to "No partial points"): The question is only answered correctly if all elements have been positioned exactly correctly. Example 1234: Only the input 1234 is correct and receives points.
- position (new): Partial points are awarded for elements that have been positioned exactly correctly. Example 1234: For the input 1432, 2 of 4 elements are positioned correctly, i.e. half of the points are awarded.
- relative (new):Partial points are also awarded for elements that were not positioned at the exact correct position, but were positioned at the correct distance from each other (e.g. one behind the other). The more relative neighbors have been positioned correctly, the more partial points will be awarded. Example 1234: With the input 3412 the relative position of two pairs fits. Again, half of the points are awarded.
SC Interaction
- exact (equivalent to "No partial points"): Each question is assigned a maximum number of points. However, this score can only be achieved if all correct alternatives are checked and all incorrect alternatives are unchecked. Otherwise, 0 points are awarded (all-or-nothing principle).
The following options are available:

- Select a question e.g. to add them to the clipboard for a copying process.
- Edit a question.
- Duplicate a question to adapt its content.
- Check the change log and restore a previous version of this question, if you wish to do so.
- Check or change the publishing status of the question. Only published questions can be selected for an exam.
- Identify a question by its type (e.g. MC Interaction, Text Interaction).
- Identify a question by its title. It is recommended to choose the title as meaningful as possible and to add (e.g. prefixes). Klick on the title to see a preview of the question.
- Enter tags for a question or filter the list of all questions according to tags.
- Check the last change of the question to keep track on the editing process.
- Archive a question with a click on the eye icon, Thereafter they can be found in the main menu under Digital Exams | Archived Items. There the items can be irretrievably deleted or restored.
Under the question management you will find the bulk actions for selected questions. Here you can...
- Add [questions] to clipboard
- Publish [questions]
- Unpublish [questions]
- Export [questions]
You can copy questions into other communities (OPU, courses).
- In the left side menu, click on "exam administration".
- Select one or several questions within the digital exam using the checkbox
.
- In the menu bar, click on "Clipboard“.
- In the drop-down menu, select “Add to clipboard”.
- Change to the exam administration of the community in which you want to insert the content.
- Navigate to the digital exams application.
- In the clipboard, select "Insert content here...".
Note: Only SC and MC questions can be transferred from the learning activities (from January 23, 2024).
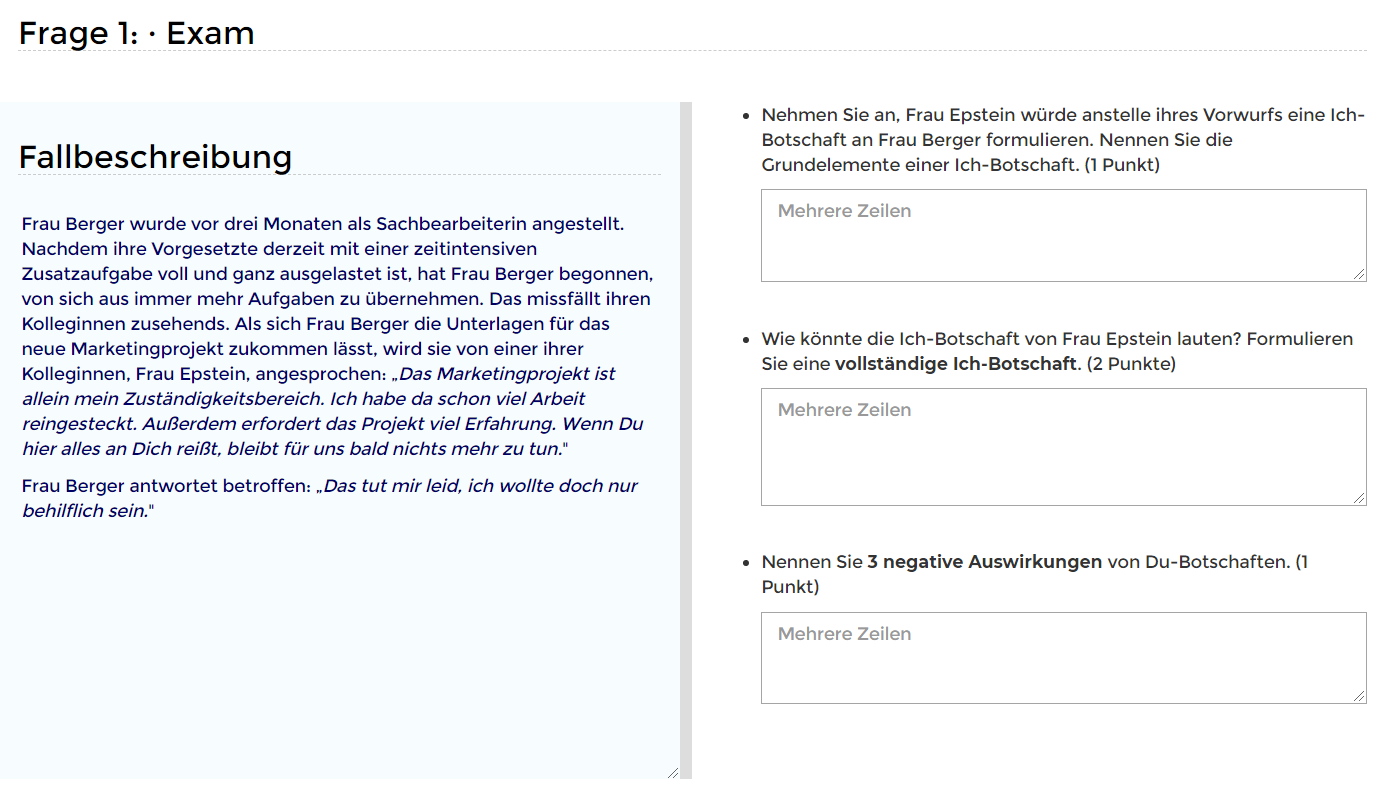
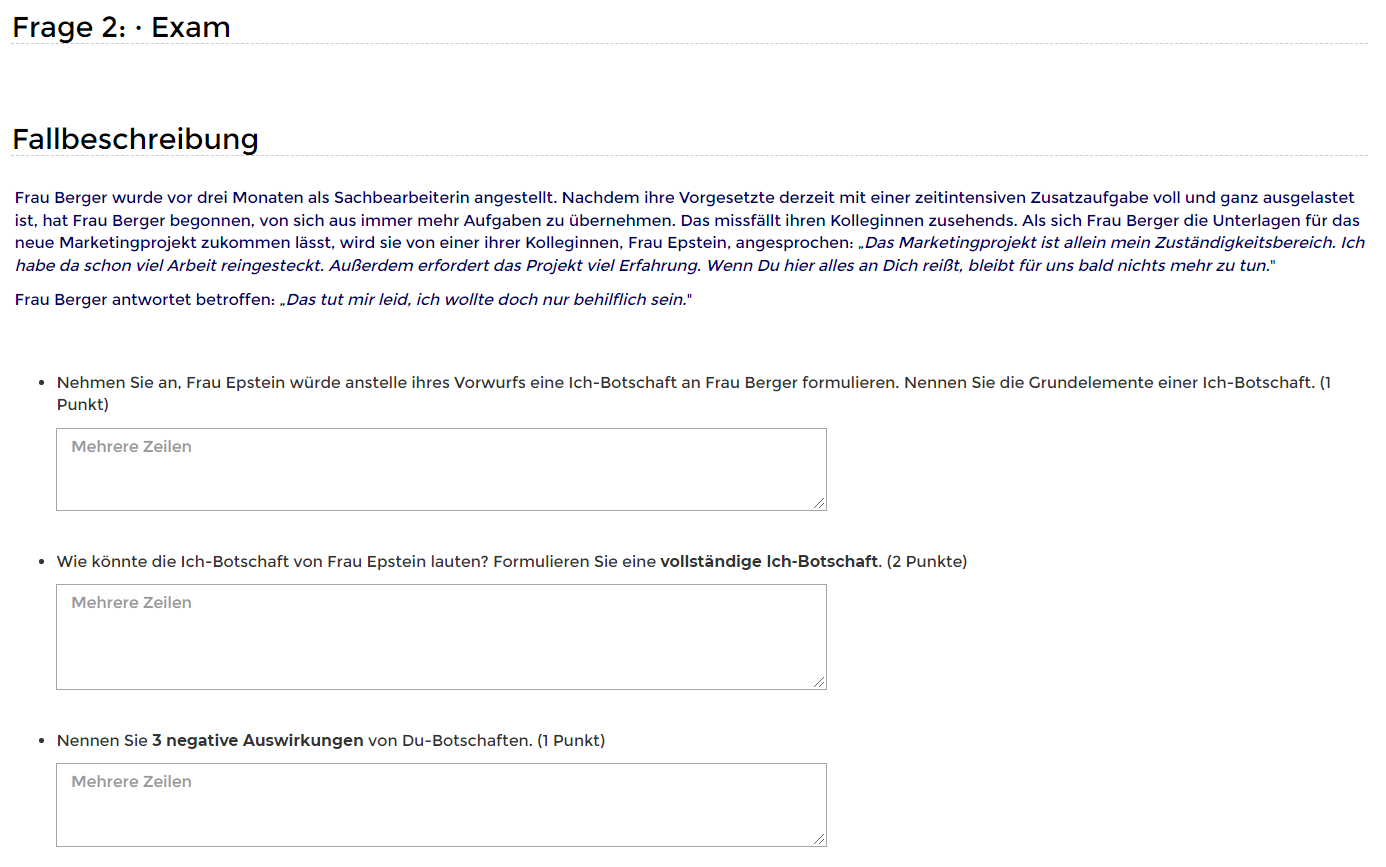
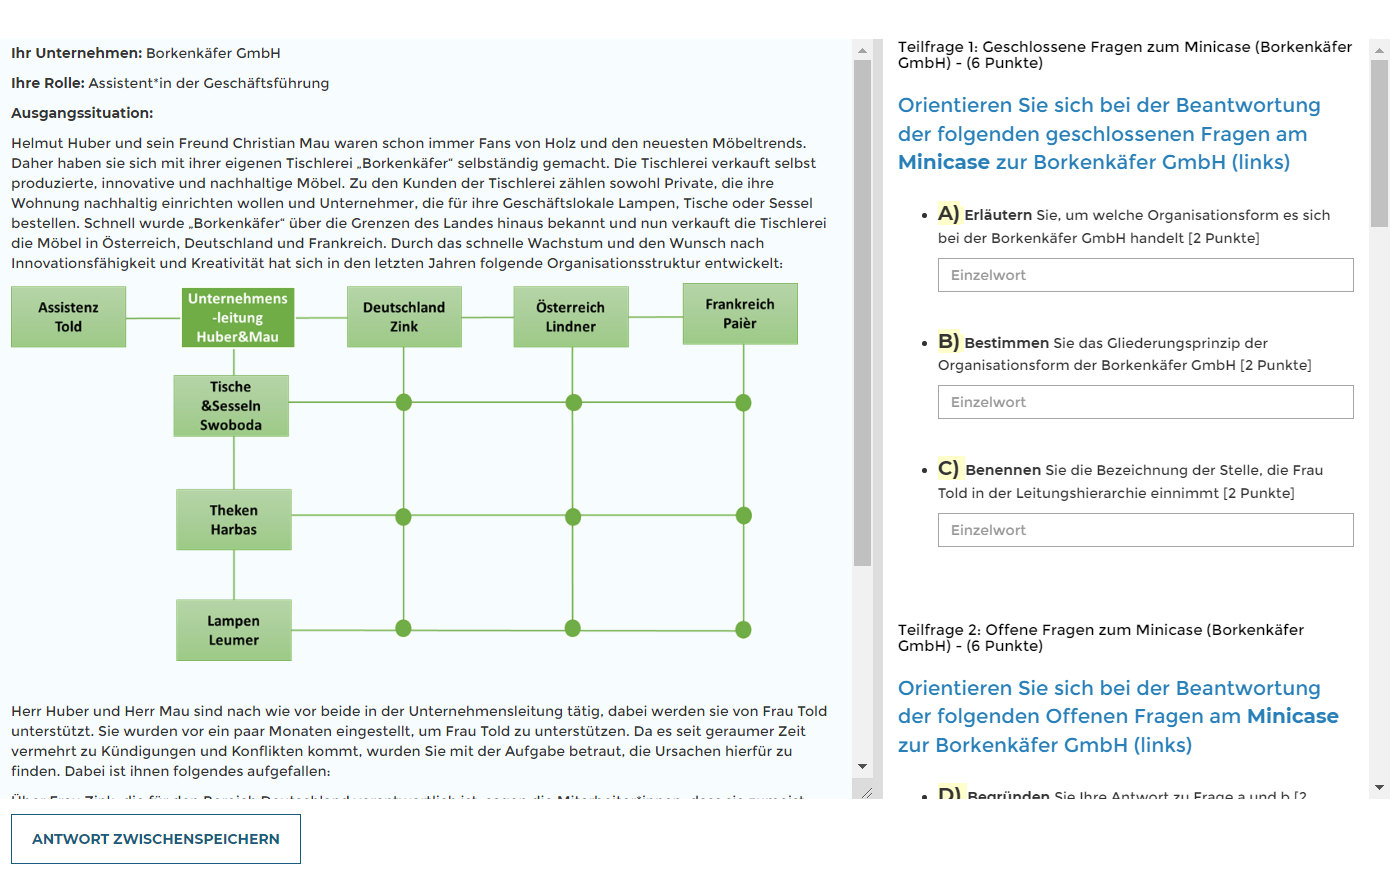
Description
Question type: diverse (open and/or closed)
Assignment: Any number of questions can be assigned by drag & drop to a shared input (e.g. a case description). The questions are presented together on one page (see screenshot with an example), but are independently graded. Students can enlarge or reduce the field with the instructions.
Input/instruction: for the case-based interaction: text, video, image, table. The format for specifying the assigned questions is diverse.
Assessment: diverse (automated and/or manually)
How to create this question
- Make all the basic settings (see above). 2-columns is already selected here as the recommended default display-setting.
- Select which information should be presented together with the subquestion (see subquestions with all information, see subquestions without information):
- Minutes display (the suggested minutes per sub-question).
- Points display (recommended, the individual points per sub-question)
- Title (recommended, the individual title of the subquestion)
- Enter the case description under "Excercise Text". This can be longer and include video and image elements.
- Drag and drop the questions that you want to present together with the input into the left selection field. Make sure that you do not drag any questions here that you would also like to use elsewhere in the exam. Students would otherwise receive this question 2x. Only questions that have already been published are displayed here (green box).
- Enter an optional "Feedback".
- Confirm all entries with "OK".
Description
Question type: open
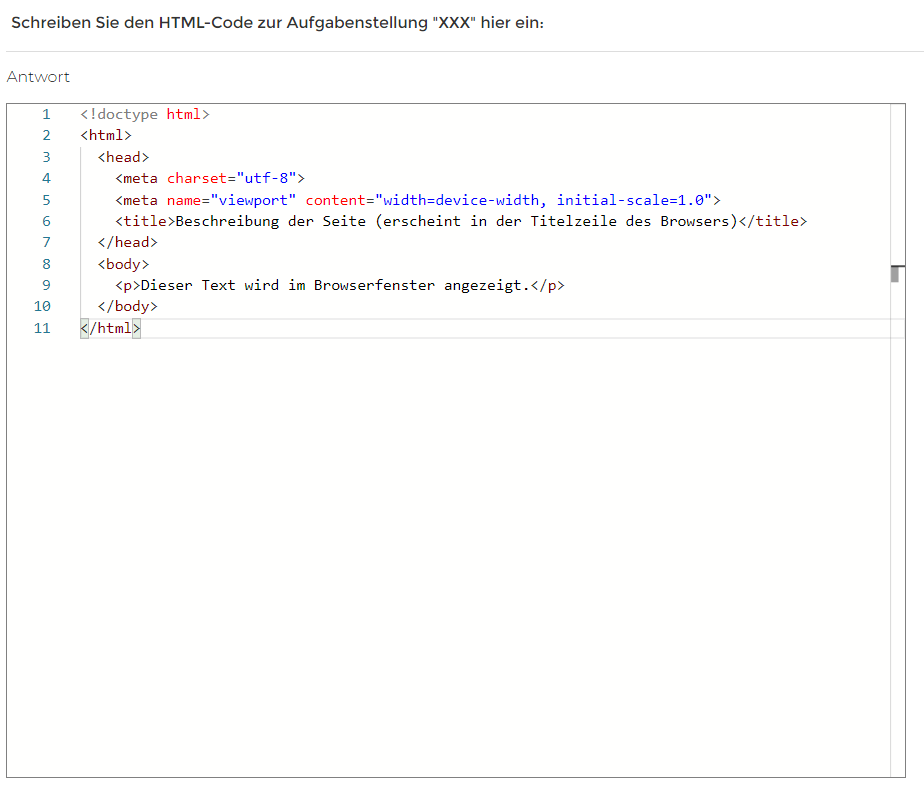
Assignment: students write code in a predefined programming language (Python, Html or Java, as of August 2021) using a text field. The text field is optimized for entering the code and consists of several lines (see screenshot with an example).
Input/instruction: text, video, image, table
Assessment: manually, by the assessor
How to create this question
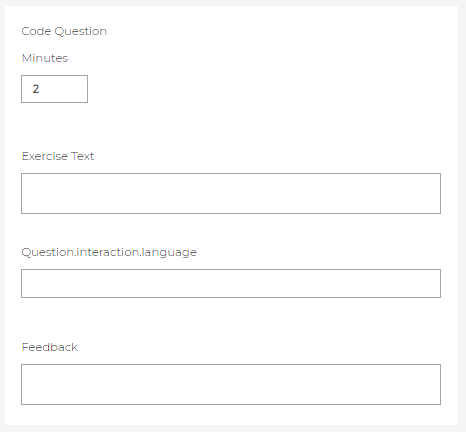
- Make all the basic settings (see above).
- The time automatically corresponds to the maximum points to be achieved.
- Enter the instructions under "Excercise Text".
- Enter html, pyhthon or java as "Question.interaction.language".
- Enter an optional "Feedback".
- Confirm all entries with "OK".
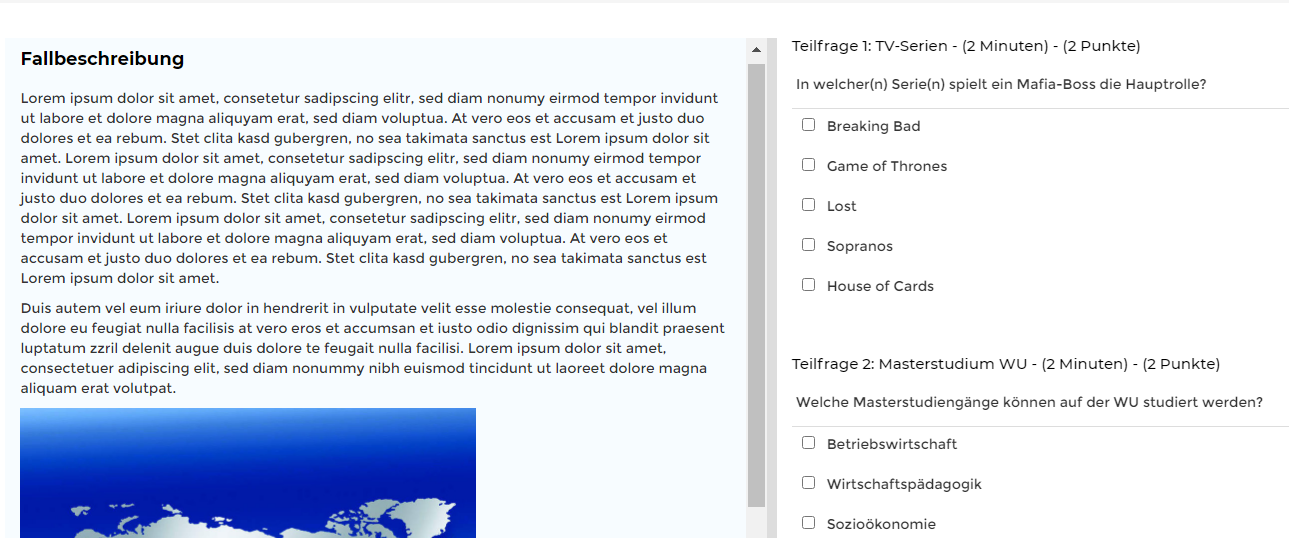
Description
Question type: closed
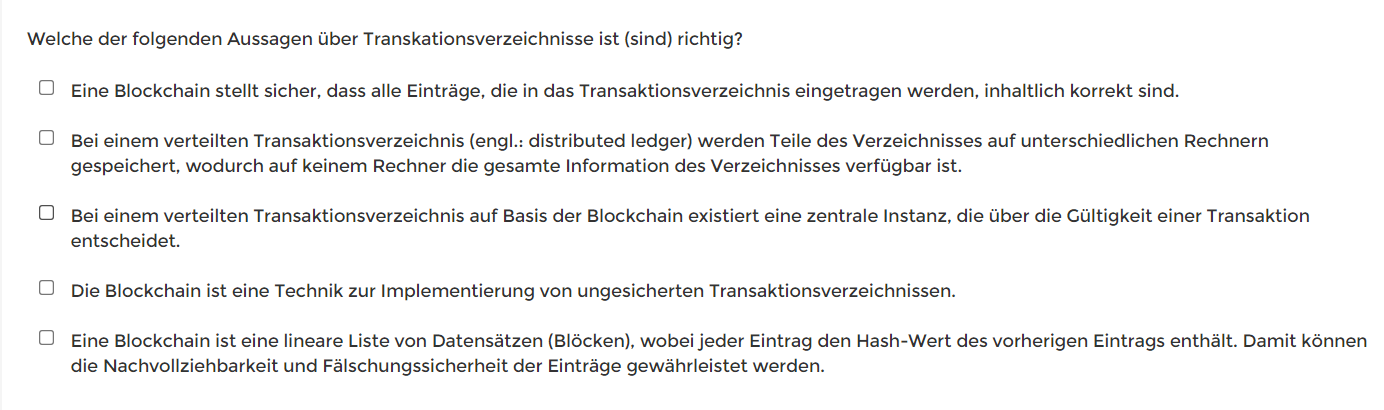
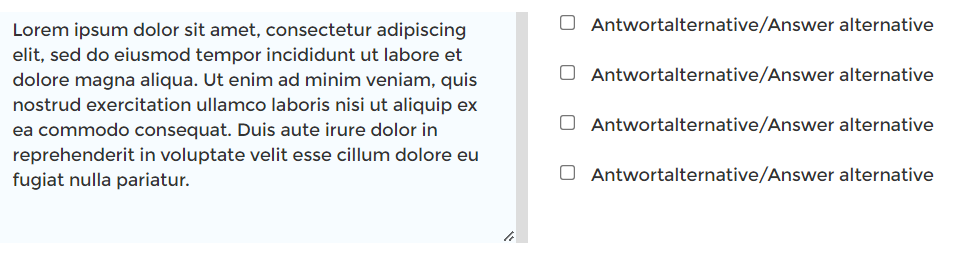
Assignment: The question type "MC Interaction", Multiple Choice questions with up to 15 answer alternatives can be created (see screenshot with an example).
Input/instruction: text, video, image, table.
Assessment: automaticalle depending on the selected scoring scheme (cf. Scoring Scheme)
How to create this question
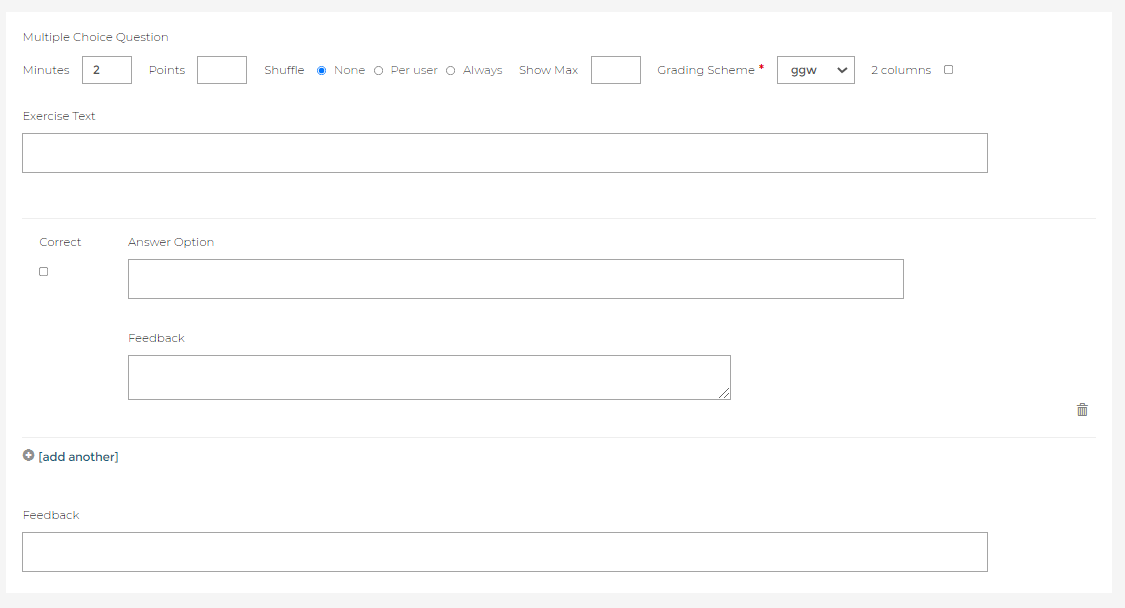
- Make all the basic settings (see above). Note that a two-column display is also possible for the MC Interaction (see Screenshot).
- Enter the instructions under "Excercise Text".
- Enter an answer alternative in the "Answer Option" field and check the "correct" checkbox if the answer is correct.
- Enter an optional "Feedback" for the answer alternatives that are not marked as correct. This feedback is only displayed in the exam protocol if an incorrect answer alternative is selected.
- Click "Add another" to create more answer alternatives.
- Repeat steps 4-5 until you have created all answer alternatives. You are also welcome to enter more answer alternatives than should be displayed per question (see "Shuffle", below).
- Enter an optional "Feedback" for the whole question.
- Confirm all entries with "OK".
Shuffle [Level: Answer Alternatives]
Determine if a selection of all entered answer alternatives should be drawn at random, and if answer alternatives should be displayed scrambled.
- None
All students will see all answer alternatives entered for the question in a fixed order. The answer alternatives will not be scrambled. - Per User [default].
The answer alternatives will be scrambled. If you enter a number in the "Show Max." box, then students are randomly shown the selected number of answer alternatives. If you leave the "Show Max" selection field blank, then all answer alternatives will be displayed. Note: The answer alternatives are drawn completely randomly, i.e. students can also get an MC excercise where none of the presented answer alternatives is correct. - Always [only for testing the exam].
When pre-testing the exam, the selected number of answer alternatives is randomly displayed. The selection changes after each new call of the exam. Thus, the correct selection/presentation of all answer alternatives can be tested once in advance.
Description
Question type: closed
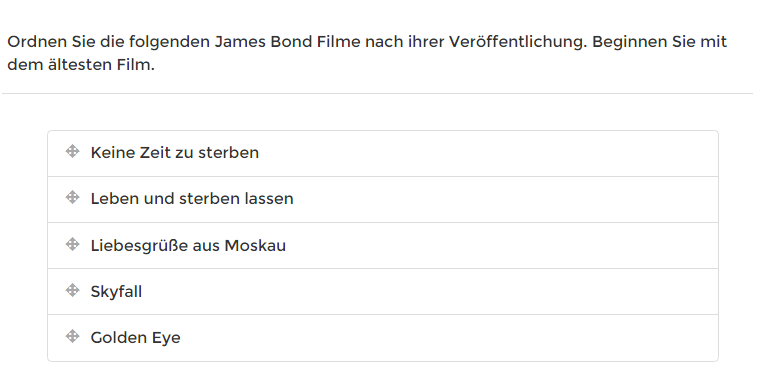
Assignment: Students arrange given elements (text or numbers) in a vertical order (see screenshot with an example). It is important to adhere to the correct order. Attention: all elements must be different.
Input/instruction: text, video, image, table.
Assessment: automatically, according to the selected grading scheme.
How to create this question
- Make all the basic settings (see above).
- Choose a Scoring Scheme for the individual question.
- Enter the instructions under "Excercise Text". Note that you also specify here how to rank (from top to bottom or from bottom to top).
- Enter the first element from the sequence under "Ordering Elements".
- Click on "add another" to make additional entries. Please note the following:
- The order you make here corresponds to the "correct" order.
- No elements should look exactly the same (i.e. duplicate).
- Enter an optional "Feedback". For example, you can show which order is correct because students cannot yet see this in the exam protocol.
- Confirm all entries with "OK".
Description
The Proxy Interaction is not an own question type. It is a placeholder for a question that is randomly drawn from a pool folder (see: Pool Folder Management).
How do I create the question?
- Make all basic settings (see above). The point and time value stored here overwrites all the information in the original questions.
- Select a pool folder (only one pool folder can be selected).
- Optionally, select which types of questions should be drawn from the pool folder (by default, all question types are checked).
- Optionally specify a name pattern for the Proxy Interaction. You can use the name pattern even if no pool folder has been created.
- Enter an optional "Feedback" for the entire Proxy Interaction.
- Confirm all entries with "OK".
How do I use the Proxy Interaction without a pool folder?
If no pool folder is created, then the Proxy Interaction automatically accesses all questions in the question management section ("exams folder"). Determine the types of questions that should be drawn for the Proxy Interaction and/or enter a name pattern. E.g.: the name pattern ad1* then accesses all questions that begin with ad1 in the title, e.g.: ad1Chapter1, ad1Chapter2, ad1Chapter3. In the preview it is shown from how many questions the Prooxy Interaction will be eventually drawn.
Description
Question type: closed
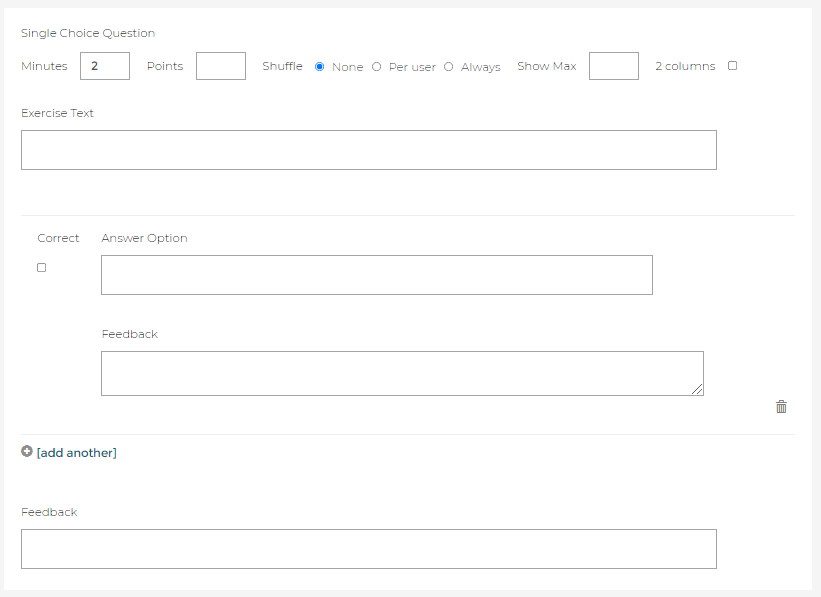
Assignment: The question type "SC Interaction", Single Choice questions with up to 15 answer alternatives can be created (see screenshot with an example).
Input/instruction: text, video, image, table.
Assessment: automaticalle "exact" (cf. Scoring Scheme)
How to create this question
- Make all the basic settings (see above). Note that a two-column display is also possible for the SC Interaction (see Screenshot).
- Enter the instructions under "Excercise Text".
- Enter an answer alternative in the "Answer Option" field and check the "correct" checkbox if the answer is correct. Please note that it is technically possible to mark multiple answer alternatives as "Correct" here. Since this is an SC question, please select only one checkbox. Students also only have the option to select a single answer alternative.
- Enter an optional "Feedback" for the answer alternatives that are not marked as correct. This feedback is only displayed in the exam protocol if an incorrect answer alternative is selected.
- Click "Add another" to create more answer alternatives.
- Repeat steps 4-5 until you have created all answer alternatives. You are also welcome to enter more answer alternatives than should be displayed per question (see "Shuffle", below).
- Enter an optional "Feedback" for the whole question.
- Confirm all entries with "OK".
Shuffle [Level: Answer Alternatives]
Determine if a selection of all entered answer alternatives should be drawn at random, and if answer alternatives should be displayed scrambled.
- None
All students will see all answer alternatives entered for the question in a fixed order. The answer alternatives will not be scrambled. - Per User [default].
The answer alternatives will be scrambled. If you enter a number in the "Show Max." box, then students are randomly shown the selected number of answer alternatives. If you leave the "Show Max" selection field blank, then all answer alternatives will be displayed. Note: The answer alternatives are drawn completely randomly but students will always get a SC-Question with the correct answer alternative. - Always [only for testing the exam].
When pre-testing the exam, the selected number of answer alternatives is randomly displayed. The selection changes after each new call of the exam. Thus, the correct selection/presentation of all answer alternatives can be tested once in advance.
Description
Question type: open or closed
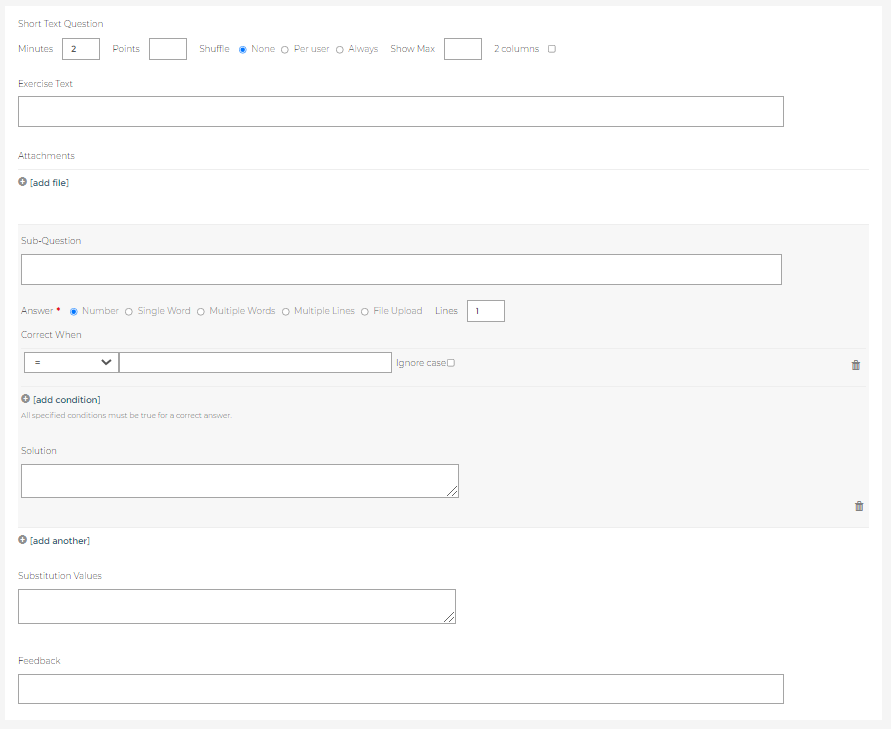
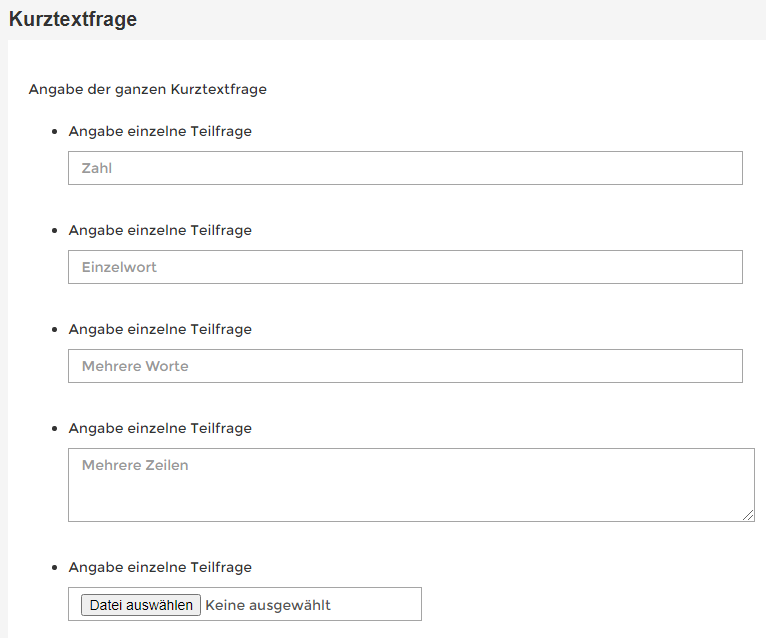
Assignment: A composite question format, where up to 15 questions can be displayed combined with each other (see screenshot with an example). For each sub-question it can be determined whether students should answer using a number, a word, several words, several lines or a file. An indication of the expected answer format is then displayed for each sub-question. The sub-questions are not weighted.
Input/instruction: for the short text interaction and each sub-question: text, video, image, table, optionally file attachment.
Assessment: There is a maximum point value of the whole short text interaction and no display of the points achieved at the level of sub-questions. The assessment varies:
- If no conditions are entered for all sub-questions, the assessment is done manually, by the assessor/s (open). No more than the maximum score can be entered for all sub-questions together.
- If conditions are entered for all sub-questions, the assessment is calculated automatically (closed). The sub-questions are weighted equally and the maximum point value can be reached.
- If conditions are entered for some sub-questions and no conditions are entered for some other sub-questions, then only the point value of the closed question formats is calculated automatically. Assessors can manually overwrite this point value in the exam protocol and add the points from the open question formats (up to the maximum point value assigned to the short text interaction).
How to create this question
- Make all the basic settings (see above).
- If required, set a random selection at the sub-question level (see "Shuffle", below).
- Enter the superordinate instructions under "Excercise Text". If the instruction applies to all sub-questions and is somewhat longer, select the 2-column display.
- Create the first sub-question: Enter a question-text in the "Sub-Question" field.
- Define the format of the answer under "Answer" (see screenshot from exam):
- Number: the field says "Number" and students will get an error message if you try to save an entry that does not contain a numeric value. Possible formats are integers and commas. The percent sign is not allowed.
- Single Word: The field says "single word" but students can enter multiple words or numbers.
- Multiple Words: The field says "Multiple words" but students can also enter a single word or number
- Multiple Lines: The field says "Multiple lines." For this, also specify in the "Lines" field how many lines should be displayed.
- File Upload: Students will see the "Select file" button.
- Under "Correct when..." you can insert conditions for the automatic calculation of the sub-question's assessment (see Automated Essay Scoring).
- In the "Feedback" field, enter the feedback for the sub-question. This is handy if you have not defined any conditions and still want students to see a standardised solution in the exam protocol.
- Repeat steps 5-7 by using "Add another" to create more sub-questions.
- Add "Substitution Values" to include variables in questions (currently a SWA-only feature).
- Enter an optional "Feedback" for the entire short text interaction.
- Confirm all entries with "OK".
Shuffle [Level: Sub-Questions]
Determine if a selection of all entered sub-questions should be drawn at random, and if sub-questions should be displayed scrambled.
- None
All students will see all sub-questions entered for the short text interaction in a fixed order. The sub-questions will not be scrambled. - Per User [default].
The sub-questions will be scrambled. If you enter a number in the "Show Max." box, then students are randomly shown the selected number of sub-questions. If you leave the "Show Max" selection field blank, then all sub-questions will be displayed. - Always [only for testing the exam].
When pre-testing the exam, the selected number of sub-questions is randomly displayed. The selection changes after each new call of the exam. Thus, the correct selection/presentation of all sub-questions can be tested once in advance.
Description
Question type: open
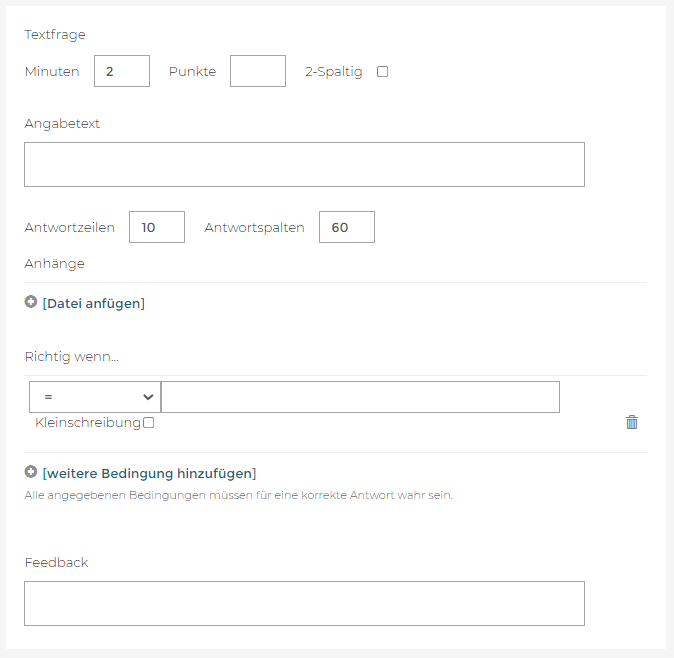
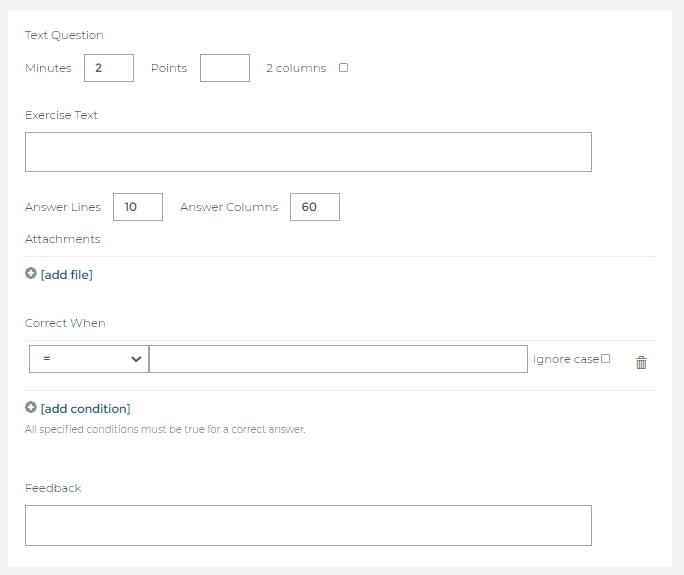
Assignment: Students write a text into a text field. The size of the text field can be specified by the number of answer lines and answer columns (see screenshot with an example). These rows and columns only determine the size of the answer box, they have no influence on the maximum length of the answer.
Input/instruction: text, video, image, table, optionally file attachment.
Assessment: manually, by the assessor, with optional assessment support (see Automated Essay Scoring).
How to create this question
- Make all the basic settings (see above).
- Enter the instructions under "Excercise Text".
- Define how large the text field should be displayed to students at the beginning:
- The number of answer lines determines the height of the text field: Default 10.
- The number of answer columns determines the width of the text field: Default 60.
- Attach a document (e.g. an article) under "Add file" if required.
- Under "Correct when..." you can insert conditions for assiststing in assessment (see Automated Essay Scoring).
- Enter an optional "Feedback".
- Confirm all entries with "OK".
Description
Question type: open
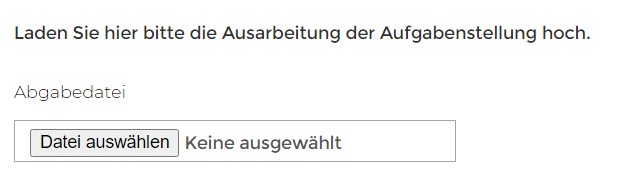
Assignment: Students upload one or more files as a submission (see screenshot with an example). You determine the maximum number of files allowed. There is no limit to this. The format of the files is not restricted (single file or ZIP file). Students' submissions can be checked for plagiarism (Turnitin).
Input/instruction: text, video, image, table, optionally file attachment.
Assessment: manually, by the assessor
How to create this question
- Make all the basic settings (see above) and define how many files students should be allowed to upload.
- Enter the instructions under "Excercise Text". Note that you also specify here how many documents are to be uploaded and in what form.
- If necessary, attach one or more documents for processing the task under "Add file" (e.g. a document template for writing in).
- Enter an optional "Feedback" (e.g. a rubrics or a sample solution).
- Confirm all entries with "OK".
AES functions are available for automated assessment of sub-questions and as an assessment aid.
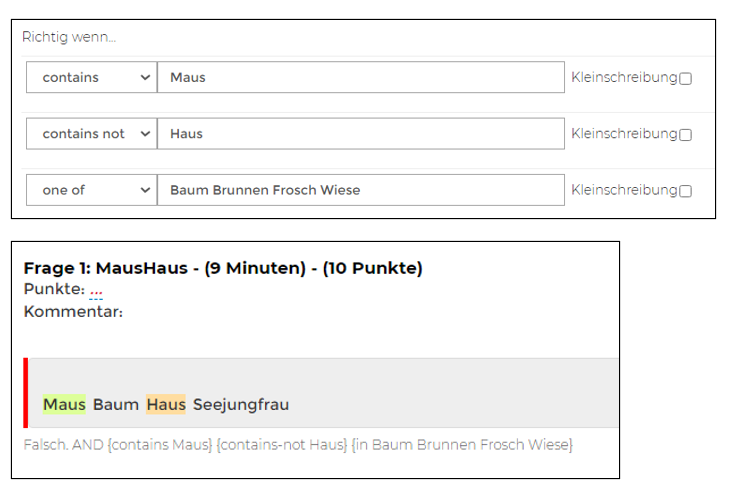
- If you enter conditions for short text interactions, then you define content conditions that indicate whether an answer is "correct" or "incorrect". If more than one condition is selected, then all conditions must be "correct" for the answer to be graded as "correct". For each of these conditions, you can select whether the answer is case sensitive ("ignore case"). Example: screenshot short text interaction: settings and exam protocol
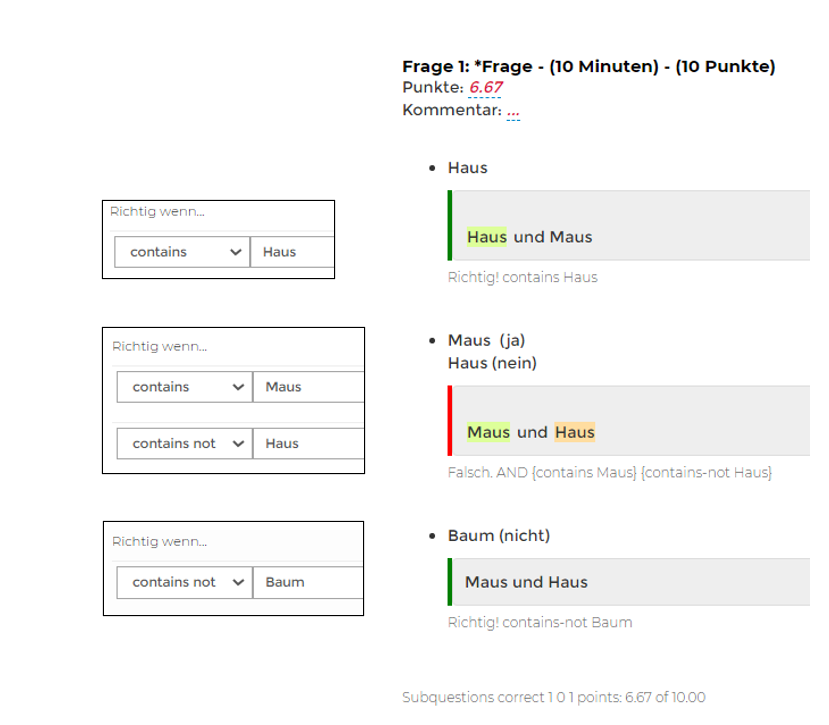
- If you enter conditions for text interactions, then these act as an indicator of what content should be displayed to assesrors and how. Correct content (condition "contains" is highlighted in yellow in the exam protocol, incorrect content (condition "contains not") is highlighted in orange. In addition to, for example, the information from feedback fields, this should enable quick orientation in the text of the answers. Example: screenshot text interaction: settings and exam protocol.
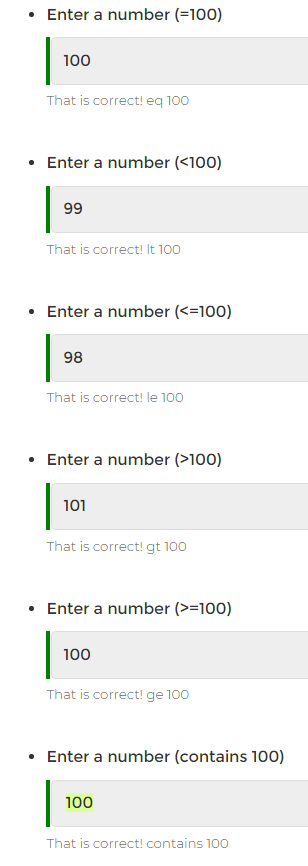
Conditions for an automated assessment (of short text interactions) see Example
|
= |
The answer has to be identical with a certain number or word: |
|
> |
The answer must be greater than a specific number: |
|
>= |
The answer must be greater than or equal to a specific number: |
|
< |
The answer must be less than a specific number: |
|
<= |
The answer must be less than or equal to a specific number: |
|
one of |
The answer must contain exactly one of the terms (not several): |
Conditions for an automated assessment (of short text interactions) and for an assessment aid (of text interactions)
|
contains |
The terms specified should appear in the answer and are highlighted in yellow: |
|
|
contains not |
The terms specified should not appear in the answer and are highlighted in red: |
If required, examiners can enter information under "Correction notes" to support them in the subsequent grading of open questions. The information here is only displayed to the administrators in the examination protocol, but not to students during within the submission review.
Click on "Exam protocol" to get to an overview of all exam protocols. These are displayed together one below the other.
- Click on Sort by "Username" to display students sorted by matriculation number in descending order (h0-h9).
- Click on Sort by "Name" to display all exam protocols sorted by family name in descending order (A-Z).
You can filter the contents of the exam protocols according to various search settings (see screenshot):
- Enter a term in the "Filter" field and click "Enter" to search in the title of the question or statement. You can search for individual persons, group-membership (see: How do I add members to the OPU?), questions or question content here. Filtering will hide all other content. If you want to grade questions one after the other, it is best to select "Grade by question" (see: How do I grade exams?).
- Activate "Search in content" next to the "Filter" field to search in student answers. This will allow you to do a quick keyword search within all submissions.
All filtered results can also be printed as PDF.
Pool Folder Management
Assign students a randomly drawn question from a created pool folder using the "Proxy Interaction" placeholder. To create a question pool:
- Click "New" under "Exam administration" and select "Pool Folder".
- Enter a "Page Name". The name of the page is a unique name of the pool folder, which is not displayed in the pool folder administration, e.g. "pool3b". This is a mandatory entry.
- Enter a "Title" for the pool folder. The title is the name that is displayed for the pool folder in the pool folder administration. If you do not enter a title, the name of the page is automatically used as the title.
- Optionally adapt the language. Default setting is en_US (English). The language setting is only relevant for the pool folder if you want to offer two versions of the same pool folder in an exam (once in English and once in German). The language setting (en or de) is part of the unique name of the page and should not be changed once the pool folder has been assigned to a Proxy Interaction.
- The person who created the new question is automatically entered under "Created by". You can always adjust this entry during editing processes or also add further names.
How can I edit, publish, restore, enter and archive pool folders?
The following options are available:

- Edit a pool folder (change name, title, language, creator)
- Check the change log and restore a previous version of this pool folder, if you wish to do so.
- Check or change the publishing status of the pool folder. Only published pool folders can be selected for a Proxy Interaction.
- Identify a pool folder by its title and enter the pool folder with a click on the title to manage its questions.
- Check the last modification of the pool folders to keep track on the editing process.
- Archive a pool folder with a click on the eye icon. Thereafter pools can be found in the main menu under Digital Exams | Archived Items. There the items can be irretrievably deleted or restored.
Click on the title of a pool folder to enter the question management of the selected pool folder. You have two add questions to a pool folder :
- Go to "New" to create new questions within this pool folder. OR
- Add questions from elsewhere via the clipboard to this pool folder. To do this, select "Insert content here".
Questions from pool folders are not displayed in the general question management. They are assigned to and subordinate to only one pool folder and are integrated into an exam exclusively via the Proxy Interaction placeholder.
Exam Management
To create an exam, proceed as follows:
- In the left side menu, click on "exam administration“.
- In the top menu bar, click on "New" and select "Exam“ from the dropdown list.
- Fill all mandatory fields (see "exam settings" below) and the optional fields as desired and click on "Create Exam".
After clicking on "Create exam" the exam is created but not yet published (=started). Students do not see an exam (see Screenshot). As an admin, you will now see an overview of the selected settings and questions in the exam settings and can test the exam from a student perspective by clicking on the "Testrun" button. The button "Restart“ guides you back to the exam administration where you can also adjust the configuration of the exam again.
All exams created in an OPU can be viewed via the exam administration:

- Click on the title of the exam to go to the detailed view (configuration settings, exam options ).
- The status indicates in which stage an exam is. Possible statuses are:
- intitial = the exam has been created, but is not yet published
- published = the exam is running (is currently published)
- done = the exam is finished (was published and is now closed)
- submission_review= submission review is open
- The "Last Change" informs about the last time an action was set in the exam.
- Under "Creator" you can see who originally created the exam.
- Archive an exam by clicking on the eye icon. Archived exams are hidden from view. Thereafter those archived exams can be found in the main menu under Digital Exams | Archived Items. There the items can be irretrievably deleted or restored.
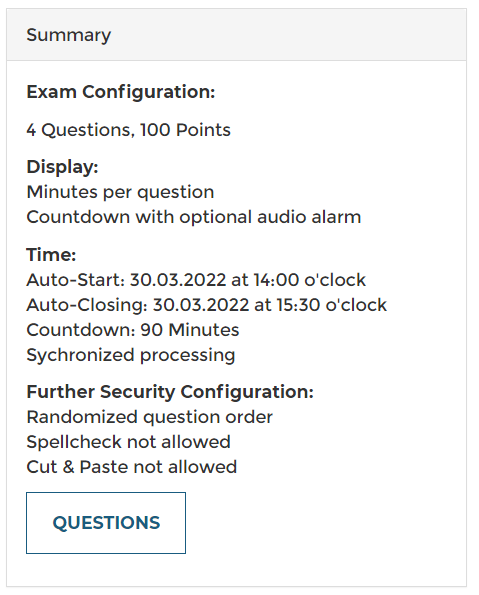
Specify a name for the exam ("Name of Exam"). This name is displayed to you in the exam administration and to the students in the gradebook. Especially if you have several exams in a course, choose a descriptive name that is as meaningful as possible, for example "Exam Labor Law" or "Exam Labor Law Beable +100". Then make the detailed settings. During the exam, an overview of the selected settings is displayed (cf. Screenshot Exam Configuration). Once you have made all the settings, click on "Create exam" to create the exam. Check all settings, especially the interaction of minutes per question (= countdown timer) and planned time window for the exam and test the exam from the student's perspective with the "test run" (see: What does the exam workflow look like?).
QUESTIONS (Detailed settings)
Questions
At "Questions", select the questions that select the questions that should be assigned to the exam. To do so, drag the questions with the mouse from the area "Candidates" to the area "Selection". All questions can be selected or deselected simultaneously using the arrow icons on top. Only the questions that have already been created and published are displayed. It is best to formulate the title of the questions in a meaningful way so that you can identify and correctly assign the questions here. [March 2022] Please note that the questions that have already been integrated into case-based questions are also still displayed here. Please do not select these (twice).
DISPLAY OPTIONS (Detailed settings)
Show questions with points
Default setting "Yes". If selected, the score (points) that can be achieved is displayed to students. It is recommended not to deactivate this setting.
Show minutes per question
Default setting "Yes". If selected, the recommended processing time per examination question is displayed to students. Feel free to disable this display, as students will always see the countdown timer for the exam in any case, based on the sum of the entered minutes of all exam questions.
Audio alarm für countdown timer
Default setting "Yes". If selected, students can activate an audio alert on the exam countdown timer. This will generate a short audible beep 1 minute before the countdown expires to remind students to submit the exam on time. The option should be disabled for Digital Campus Exams (see screenshot example)
TIME MANAGEMENT (Detailed settings)
Exam Time Window
If the date and time have been entered for the time window of the exam, the exam is automatically released at the time entered and automatically closed again later. Even if a time window has been entered, the test can also be released and closed manually at an earlier point in time. If all exam questions, Attention: the time of the exam questions determines the display of the countdown. However, the countdown is not based on the entered end time of the exam. Make sure that the total time entered per question corresponds to the total time window (e.g. 30 MC questions of 2 minutes each = countdown of 60 minutes, time window 14:00 - 15:00). If you have entered an end time for the test that is before the calculated end of the test according to the countdown timer, then the end time is automatically adjusted by the system. Important: Please use Chrome, Edge or Opera to enter the time window. Other browsers may cause display problems here.
Synchronized Exam
Default setting "Yes". Here the countdown starts uniformly for everyone at the official start of the exam time (or respectiveley when the exam is "opened") If students enter the exam late, then they will see an adjusted countdown in each case (e.g. instead of 45 minutes, only 30 minutes). If the setting is "No", then the countdown (regardless of a person's start time) always starts in full.
Time budget
Default setting "100%". By adjusting the slider, the duration of the exam can be increased in steps of 5%, e.g. to 125%, 150% or 200%. The processing time is based on the value entered for each individual exam question under "Minutes". This feature is intended for the processing of BeAble exams . It means that you do not have to manually adjust the number of minutes per question. Adjusting the time budget also automatically adjusts the end time of the time window for the exam. Example: Exam and the same Exam with a time budget of +200%.
SAFETY OPTIONS (Detailed settings)
Randomized Item Order
Default setting "Yes". If selected, students will be provided with the exam questions individually in a random order.
Restrict Items
This setting can only be activated, if all questions have exactly the same value of minutes and points. Enter the number of questions in the field that should be randomly displayed to students (from all questions assigned to the examination). Example: 100 MC questions with 1 minute and 2 points each are assigned to the exam. You enter the value 50. Students receive a (changing) random selection of 50 of the 100 questions. The exam has a total time value of 50 minutes and 100 points to be scored.
Allow Cut and Paste
Default setting "Yes". If selected, students can interst content (text, numbers, code) into the exam via Copy & Paste (Ctrl + C / Ctrl + V).
Allow spellcheck
Default setting "Yes". If selected, students can use the spell checker for questions with multi-line text fields.
Show IP address
Default setting "Yes". If selected, students see their own IP address during the exam.
Signature
Default setting "No". If activated, a digital fingerprint is generated during submission, which enables the evaluators to compare the IP address of the person processing the submission with that of the person submitting the submission.
Allow free navigation
Default setting "Yes". If set to "No" students are not alllowed to freely navigate through the questions.
SELECTION OF PARTICIPANTS
By default, the exam is assigned to all persons with the role "Member". If you want to change the assignment of an exam to individual persons or a group, then click on the "Members of..." button here. Remove the checkmark under "All participants" and select one/several persons or groups instead. The selection is sufficient and does not need to be saved separately. The selection field now lists all persons/groups to whom the exam has been assigned. This function is mainly intended for assigning exams with time extension to BeAble students.
COMMUNICATION OPTIONS
You can send a message to selected students or to all students during the exam (see below). This will be displayed directly in the exam. You can also activate a support chat. This is primarily intended for questions to the proctor during on-campus distance learning exams. The default support chat setting is "No". If you choose to enable the support chat, students will be able to start the chat during the exam by clicking "Start new chat" (see Screenshot, German Texttemplate)

This will open a small chat window where they can ask questions of the proctor. Communications are private and will not be shared with other students. The log of all messages and the content of the support chat (if used) will also be displayed in the exam record and shared with the student when they view it.
GRADING SCHEME
If you enter a grading scheme here, the calculated grade will already be displayed to students in the exam protocol i.e. they would not need to activate the gradebook. The Gradebook is useful if you want to export the gradesto BACH or Canvas, for example.
There are two ways to publish an exam:
- If a start time is entered for the exam, the exam is automatically published (and accessible for students) when this start time is reached. You do not have to do anything else.
- You can also activate the exam manually. To do so, select "Publish exam". This will publlish the exam at a time of your choice.
The prerequisite for activation is that the random selection of the assigned exam questions is set to "Per user" or "Never". The "Always" setting is intended exclusively for testrun of the exam. As long as "Always" is still selected in one of the assigned exam questions, the exam cannot be published. Please check the questions and change the setting directly in the question (via question management) if necessary.
After the exam has been published it can be accessed immediately by students. After that, students see in the side menu the item "Digital Exams" and below the name of the corresponding exam (see screenshot). With a click on the exam students can start working on it. Alternatively students can access the exam via a Link or a QR-Code. This will be displayed in the exam details after the exam is published and would need to be sent to students by you. Anyone with this link/QR code can take the exam as long as he/she is also a member of the OPU and logged in to MyLEARN:
Please note that even with a set start time, manual opening (e.g. at an earlier time) is still possible.
To access the current exam:
- Click in "Exam administration"
- Select the Exam that is currently in the state "published" and click on its title .
Here an overview page is displayed where you can see:
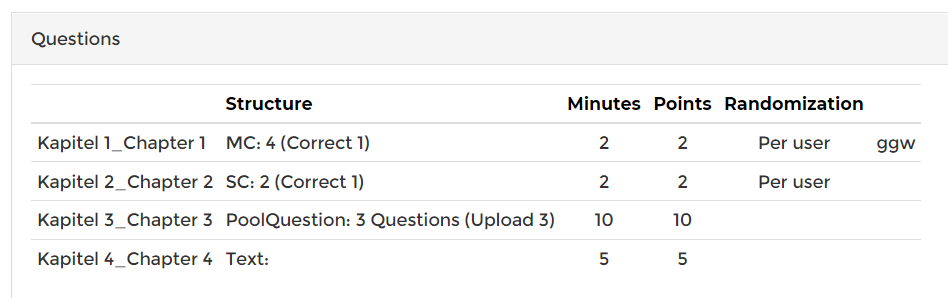
- the exam configuration including the list of questions (cf. Screenshot) and the time of the current exam release
- the countdown-timer and the remaining time. You can ctivate the accustic signal to indicate when the time will be over (in a synchronized exam).
- the list of participants who have already accessed the exam
- the number of participants who have already submitted the exam
Look at students' individual progress
- Under "Submitted Exams" click on "Participants". You will see all exam participants with their working state
- initial = The examinee has opened the exam but not yet saved any drafts.
- working = The examinee is still working on the exam or has not handed it in despite the closure of the exam.
- done = The examinee has handed in the exam before the exam was officially closed.
- You also see if (and how long ago) students have saved an answer/a draft. This time is displayed in "Last Modified"
- Seconds" shows how long a person has already been working on the exam. This entry updates with each save-activity as draft.
Reset a students processing status (re-open the exam for a particular student)
If students leave the exam environment without handing in the exam, they can always open it again and continue working on it until the exam is finally handed in or closed. However, it can also happen that students accidentally click on "Submit" too early. You can enable these students to access the exam again using a workaround. To do this, proceed as follows:
- Select the person with the status "done" and click on the participant* abbreviation (hyperlink) on the left. This will take you to that person's exam protocol.
- Click on the penultimate number at the top under History. The last number is the submission version. Confirm your selection with "Use displayed version as submission". The person's status is now "working" again and the student can continue working on the exam until the exam is finally closeds. Please consider: Depending on the status of the cache, it is possible that content changes that have already been made may be lost with the reset.
Send an individual message to one candidate
- Open the Communication Center.
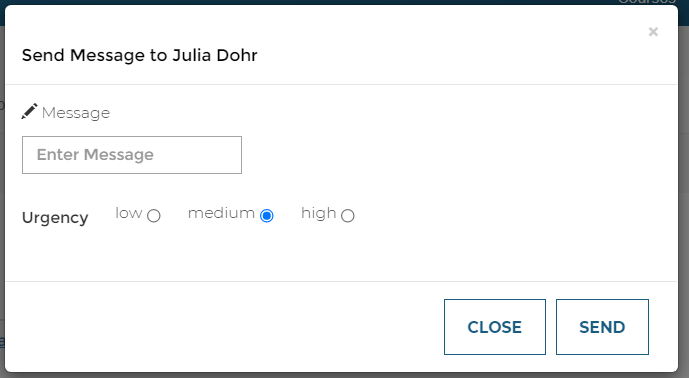
- Click on the name of one person in the state "working". A pop-up opens where you can enter a message (see screenshot)
- Define the urgency (low, medium, high). The urgency defines the colour of the message which will be displayed in the student*s exam.
- Click on "Send" to send this message to the individual student.
Send a message to all candidates
- Open the Communication Center.
- Click in "Send Messages to X Participants". A pop-up opens where you can enter a message.
- Define the urgency (low, medium, high). The urgency defines the colour of the message which will be displayed in the students' exams.
- Click on "Send" to send this message to all students who haven't submitted the exam yet.
Manage Support Chat
If the support chat is enabled.
- Open the Communication Center.
- Check to see if students have questions. A speech bubble icon indicates that someone has opened the chat and there is a question.

Click on the name or student number to view the chat with the selected person. You can reply here. The other person will immediately see your answer directly in the chat in their own exam. Your name will also be displayed.

Note: Only Students can start this chat. If you want students to interact with you, send a message to the selected person telling them to start the support chat.
Analogous to the publishing of the exam, you also have two options for closing the exam:
- If an end time has been entered for the exam, it will be closed automatically when this end time is reached. You do not have to do anything else.
- You can also close the exam manually. To do so, select "Close exam". This will close the exam at a time of your choosing.
- Every closing is noted under "Releases" in the exam configuration overview.
Please note that even with a set end time, manual closing of the exam is still possible. And if the exam was closed too early, you can reopen it by clicking on "Open exam again". However, students who have already submitted the exam (status: done) cannot continue to work on it.
Important: The countdown timer is only information for students that is always displayed, and if it has expired, it does not close the exam.
What happens if students do not officially hand in the exam in time?
If students do not actively hand in the exam in time, their status remains "working". You can still grade the work as normal via the exam protocol and do not need to change their status.
In case of a set end time of the exam and students reporting technical difficulties, you may opt to give students more time for the exam. In this case:
- Sent a timely message to all participants (urgency: high) to announce that they will receive extra time for the exam and thus should not submit the exam with the end of the countdown-timer, if they want to make use of the extra time.
- Wait until the exam is automatically closed and then click on "Open exam again".
The countdown-timer will show negative time (e.g. -00:03:15) but students can continue working on the exam until you close it manually again.
To access an exam:
- Click in "Exam administration"
- Select the Exam you are interested in and click on its title.
Here you can:
- See an overview on how many persons have submitted the exam (eg. 57/61).
- Under Participants download a csv-file with an overview of all participants in the exam with their status (working, done).
- Access the "Grading by question" option (see Screenshot) with additional information of students' performance in each question (see Statistics). The answers to a selected question can also be printed as a PDF.
- Access all submissions via "Exam Protokol". Here you will find all information about the exam, e.g. processing time, caching versioning, automatically calculated points and can grade and comment open questions.
How do I check on scores and enter grades manually?
Within the exam protocol all questions and the students answers are displayed. You can filter the results (see: filter options).
- The grade of closed-ended questions (MC interactions, SC interactions, Ordering interactions and Short Text Interactions with conditions) is automatically calculated accoring to the selected scoring schema (cf. Screenshot), but can always be changed manually.
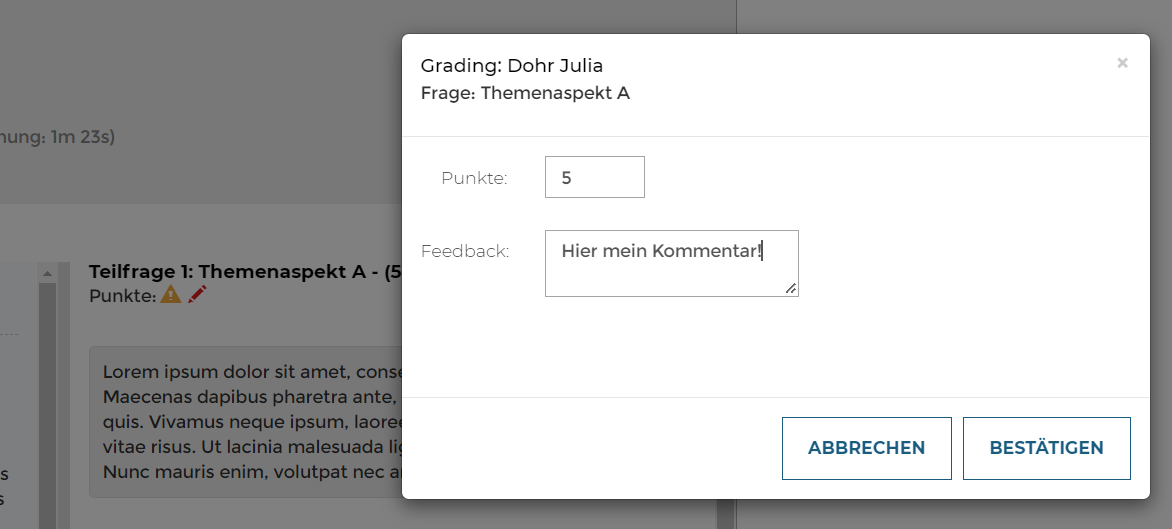
- The grade of open-ended questions must be entered manually (cf. Screenshot). To do this, click into the red pen icon next to the yellow triangle. A pop-up window will open where you can enter points and an optional comment (cf. Screenshot). Please note that points are to be entered in English format, i.e. with a full stop instead of a comma. In case of text-uploads by students (Upload Interaction) a (Turnitin) plagiarism check can be carried out (cf. Screenshot).
What can I do if questions need to be corrected?
It may happen that a setting was overlooked during the preliminary check of the questions, or that the inspection reveals that the wrong answer alternative was selected. Here you have the possibility to correct settings that are relevant for the evaluation of questions afterwards. Proceed as follows
- Click on "Exam administration".
- Select the exam in question and click on "Edit". The exam must be closed (status "done").
- Click on "Create grade book structure".
- Correct assessment settings for questions (e.g. markings as "correct" for SC and MC questions, conditions or assessment schemes). Of course, content changes must not be made afterwards.
- Click on "Recalculate Score".
What can I do if an alternative answer needs to be neutralised?
If an answer alternative cannot be answered, then the answers already given here must be score-neutral. To ensure that the final grade is still correct, you can give all students the points/partial points (depending on the assessment settings). To do this do the following:
- Click on "Exam administration".
- Select the exam in question and click on "Edit". The exam must be closed (status "done").
- Select 'Grade by Question'.
- Click on the question where a wrong answer alternative has been entered.
- Go through the questions and check who did not get any marks for that question. Enter the appropriate marks by clicking on the red pencil icon.
After the exam has been closed, you have the option to
- either synchronize the exam with the MyLEARN-gradebook by clicking the "Create gradebook structure" button,
- or to later export the results in a csv-file to e.g. import it in a gradebook of your own choice (cf. Screenshot).
The Gradebook application is automatically activated in every OPU (cf. Guide: Gradebook). If you choose to create the gradebook structure for the exam, you can edit the entries in the gradebook according to your own needs (e.g. combine them in self-selected categories), add other partial performances (e.g. in case of consideration of bonus points), set roundings, store a grade key and decide which of the entries you release and when. The results can then be imported from the grade book as a CSV to BACH. Use the grade book when the exam is the only performance/most important sub-performance and you want to communicate a grade to students right away.
Use the CSV-Export from the exam protocol if you have more than one exam in an OPU (e.g. BeAble exams, too) or if you want to communicate the exam results outside of the OPU only. It is reccomended to proceed in this way if the assessment is only one of several sub-assessments and the overall grade is to be communicated to students in the gradebook of a regular online course environment (LEARN or Canvas).
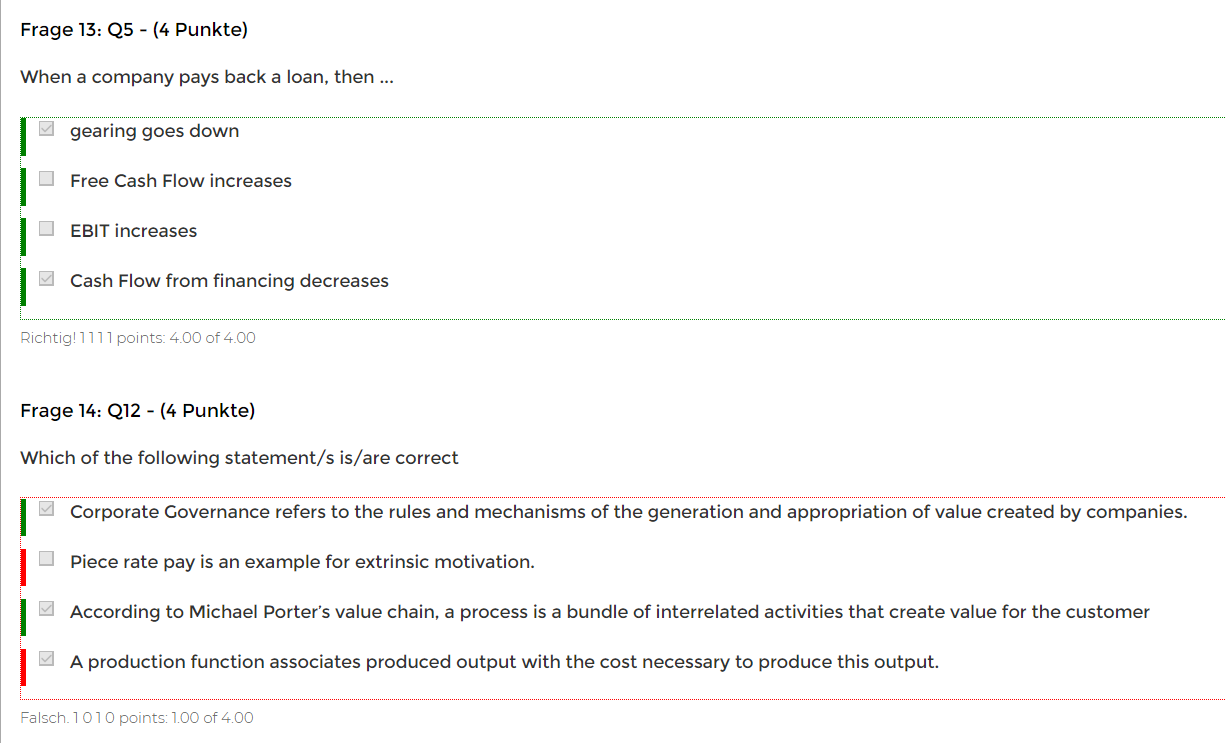
Show students the results with points, comments and achieved grade (in case of the gradebook synchronizsation) by opening the Exam Inspection. Here, students can see the points they received per question. Closed question types will show what was marked correct and what was marked incorrect, and open question types can be viewed for comments, if applicable. All feedback fields (if there was content) can be viewed. Use the exam inspection in addition to the two options outlined above or as the only communication tool.
Once the exam is closed, you can allow students to view the exam by clicking the button "Open Student Submission Review". This generates a link to the inspection and you have two options:
- You can send the link to the students for inspecting (see: Screenshot "Exam Protocol (student view)").
- Students can also find their digital exam protocol next to the results from analog campus exams directly on MyLEARN (see: Screenshot "Exam Inspection in LEARN",",).
Students can view the exam protocol on the computer and download it as a PDF file.
Clicking on "Close Student Submission Review" closes the student inspection of the exam protocol.
After completing an exam and opening the exam log for the first time, statistical evaluations are created. Under the "Points and grades" area, the students' total points, the points per question and an overview of the distribution of the students' grades, if a grading scheme has been selected, are displayed.
In the "Analysis" area, an evaluation of the answers for SC and MC questions is displayed (total number and percentage of the selected answer alternatives) if there was only this question type in the exam.
Further FAQs
It may happen that an exam consists of several sections. The following shows how different types of partials can be implemented with the Digital Exams.
One part with randomized questions and one part with strictly sequenced questions
- You can "package" some of the questions together into one question, for example, a short text question (all questions have the same point value) or a case-based question (questions can have a different point value). These questions are then displayed to students in the order you specify (on one page, away from each other). Then, in the exam configuration, select Randomized question order with or without free question navigation restriction as the safeguard option. Students will now be presented with questions in a randomized order, except for the questions that are presented together and in the specified order. Students are presented with the strictly sequenced question part at different positions in the exam, e.g. as question 1 or as question 25.
- In the configuration of the exam, select "No" as the safeguard option for Allow free question navigation and deactivate the Randomized question sequence. Students are now presented with questions in the order you specify in a strict sequencing. Build in questions from a question pool as random questions to build in some level of randomized assigned questions. However, this also implies that not every student will receive exactly the same questions on an exam.
Two parts, which are to follow each other with a time interval
- Create a separate exam for each of the two parts of the exam. Have the exams follow each other in a sequenced manner. For example, have Exam A end at 12:30 p.m. and Exam B start at 12:00 p.m. (if some students may have completed the first part much earlier) or 12:30 p.m. (if both exams are to follow directly) or 12:45 p.m. (if a break has been scheduled between the two exam parts). Communicate the split into both parts of the exam very clearly to the students. They will need to close the browser completely once after completing exam A and then log back into the OPU and online proctoring. Only then can the link to Exam B be viewed and clicked on. In BACH, only one exam is created in terms of dates. This includes both exam parts (A and B) as a time period.
BeAble students will receive time-extension compensation on their online exam. A time-extension exam should be created for students who report directly to you outside of the GP exam period and provide official confirmation from BeAble for the current academic year. Medical confirmation alone is not sufficient for this purpose. Or for students on the BeAble student list, which you will receive directly from BeAble during the GP exam period. If you have any questions regarding BeAble students as exam participants*, please contact the BeAble-Team .
The corresponding time extension must be taken into account both when configuring online exam supervision or the examination statement (see: How do I conduct an online exam with BeAble students?), as well as when designing BeAble exams themselves.
How do I create BeAble exams?
Follow these steps to create an exam for BeAble students:
- Create an exam for students and test all questions and settings until the exam fits.
- Create another exam and write the name of the exam with a meaningful suffix as the name, e.g. VUE Labor Law BeAble +50%.
- Configure the exam in exactly the same way as the other exam. Orient yourself thereby e.g. at the configuration overview. Only make the following two adjustments:
- Change the time budget to the intended time balance by moving the slider under Time settings, e.g. from 50% to 150%. The time window for the exam then adjusts automatically when the exam is created. If you do not enter your own end time, the entered time extension and a 5-minute buffer will be selected as the new end time.
- Under Access control, go to Members of [OPU name]. Uncheck the Members of [OPU Name] checkbox and instead select all those students to be assigned the BeAble exam with this time extension. If there are a large number of students, you can also create a group in advance and then select the group here (e.g., BeAble +50). If there is a BeAble writing assistant, it will be selected and added in addition.
- Click on Create Exam
Proceed in the same way for multiple BeAble groups (e.g. +25%, +50% and plus +100%). A separate exam will be created for each of these groups of people. About assigning the exam, the regular students will see only the regular exam and the BeAble students will see the regular exam and the BeAble exam with the time extension.
How do I export BeAble students' results?
There is no need to create a gradebook structure for BeAble student exams. The results of the exams can be imported directly into the gradebook of the regular exam. To do this, do the following:
- Ensure that all exams are set to Done.
- Open the Gradebook.
- Under 'Actions' at the top, click on 'Import results from similar exams'. This will display all the exams that contain exactly the same questions and have the status set to 'Done'.
- Select an exam. You will be shown the students whose results will be imported into the Grade Book.

BeAble exams with writing assistance: If a BeAble Writing Assistant is present, the performance of the Writing Assistant will be scored in the exam log by default. This corresponds to the performance of the student being assisted. The second step is to manually enter the results for the BeAble student. This is done by clicking into the exam log and entering the marks for the questions. These results are then exported to the gradebook as described above.
How is viewing organized for BeAble students with BeAble writing assistance?
The writing assistant will remain as a member in the course and the results will remain in the course until the viewing of the exam is finished. Viewing is organized between exam proctors, BeAble students, and writing assistants.
If you notice when reviewing a question (in preview or in trial run) that there is a strange indentation in checkboxes, or there is an unintended space between answer alternatives, it is probably because you have copied and pasted text content with markups.
For example:

To remove the unwanted formatting, do the following:
- Open the HTML editor ("Source Code") of the page and delete out any unwanted formatting.
- OR remove the text and then paste it back in using CTRL+SHIFT+V. This will also remove the formatting.
If you want to allow your students to write the exam in e.g. English or in German, then proceed as follows:
- Create questions in e.g. English and assign a neutral title e.g. Q1 for question 1 and Q2 for question 2 etc.
- Duplicate the questions and go into the settings of each of the question duplicates:
- Change the language of the content here to German (name, statement, answer alternatives if any, etc.).
- Restore the title. The title must be exactly the same as before, i.e. Q1 for question 1 etc.
- Change the language below to "de_DE".
- Create two exams selecting only the German language questions for the German version and only the English language questions for the English version.
Inform the students about the selection option and administer the exam. Follow these steps to display the assessments in the gradebook:
- After completing the exam, create the gradebook structure for only one of the two exams.
- From the exam log of the other exam, download the CSV file containing all the assessments.
- Now import the CSV file into the grade book under Actions and Bulk CSV Import.
The results of all participants are now merged under the designation in one of the two languages. You can now share the exam results or export the grades as CSV and then import them into BACH.
You can archive a exam by clicking on the icon with the crossed-out eye  next to the exam.

The exam is no longer displayed after archiving. Proceed as follows to undo archiving:
- Click on "Digital exams" under exam administration.
- Open "Archived items".
- Now click on the black box◾ to set the exam back to "Editing" status.
The exam is now reactivated and appears again directly under the exam administration.
Support
Technical Problems: WU Servicedesk
Gerneral Requests: General requests about digital exams
Pre-Check: Request for a pre-check of a digital exam