Gradebook
The gradebook allows you to administrate all your students’ partial scores which are graded with points. Alternatively, you can map partial scores with grades in a reduced grades mode.
- In the gradebook, you can create categories in which you can classify partial scores and sum them up and calculate them in various ways (Sum, Average, best N results). This allows to cover more scenarios than before and you don’t need to calculate the points in a separate tool any more. With the aggregation type „Top-n sum“ it is possible, for example, to drop partial scores (e.g. only the 3 best scores out of 5 partial scores are basis for the calculation of the total points).
- The gradebook shows you the automatically calculated weight (in %) of partial scores. This ensures a better overview – as well as displaying the maximum points that can be reached. If necessary, the weight can be set/changed manually, e.g. to raise the importance and the value of a partial score.
- Gradebook entries are inactive by default and only become visible to students when they are activated. You determine the time of publication. In this way you can prepare the gradebook structure and the entries and control the visibility in a targeted manner.
- As a course leader, you can view the grade book from the perspective of a student and thus make sure whether the grade book entries are displayed correctly.
- You can customize the gradebook by showing and hiding columns. In this way you can decide how much information students should see in the grade books (e.g. weighted result in points or in %).
- The transfer of a grade book structure from an existing course to another course saves you administrative work
- The import of the grading of several students for several partial scores is possible with a single CSV file.
All partial scores of your students which are assessed with points can be either imported from already existing learning activities or from the assignment module or can be recorded manually in the gradebook.
You can either import all partial scores of your students basing on Learning Activities or from the Assignments module or record them manually in the gradebook.
An overall grade can be calculated on the basis of a grade key entered into the gradebook. Furthermore, you can display statistics on the performance status of your students.
If you assess and display partial scores exclusively with grades, you have the option to use the gradebook in a (reduced) grades mode. The grades given by you are not added by the system, they are just displayed for at each entry for a partial score.
General
How can I determine the type of weighting for my gradebook?
In order to show the different importance of individual partial performances or categories in relation to the overall performance, the automatic weighting is shown in the overview table in the grade book by default. As a course teacher, you are free to change the type of weighting with respect to the overall score and to carry out manual weighting for certain partial scores or categories.
Change the type of weighting:
- At the "gradebook", click in the top menu bar on "Gradebook" and select "Settings" in the dropdown list.
- At "Weight", select the type of weighting.
- Click the button "OK".
Types of weighting:
|
automated weight: |
|
manual weight: |
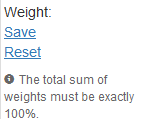
If "manual weight" is selected, the sum of the weighting has to be always 100 %. At any time, you can reset the type of weighting to automated weight by clicking on the link "reset".
Attention! It is advisable to set the manual weighting only when all partial scores have been created as entries in the grade book and no more changes need to be made. Adding new partial scores has the consequence that the system calculates the "automatic weighting" again and displays it in the table.
Only categories and regular partial scores on the first level can be weighted. Bonus scores are exempted from the partial weighting in the overview table. They are only used to improve the overall score.
How can I create a category?
The grouping of individual partial scores in categories gives your grade book on the one hand more clarity and on the other hand the option to define certain aggregation types (sum, average and top N sum) for summarized partial scores. This enables you to calculate partial scores that can be dropped or average values and to display them clearly to students.
- At "Gradebook", click at the top menu bar at "New" and select "create category" from the dropdown list.
- Provide a unique title.
- Determine the aggregation type.
- Click the "Save" button.
Aggregation types:
| Sum: | The max. points of all partial scores are added. | ||
| Average: | The sum of all partial scores is divided by their number (= arithmetic mean). | ||
| Top-n sum: | The N best scores are added together. |
The maximum achievable points and thus the weighting of a category result automatically from the selected aggregation type. You cannot set the points yourself.
Within a category, only regular partial scores can be created or shifted into this category. As soon as a required score or a bonus score is shifted to a category in the overview table using the drag and drop function, the score is changed to a regular score.
How do I import partial scores from Learning Activities into the Gradebook?
You can transfer partial scores from the application "learning activities" directly to the gradebook, so that assessments and comments are automatically displayed there.
First Option:
- In "Gradebook", click in the top menu bar on "New" and select "Acquire partial score from learning activity" from the drop down list.
- Select the desired partial score(s).
- Determine the Type.
- If you have selected the type "Regular Score", you can add the partial score to a category. Select the desired category.
- Click the "Save" button.
Second Option:
If you have already created a category, you can import a partial score from the learning activities also directly via the "drop-down menu (Screenshot)" from the overview table.
- In the Gradebook overview table, click the down arrow next to the category title. A drop-down menu opens.
- In the drop-down list, click on "Acquire partial score from learning activities".
- Select the desired partial score(s).
- Determine the type.
- If you have selected the type "Regular Score", you can still readjust the category for the partial score.
- Click the "Save" button.
On the homepage of the Gradebook you see an overview of all categories and partial scores. From there, you can get via a click to the table of results of each individual partial score. The link "student view" (below the table) will take you to the admin view of the overview table of the students' gradebook.
Tips:
- Only regular partial scores can be assigned to a category. If you select a different type of score, the selection of a category is not possible any more.
- If several partial scores should be assigned to different types, the process must be repeated for each partial score, assigning the desired type.
How do I create a partial score manually?
You can create partial scores also manually. This Sie können Teilleistungen auch manuell anlegen. This is useful in order to map partial scores that cannot be imported from the learning activities, e.g. oral participation in class or presentations.
First option:
- In "Gradebook", click on "New" in the top menu bar and select from the drop-down list "create partial score manually".
- Enter a unique title for the partial score.
- Enter the max. Points for the partial score.
- Select the type.
- If you have selected the type "Regular Score", you can add the partial score to a category. Select the desired category.
- Click the "Save" button.
Second option:
If you already have created a category, you can create the partial score manually via the overview table using the "drop-down menu (Screenshot)" next to the category title.
- In the Gradebook overview table, click the down arrow next to the category title. A drop-down menu opens.
- In the drop-down list, click on "Create partial score manually".
- Enter a unique title for the partial score.
- Enter the max. Points for the partial score.
- Determine the type.
- If you have selected the type "Regular Score", you can still readjust the category for the partial score.
- Click the "Save" button.
If you already have assessed partial scores, e.g. in an Excel spreadsheet, you can import them for manually created partial scores via "CSV import". This saves you having to type it in manually.
On the starting page of the gradebook you see an overview of all partial scores. From there, a click on the title leads you to the individual partial score and the associated entries.
How can I grade a partial score which was created manually directly in the Gradebook?
Unlike partial scores which were transferred from learning activities, manually created partial scores do not offer automated transfer of assessment into the gradebook. The assessment of the manually created partial score can be entered directly into the gradebook.
- In the "Title" column of the overview table of the gradebook, find the manual partial score for which you want to enter an assessment.
- Click directly on the title of the manually created partial score. (You can recognize manually created partial scores by the icon
 „Import CSV file data into gradebook“.)
 - Find the student(s) you want to assess in the table.
- In the row of the student to be assessed, click on the three points “…” in the “Score” column.
- Enter the points scored by the student.
- Click on the checkmark
 or press <Enter> to save the points.
 - Now, you have the opportunity to enter a comment.
- In the column "Comment", click on the tree points “…” and enter a comment.
- Click on the checkmark or press <Enter> to save the comment.
Note:
Before you can enter a comment for a student, you have to enter the points. In the column "Actions" you can delete the points/grade or the comment. However, pay attention to transparency for the student (s). If the partial score has already been activated for the student, the student can see every change in the assessment. If necessary, you can also use the comment option to inform students about changes.
Another option to assess manually created partial scores is a CSV-Import from assessments recorded with a Spreadsheet program.
How do I import assessments from a Spreadsheet programme into the Gradebook?
Assessments of partial scores that have already been prepared in a spreadsheet program can be imported directly into the grade book. You can either import assessments of a single manual partial score using "CSV import" or insert assessments of several partial scores at once using "Bulk CSV import" in the grade book.
ATTENTION! In both cases you first have to create the partial scores manually in the Gradebook on LEARN.
Only if these partial scores are created in the Gradebook, you can import the assessments on the basis of a correctly formatted CSV file.
Import assessments of a manually created partial score via "CSV import":
- At "Gradebook", in the top menu, click on "New" and select from the drop-down list "create partial score manually“. Create a partial score manually.
- Open a spreadsheet programme, e.g. Excel.
- In the first column, enter the user name of the student (= Matriculate number [h]12344612 – without the "h", only the numbers).
- Enter the points (awarded for the partial score) into the second column.
- In the 3rd column, enter a comment, if desired.
- Save the file as a CSV file by clicking on File > Save as.
- Select the local drive/path to save the file.
- As a file type, choose the format „CSV (comma delimited)(*csv)“.
- Click the Button „Save“.
- After having created the CSV file, select in the overview table of the Gradebook the manually created partial score for which you want to import the assessment. You can recognize manually created partial scores by the icon "Import CSV file data into gradebook“.
- Click the icon "Import CSV file data into gradebook“.
- Upload the correctly formatted CSV file.
- Click the button „OK“.
Via this option of CSV file import, you can upload assessments for several students at once. This saves you a considerable amount of time.
Import assessments of several manually created partial scores via "Bulk CSV Import":
- Create all partial scores manually by clicking in "Gradebook" in the top menu bar on "New" and selecting "create partial score manually“ from the drop-down list.
- Open a spreadsheet programme, e.g. Excel.
- In the first column, enter the title of the manual partial score (without the ordinal number).
- Enter the user name of the student (= Matriculate number [h]12344612 – without the "h", only the numbers) in the second column.
- Enter the points (awarded for the partial score) into the third column.
- In the 4th column, enter a comment, if desired.
- Save the file as a CSV file by clicking on File > Save as.
- Select the local drive/path to save the file.
- As a file type, choose the format „CSV (comma delimited)(*csv)“.
- Click the Button „Save“.
- After having created the CSV file, click in the horizontal menu bar on "Actions" and select "Bulk CSV Import" from the drop down menu.
- Upload the correctly formatted CSV file.
- Click the button „OK“.
Via this option, you can upload several partial scores of several students at once. Make sure that the "Title" of your partial scores is in correct notation. The spelling of the title must match so that the system can assign the partial scores.
How do I export Gradebook entries to a Spreadsheet programme?
For further processing of the data in a spreadsheet programme, such as Excel, the grade book entries can be exported as a CSV file.
- Click on "Gradebook" in the left menu bar.
- Click on "Actions" in the top menu bar and select from the drop-down list "Export to CSV".
- Select the format of the data and click on the button “Export”.
- Save the downloaded CSV file locally on the computer.
The following output formats of the gradebook data can be selected:
| Grades (BACH): | exports all student ID numbers and corresponding grades (only available if a grade scale has been created) |
| Points: |
exports all student ID numbers and the total points (column: Score (points)) |
| Raw data: | exports all gradebook entries on 1st level (category or loose partial score) incl. metadata (type, title, max. points, weight (%)) and the students' data (student ID, name, point score, weighted result (points), weighted result (%), comment) per row. Partial scores within the category (2nd level) are not exported. |
| Matrix: | exports all results (points) for each gradebook entry on 1st level (category or loose partial score) per each student. Partial scores within the category (2nd level) are not exported. |
Usually, you can simply open the CSV file with your spreadsheet programme. If this doen not work, you can import the CSV file into the programme. When importing the CSV file into the spreadsheet programme Excel, proceed as follows:
- Open MS Excel.
- Click on the "Data" tab.
- Click on the "Get external data" icon in the menu bar. A drop-down menu opens.
- Click on the "Get external data from text" icon in the dropdown menu and select your locally saved CSV file.
- Click on the "Import" button.
- The Text Import Wizard will start. Select the data type that describes your data (e.g. "delimited").
- Select the file origin "65001: Unicode (UTF-8)" and click on "Next".
- Use the "delimiters" selection in order to see how your text is affected (e.g. tick tab and semicolon).
- Click on the "Next" button.
- Specify the individual file types per column (e.g. general or text).
- Click on the Button “Finish” and then “OK”.
IMPORTANT! If the values in the columns are incorrect after completing these import steps (e.g. date format for points), then repeat steps 1-9 and be sure, that you define “Text” as data format for those columns! Especially in the EN version of the CSV file, problems can occur if the wrong data format is selected! This may be related to the individual settings of your Excel version.
NOTE! Pay attention to the language settings (of LEARN and e.g. Excel).
- If you use LEARN with the language setting DEUTSCH, a comma (,) is used as decimal separator during export. It is therefore advisable to set the language settings of the spreadsheet program to DEUTSCH as well.
- If you use LEARN with the language setting ENGLISH, a dot (.) is used as decimal separator during export. It is therefore advisable to set the language settings of the spreadsheet program to ENGLISH as well.
How do I publish the Gradebook for all students?
Newly created categories and partial scores are invisible by default, i.e., students cannot see them in their Gradebook. The advantage: you can prepare the gradebook without pressure. After you made sure that the categories and partial scores should be visible for the students, you release them.
You have two options to release categories and partial scores.
First option:
- Select one or more categories or partial scores in the overview table of the gradebook using the checkboxes.
- Click the button "Selected".
- In the drop-down list, select "Release“.
- In the respective category or partial score you will see the change of the alert box from red
 to green
  in the column "Actions".
Second option:
- In the respective category or partial score, in the column "Actions", click the red box .
- You will see that the box changed to green .
Released entries are visible now for all students. Entires that were not released are displayed in the admin-view of the gradebook as seen by an individual student in gray letters.
How can I move individual partial scores in the overview table?
The overview table of the gradebook provides you with an overview of all partial scores created in or imported into the gradebook which are are used to assess student performance.
You can, for example, create categories or assign partial scores. If the sequence or the assignment of the partial scores needs to be edited later on, this can be done directly using the drag & drop function in the overview table.
- Click with the left mousekey in the row of the individual category or partial score and keep the mousekey pressed.
- While holding down the mousekey, drag the content to the desired position.
- Release the mousekey.
- The selected category/partial score should now be moved to the desired position.
Only regular partial scores can be moved to a category. If a bonus score or a required score is moved via drag & drop into a category, it is converted to a regular score. Furthermore, a category cannot be shifted into another category.
How do I set a grade key?
If an overall grade should be calculated in the gradebook, a grade key for all partial scores has to be created. You can select either"Percent" or "Points" are the basis for the calculation of grades and determine, if students can see their overall grade.
Create grade key:
- In gradebook, click in the top menu on "Actions" and choose "grade key" in the drop down menu.
- Select the option "Yes" as answer to „Use grade key“. Now, you can ake further settings.
- Choose the format and enter the minimum level for the individual grade in percent or in points.
- Determine if students can see the overall grade.
- Determine, if students should also be able to see the statistics of the average score in a study course.
- Click the button "Save".
The grades of the students are generated automatically from their results and the entries in the gradebook. If you have specified on the settings page of the grade book that the grades should be visible to students, then the grades will be displayed below the individual student view of your own grade book.
How can I round up the overall student scores?
As a course teacher, you can decide if you want to round up the overall score in points or the overall results in percent. You can make this setting manually and define the setting precisely.
Rounding up of scores (total):
- In the "Gradebook" click at "Gradebook" in the top menu bar and select "Settings" from the dropdown list.
- At "Rounding of total scores" determine, if the score (points) or the score (%) should be rounded.
- Set the "type of rounding".
- Click the button "OK".
We recommend to make the settings only at the end of the term or course, when the overall scores of the students are available. Based on this, you can consciously decide to round up the total score so that students improve their total score somewhat and possibly receive a better grade.
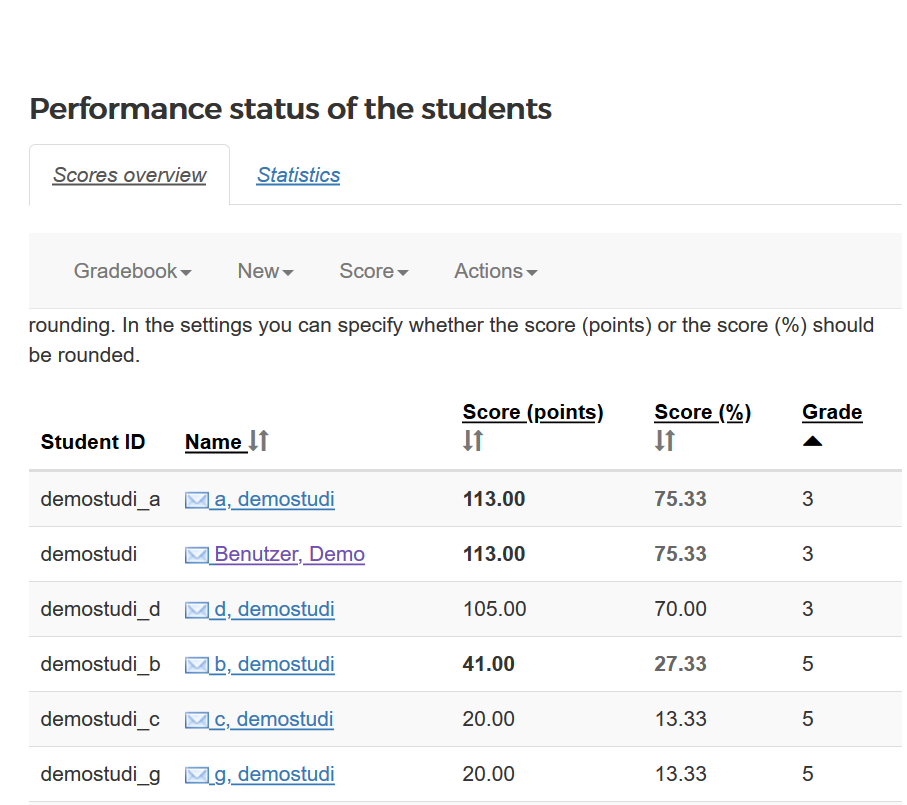
The rounded total scores are displayed in the student's point of view in the row "Total (rounded)" and in the performance status of the student as values formatted in bold and black.
If you chose the setting that the total score (points) shall be rounded up, the total score (%) is adapted accordingly and the value is shown in grey and bold format - or vice versa. If you hover over the values formatted in bold with the cursor, a tooltip supplies you with information about the unrounded respectively original values.
The scores which were rounded or adjusted due to a rounding can be exported with the CSV export option "points".
Note: The setting of rounding refers to all students, individual rounding up for selected students is not possible.
How do I take over the Gradebook structure from another study course?
You can take over the gradebook structure from another study course, if it is your own study course and if the courses belong to the same course repository.
- Click on "Gradebook" in the left menu bar.
- In the horizontal menu on the top, click on "Actions" and choose in the drop-down list "import form course"
- Select the semester of which you want to import the structure of a course.
- Click on the desired items which you want to import.
- Click on "Save".
The feature "import from course" feature serves as a tool to transfer already tested categories and the structure of a course into another course.
Note:
Both courses must be part of the same course repository. Please note that only categories or manually created partial scores are taken over (partial scores imported from learning activities are not adopted).
How can I send an e-mail to students from the Gradebook?
If you want to send an e-mail to the students during the grading process, you can do so in a quick and easy way directly from the gradebook.
- In your course, click on "Gradebook" in the left side menu.
- In the overview table of the gradebook, click on the title of a category or on the title of a partial score.
- Select the student to whom you want to send an e-mail and click on the envelope symbol
 next to the individual name.
 - If you only want to send an e-mail to the selected student, leave the makr in the recipients filed as is.
- If you want to send a message to several students, hold down "CTRL" on the keyboard and select other people as well.
- Fill all mandatory fields and the desired optional fields.
- Click the button "Preview".
- Check you e-mail again.
- If you are sure that you want to send your mail, click the button "Send".
A major advantage of sending e-mails directly via MyLEARN is that you can set a future dispatch date when composing the e-mails and thus make preparations in good time. E-Mails sent via the Gradebook are listed in your e-mail-archive in MyLEARN (use "Administrate" from the side menu and select "E-mail archive" in the page that opens).
Student view
How can I see the Gradebook from a particular student's point of view?
As a course teacher, you can also take the perspective of a student. You can either see the gradebook choose the perspective of a selected student or the general admin perspective. the general admin view of the student gradebook allows you to see not only the released partial scores but also the scores which are not released yet. This allows you to control the release status of individual partial scores.
- In your study course, click in the left side menu on "Gradebook".
- You see the overview table of the gradebook.
- Below this table, click on the link "Student view" Now, you see the gradebook from the student perspective. Partial scores which are not released yet are not displayed.
- If you as a course admin want to see the gradebook with all partial scores from the point of view of a particular student, click on "--Please select--" and select the name of the student from the drop-down list.
- In this view, you see the gradebook with all partial scores of the student as an admin. Partial scores that are not released yet (rows in gray letters) are visible to you in this type of view, they can, however, not be seen by the student.
- If you want to see the gradebook as seen by a selected student, only with the scores that were released, click above the table on "As seen by XY".
Note:
If at Actions > grade key a grade key was defined and the setting determines that the overall score and/or the statistics should be visible for the student, you can find this information below the overview table of the gradebook in student view.
On the "Settings" page of the gradebook you can determine which columns students should see in their gradebooks.
How can I hide individual table columns in the student view?
You can determine for your course which columns of the table (Weight %, weighted result in points, weighted result in percent, Comment) are displayed for students in their personal gradebook.
Hide table columns in student view:
- in "Gradebook", click in the top menu on "Gradebook" and select "Settings" from the drop-down list.
- At "Hide columns in student view“ determine, which columns should be hidden for students in the scores overview.
- Click the button "OK".
Now, the columns of the table which were marked in the settings page as to be hidden will not be shown to the students.
How can I determine whether students can see their overall grade or statistics on all scores in the course?
As a course teacher, you decide if students also can see their overall grade and/or the average scores of all performances of all students. You have to make this setting manually.
Create grade key:
- At "Gradebook", click on "Actions" in the menu bar and select "grade key" in the drop-down list.
- When asked "Use grade key" click the option "Yes". Now you can make further settings.
- Select the format and enter the grade boundaries (minimum level) for the respective grade.
- Determine if students can see the overall grade.
- Determine, if students should also be able to see the statistics of the average score in a study course.
- Click the button "Save".
As all partial scores can be fulfilled by the students only towards the end of a study course and therefore the final grade is definitely determined only at the end, it is recommended to show the overall grade and the statisitics only at the end of a study course to the students.
Scenarios for the use of Gradebook
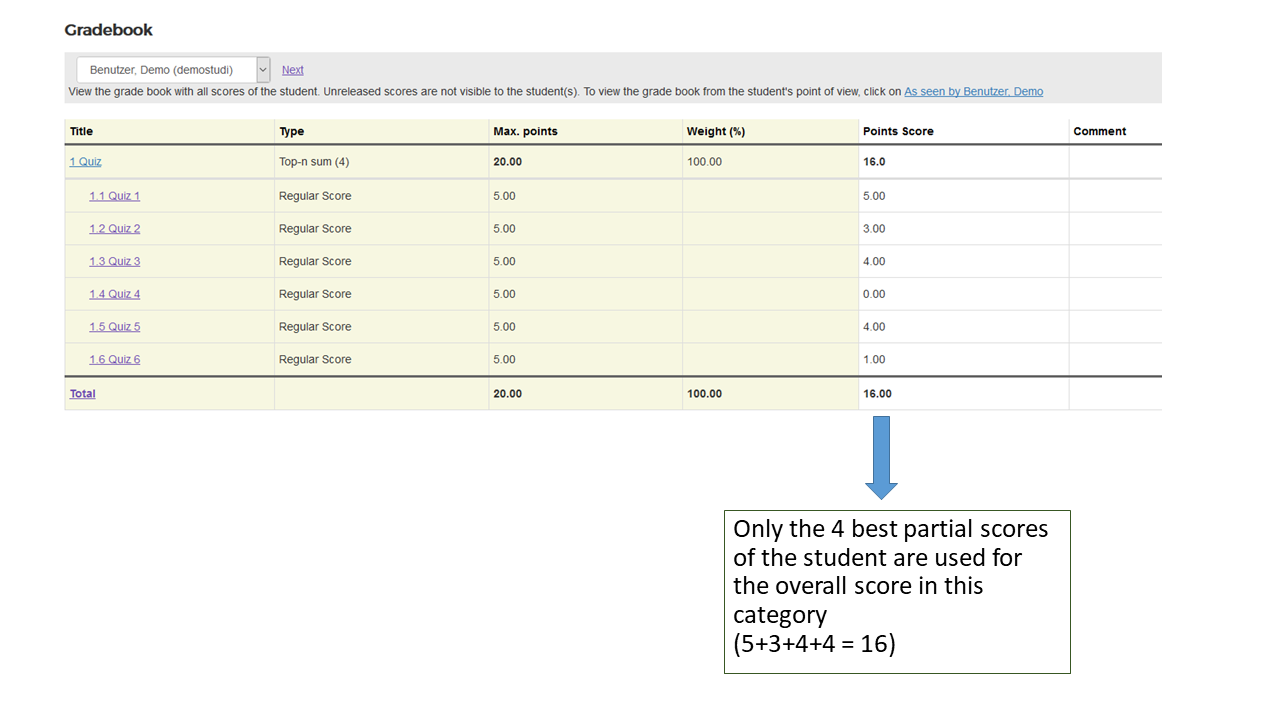
TOP-N SUM: How do I only map the top N results in the gradebook?
For what?
In your course, you want to grant your students a certain amount of liberty and flexibility regarding the elaboration of partial results. To pass the course, the students do not have to complete all partial scores. From a certain number of partial scores, only the best results of the students are used for the overall assessment. This should also serve as an incentive for the students.
|
Example: In your course, you lead a quiz at the beginning of each unit that covers the subject matter of the previous unit. In total, students can participate in 6 quizzes and score points for them. However, only the best 4 performances are used to assess the overall performance. |
Solution:
In the Gradebook, a top-N sum can be mapped, i.e. within a category only a certain number of the best results (scored points) is used for the overall grading.
How is the top-N sum mapped in the Gradebook?
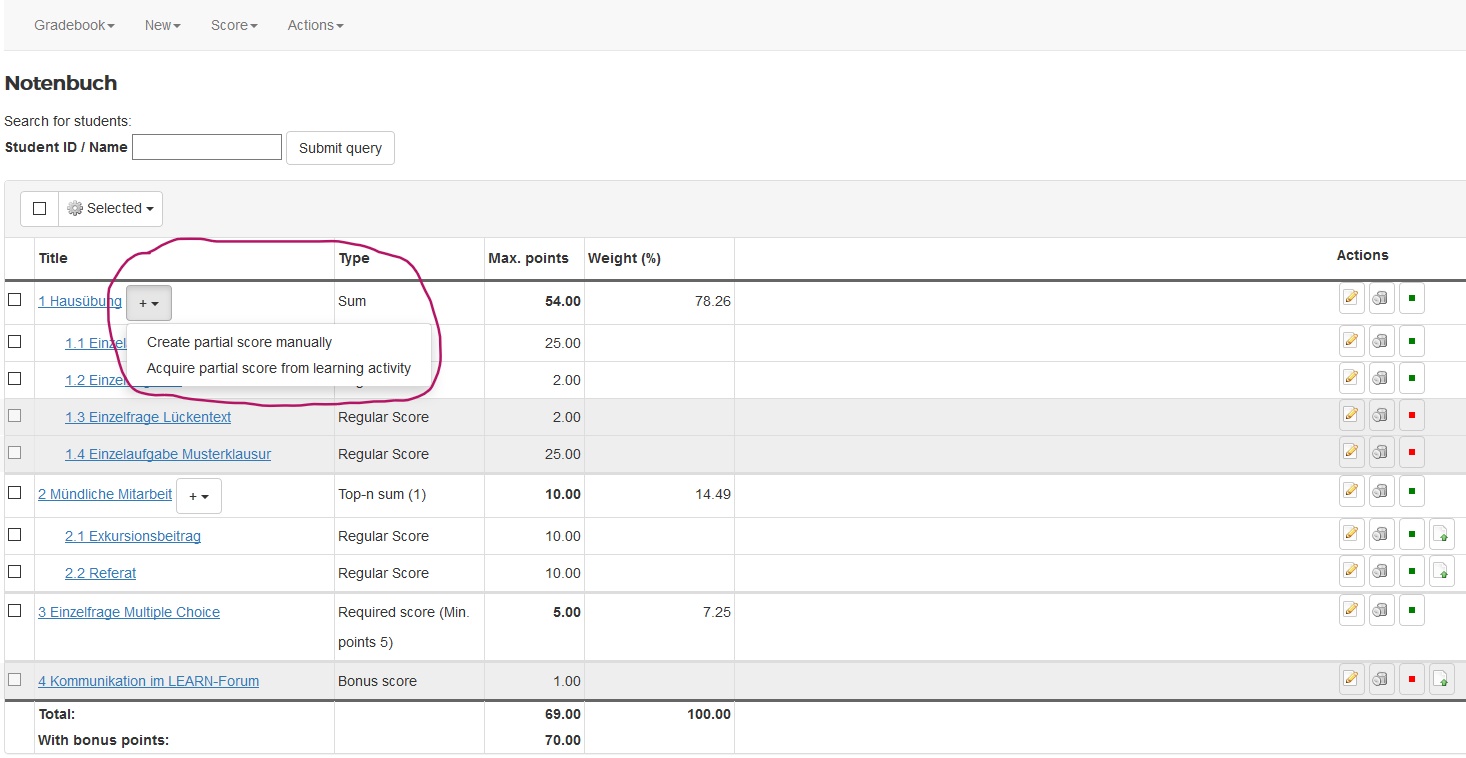
- In the Gradebook, create a category with the title "Quiz" and select "Top-N results" as aggregation type.
- Enter "4" as number of scores.
- Within the category "Quiz" create the 6 partial scores (either manually or by acquiring them from learning activities).
- As soon as points for the students are entered, the Gradebook will use only the 4 best scores for the overall grade (see Screenshot "top-N results of a student").
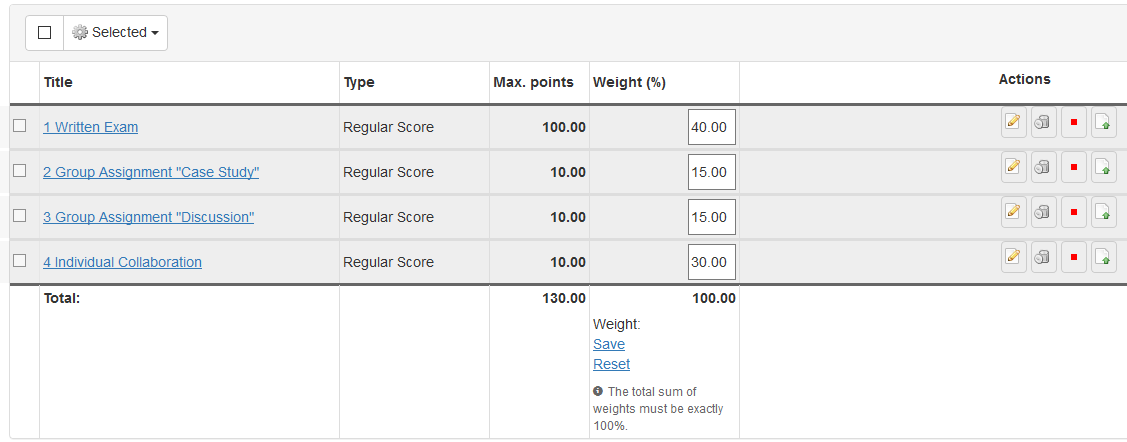
WEIGHTING: How can I assign weights to partial scores?
For what?
You have various partial scores in your course, in which the students can acquire points. You have chosen a round number of points (e.g. 10 or 100), as this makes it easier for you to correct and to grade. For the overall assessment, however, you want to weight these partial scores differently so that the same number of points weighs more and less.
|
Example: In your course, there are 4 partial scores which are relevant for the grading:
|
Solution:
In the Gradebook, a manual weighting can be selected for partial scores and categories. Doing so, the achieved points are transformed according to the weighting. Partial scores can thus be upgraded or downgraded. NOTE: he weighting of the partial scores must be communicated in advance by you in the syllabus of the course so that it is transparent for students!
How is weighting mapped in the Gradebook?
- In the Settings of the Gradebook, select "manual weight" instead of the automated weight.
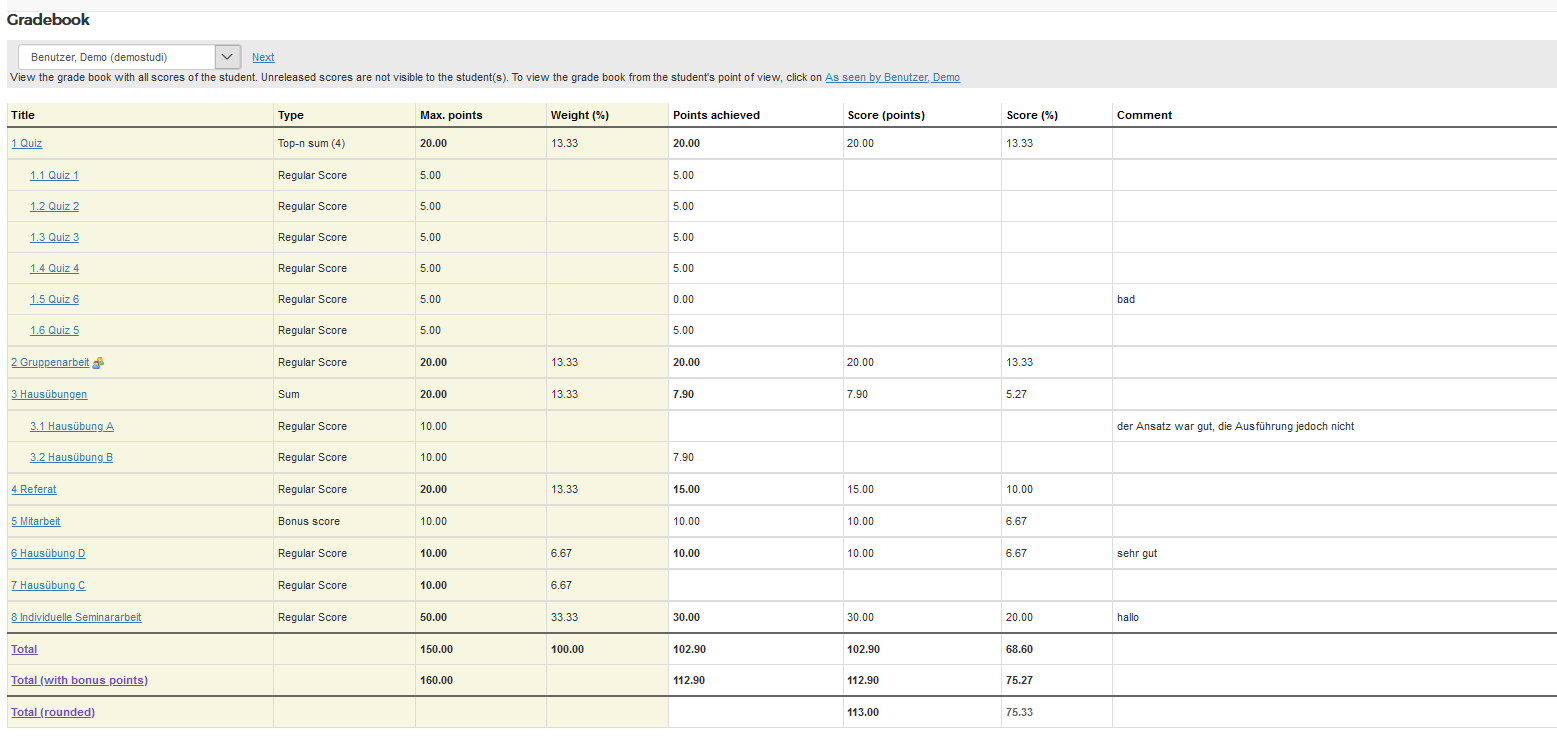
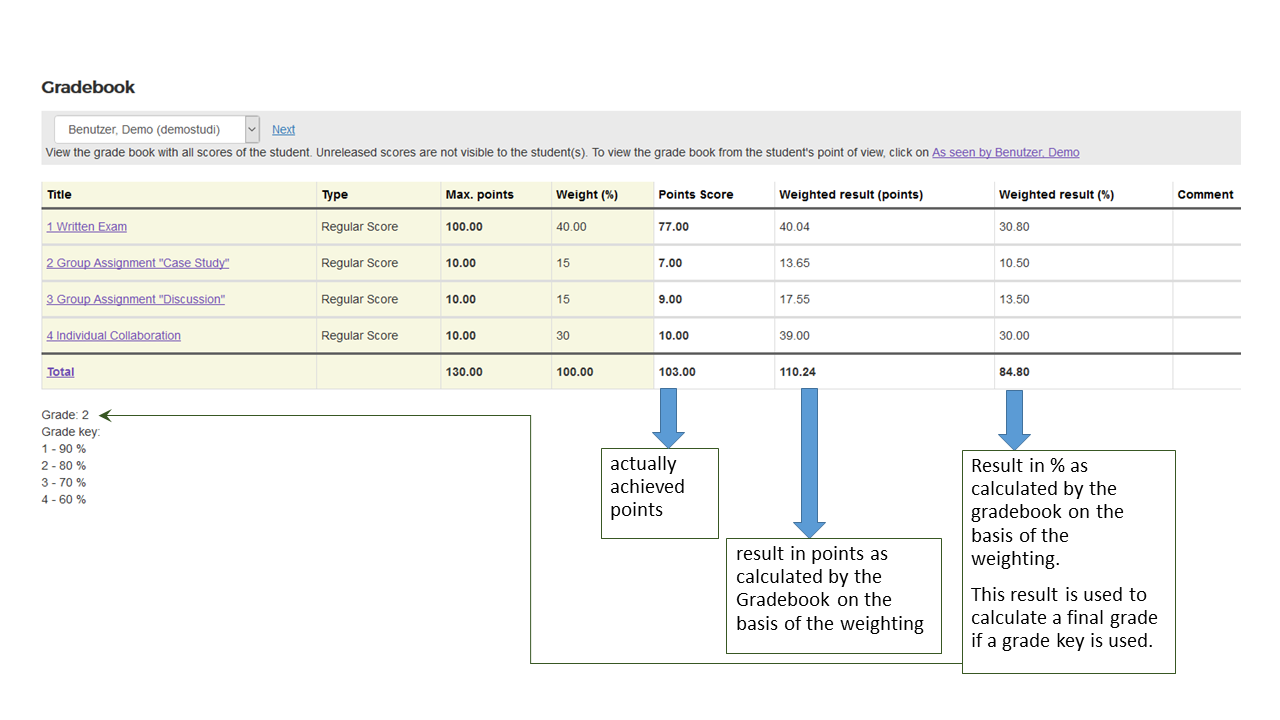
- Create the individual partial scores and enter the values for the weightings for each partial score manually. The total sum of weights must be exactly 100%. (see screenshot "manually entered weighting").
- As soon as you enter or import the points for the students, the Gradebook automatically calculates the weighted results of the students (see screenshot "Gradebook of a student").
- If you enter a grade key, the Gradebook can also deliver a final grade for each individual student.
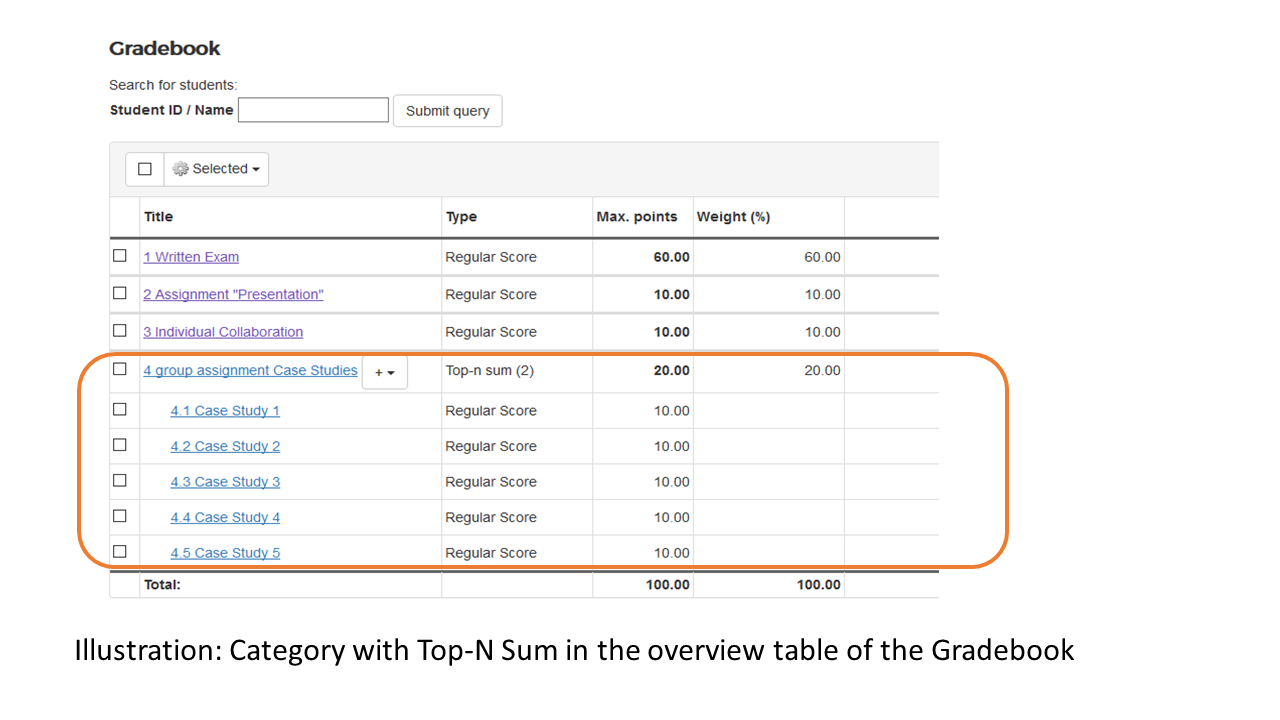
TOP-N SUM: How do I map (group) assignments in the Gradebook that are not submitted by all students?
What?
In your course, you create a choice of various assignments which shall be elaborated by the students in groups. Each group only needs to work on 2 of these assignments. The choice of assignments is done by the group. This means, the groups do not need to work on all the assignments.
|
Example:
|
Solution:
(Group) assignments that are not processed by all students can be mapped and displayed correctly in the Gradebook using a category with the aggregation type "Top-n sum".
How are the group assignments mapped in the Gradebook?
- In the Gradebook, create a category with the Title "group assignment Case Studies" and select "Top-n sum" as an aggregation type.
- As "Number of best results to aggregate (n)" , enter "2".
- Inside the category, create the 5 individual Case Study assignments either manually or by acquiring the partial score from the learning activity (see screenshot "Category with Top-N Sum in the overview table").
- As soon as points for the students are entered, the Gradebook will base its calculations on the 2 best results only.
- As each group (respectively: each student) only has worked on 2 case studies, only the 2 results of these case studies are the basis for the calculation. Therefore, the maximum score are the 20 points for both case studies.
Troubleshooting
Why do I see in the student view a row in the table in gray letters?
As a course admin, you see the gradebook in the student view with all partial scores. Scores that are not released, are displayed in gray letters. These scores are not visible for the student.
Why can't I move a bonus score/requested score into another category?
Only regular partial scores can be created within a category or moved into a category. As soon as a bonus score or a requested score is moved to a category with the drag & drop function, it will be changed to a regular score.
Types of partial scores:
|
Regular score: |
|
Requested score: |
|
Bonus score: |
Why can't I import an assignment which I created earlier into the gradebook?
Assignments can only be transferred to the gradebook if they were assessed with points.
If you plan to transfer assessments automatically from learning activities, a grading mode using points is recommended. Assignments graded with percent still have to be converted into a point equivalent. Assessments graded with achieved/not achieved cannot be transferred to the gradebook.
Why don't the students see their overall grade?
The overall grade is not shown to students per default. If you want to change this, you have to make the appropriate setting.
Make the overall grade visible for students:
- At Gradebook, click on "Actions" in the top menu bar. In the drop-down list, select "grade key".
- Determine if students can see the final grade.
- Click the button "Save".
The overall grade is displayed for the students in their gradebook.