Subgroups
In the various Communities, like course repositories, courses and clubs, as well as in the environment of Problem Based Learning, you can create subgroups. They can be used, for example, for Online Exam Environments for written exams or for cross-course, inter-semester project work. The subgroups are a community environment, which offers full functionality of various applications (see Screenshot "Display of Subgroups at the MyLEARN Homepage").
How do I create Subgroups?
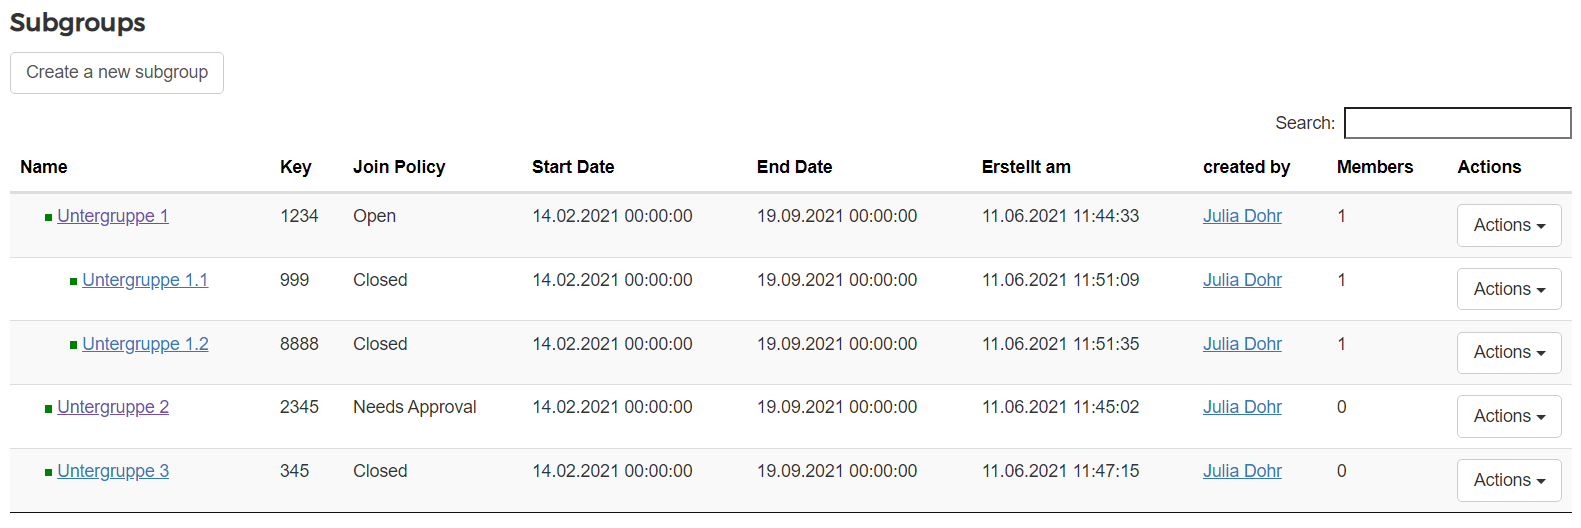
Subgroups can be created in the desired community at any time. To add a subgroup, go to "Administrate subgroups" under Administrate and Subgroups. Here you can see all the subgroups that have already been created and you can create or duplicate a subgroup.
To create a new subgroup, proceed as follows:
- Click on "Create a new subgroup".
- Enter a unique key for the subgroup. This is not displayed to students in MyLEARN and is only used for technical identification.
- Assign a name under "Name".
- Enter an optional description. This group description is displayed in the subgroup itself, under Home.
- Select "closed", "on request" or "open" as the join policy. Students can then add themselves to an open group if the start portlet (with the name of the community) is activated in the superordinate community. All subgroups are listed there.
- Confirm all entries with "OK".
Note:
If you want to add a new subgroup under an already created subgroup, you can do this directly under Actions . The subgroup created in this way is subordinated to the selected subgroup.
To duplicate a subgroup that has already been created, proceed as follows:
- Click next to an already created subgroup on "Actions" and select "Duplicate" to create a new subgroup based on the template of the selected subgroup.
- Select to which community the new subgroup should be assigned. The parent community (e.g. the course) and all subgroups subordinate to this parent community can be selected.
- Enter a unique key for the subgroup. This is not displayed to students in MyLEARN and is only used for technical identification.
- Assign a name under "Description".
- Select which content should be copied from the template. The following can be selected:
- Administrators
- Learning activities
- Digital exams (SWA only)
- Portal layout and portlets
- Confirm all entries with "OK".
Click on the hyperlink with the name of the newly created subgroup in the table or go to "Administer" next to the subgroup under Actions to access the administration settings of the newly created subgroup. Only when you add yourself as a member will this subgroup be displayed to you in the portlet for "Memberships" below the parent community (depending on where you created this subgroup).
You can create as many subgroups as you want.
Where are the subgroups displayed?
Depending on whether you are an administrator of this subgroup or a member, you can see the subgroups in different locations:
- Administrators can view the subgroups at the level of the parent community via Administrate and Administrate subgroup (see Screenshot "Subgroups").
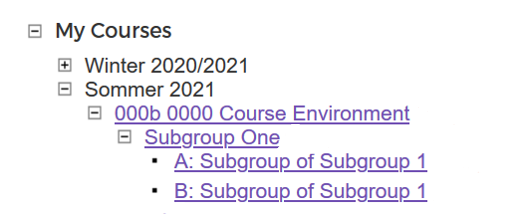
- Members of the subgroup can find the link to their subgroup directly below the parent community at the MyLEARN homepage (see Screenshot "Subgroup at MyLEARN Homepage"). If the portlet "memberships" is activated in the main community environment, you can also see a link to the subgroup at the homepage ("Home" - see Screenshot "Subgroup on Home-Portlet").
- Students can be members in a subgroup, however, they do not need to be members of the parent community. In this case, the name of the parent community is not shown as a hyperlink and students can only click on the subgroup itself (see Screenshot "Only a member of a subgroup").
How do I add members?
By default, the subgroup is first created without members.
As administrator of a community, you can add and remove persons with a WU account.
- In the left side menu of your community (here: the subgroup), select "Administrate".
- Click on "Members".
- Click the button "Add A Member" . If you want to remove a member, select the member you want to remove by clicking the checkbox next to the member‘s name, then click on „selected items“ and on „Remove members“.
By adding or removing members manually, you can administrate your member list induvidually. Additionally, persons can be added to a subgroups with the role "administrator" or "member". You can also add members via CSV upload ("Bulk Member Add") (cf. Manage Members). Furthermore, you can use all fuctions of the group administration in the subgroup (cf. Group Administration).
Members of this subgroup can end their membership in the subgroup (see Screenshot "Subgroup Portlet at homepage"). If you do not like that members see this option, do the following:
- Click "Administrate", and navigate to "Customize Portal Layout".
- Next to Subgroups, click on the symbol l
 to remove the subgroups portlet.
Only persons who are members, see the subgroup in MyLEARN. It is not visible for any other persons.
How do I adjust the end date of a Subgroup?
You can leave a subgroup in place for a whole year or more, e.g. for project work across semesters. For this, the end date of this subgroup has to be adjusted. The end date determines when a subgroup is archived.
To adjust the end date of a subgroup, proceed as follows:
- In the subgroup, click on "Administrate" and at Options on "Change Options".
- At the bottom of the resulting page, choose "Bearbeiten" (= "Edit").
- Enter a new end date and confirm your input with "OK".
If you do not adjust the date, the subgroup will be archived at the same date as the parent community.
What can members in a Subgroup do?
You can design the contents of a subgroup like in other communities. You can, for example, provide learning materials, collect and grade assignments, communicate with students. Possible application scenarios:
- Written online examinations with examination statement and optional activation of: Calendar, Ankündigungen (= announcements), Learning Activities, Gradebook, Digital Exams (via "Learning Apps") . If the subgroup is created in a separate online exam environment, the online supervision can be activated, as well.
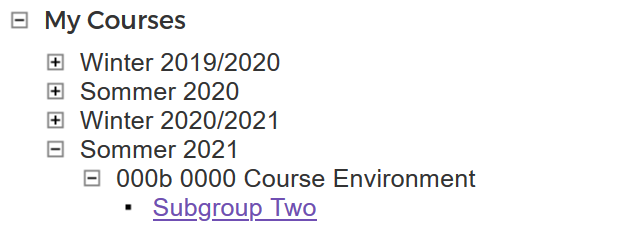
- Project work across courses or across semesters: Add members and adapt the end date as required. Students can find the subgroup, even after the parent community is archived, on the MyLEARN homepage. (see Screenshot "Active Subgroup below archived Community").
- Enable students to create study material: Assign the role "administrator" to participants to enable them to create study materials (e.g. glossary entries, study modules, MC questions or Cloze questions). You can assess the work on these study materials and the materials can be reused on the level of the parent community.
For other scenarios of group work, rather use the Group Administration or the Problem Based Learning.
If you want to use the subgroups for the assignment of written online exams, adapt the subgroups as follows:
- Check the end date of the subgroup and, if necessary, change it so that archiving only takes place after it could be viewed.
- Click on "Administrate", and at Options on "Change options".
- Select "Bearbeiten" (= edit). Change the end date, if necessary and confirm your entry with "OK".
- Only activate the applications that you really need to process the exam. The following combinations can be recommended:
- Learning Activities
- Learning Activities and Gradebook
- Learning Activities and Gradebook and Calendar
- Digital Exams (via "Learning Apps") and Gradebook
- Digital Exams (via "Learning Apps") and Gradebook and Calendar
- Configure the examination statement for the duration of the exam. You will find more information on this in "Exam Mode".
- Do only activate the online supervision if the parent community is a separate online exam environment (more information about possible exam environments can be found via the distance learning pages) and if you have announced the use of an online supervision for your exam via Rooms and to your students.
- Adapt the layout of the portal. At Administrate, select "Customize Portal Layout" and remove all Portlets. Then add your own portlets. For doing so, navigate at Administrate and Custom Portlet Administration to "New Custom Portlet". Enter a Name and Content and confirm your entries with a click on "OK" directly under the content window.
- Add students as members before the exam.
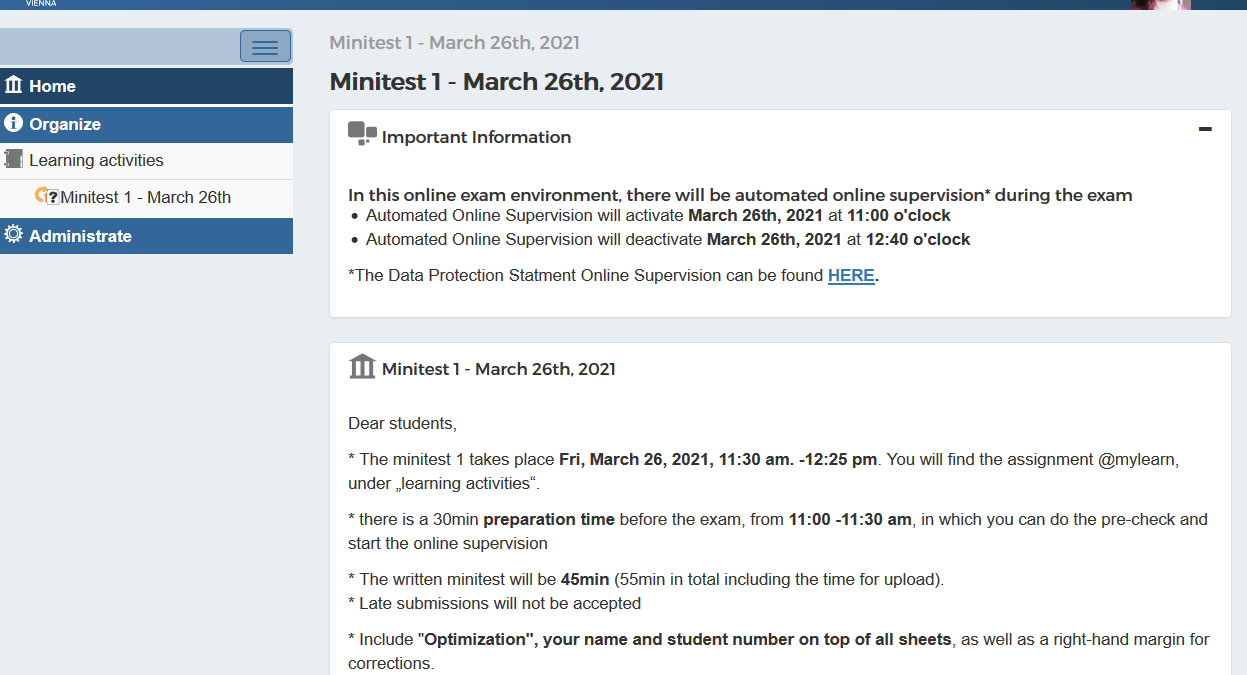
Example for the organisation of contents of a subgroup (see Screenshot "Exam Hompage").
It is up to you which contents students can see in the parent community. It is only important that you clearly communicate to the students what they are supposed to see, find, do where at which time.