Problem Based Learning
The application Problem Based Learning is a tool for the process accompanying support of problem based teaching. It can be activated in a course repository, a course, or in a club. As soon as the application is activated, you can create environments for the definition of processes and activities. In Problem Based Learning, these activities are called "groups", even though they should not be mixed up with the regular groups and group working spaces in a course environment (cf. group administration in MyLEARN). The enivronment groups in Problem Based Learning can be used for the structured elaboration of a complex assignment.
A big advantage of this application is the option to define project milestones and to schedule them. All learning process steps and activities of a problem based learning take place in these own environment groups and are displayed on the MyLEARN homepage in the "Memberships" portlet under "My problem-based learning" as a separate workspace (see: Screenshot "Working area for a process step/process item").
How do I create groups?
Basically, students can work on a task in groups of about three to seven people. For the entire course of the work, the group is relatively autonomous in its work and also searches for the required information on its own. The teacher no longer has the task of directly conveying knowledge content, but supports, corrects and guides the learning process.
To add a group, proceed as follows:
- Activate the application "Problem Based Learning".
- In the left side menu, click on "Problem Based Learning“.
- Select "Add group“.
- Give the group a name and click on "Save“.
- Add a coach for the group by clicking on "Add Coach".
- Optionally, you can add a description of the general coaching task in the field competence and confirm your entry with "save".
- Click the button "Add Member", if you want to add members to this group.
- Select students by checking the checkboxes. After that, click on "Selected items" and confirm your selection with the button "Add".
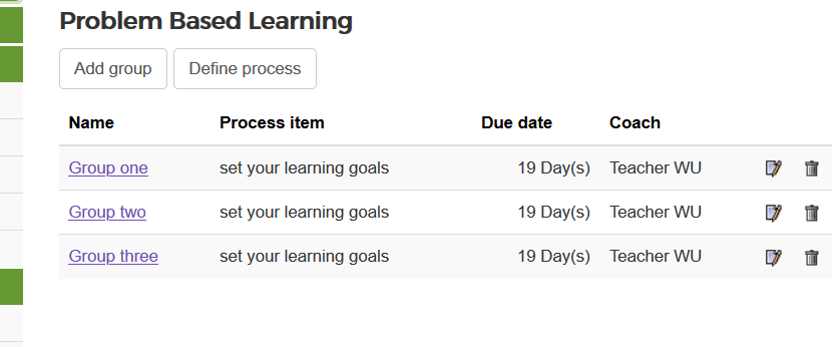
- To navigate to the overview of all groups, click the button "Back" (see: Screenshot "PBL groups")
The environment of Problem Based Learning has the same end time (archiving date) as the course environment. You can adapt this end time always by clicking "Administrate" and "Options". Like this, the environment can be used by students across semesters.
Explanations regarding the roles:
Coach |
For selecting a coach, all course members with administration rights are displayed (roles in the course: Instructor and teaching assistant). Their tasks are supplying expertise and ongoing monitoring of the learning process. If necessary, a coach will intervene regulatively in the learning process. Select a person as a coach who will supervise the group throughout the whole course. Additionally, further coaches can be defined. Additionally you can determine further, alternative, coaches for each process item. |
|
members |
All members of the course without admin rights are displayed (role: "member" or "student"). If you skip this step, you can add members later via "Administrate" and "manage members" (on the community level). The list for the selection displays only those students who are not yet members of another group. This should make the administration of the group members easier, as you see at a glance which students are not yet assigned to a group. After their selection, members are added to the environment of Problem Based Learning with the role "member". If required, you can change this role later on to "admin", if students are requested to create their own learning activities (e.g. Clicker questions, glossary entries or MC questions). |
If you click on "Problem Based Learning" in the left side menu, you get to the table with an overview of all groups.
How do I add a Learning Process Step?
During the work, each group follows an individual learning process which on the one hand is predefined by the group's coach and on the other hand can be determined by the group itself. Depending on how strictly the coach predefines the processes, you can call the process steps structured or unstructured. Aim of Problem Based Learning is to grant the group to choose its part as flexibly as possible. In spite of that, there will be a range of dates and events which are predefined by the respective coach (e.g. hand in milestones, date of presentation of outcomes, submission of final product).
To define a learning process as aim for the course, proceed as follows:
- In the left side menu (of your course), click on „Problem Based Learning“.
- Select "Define process“.
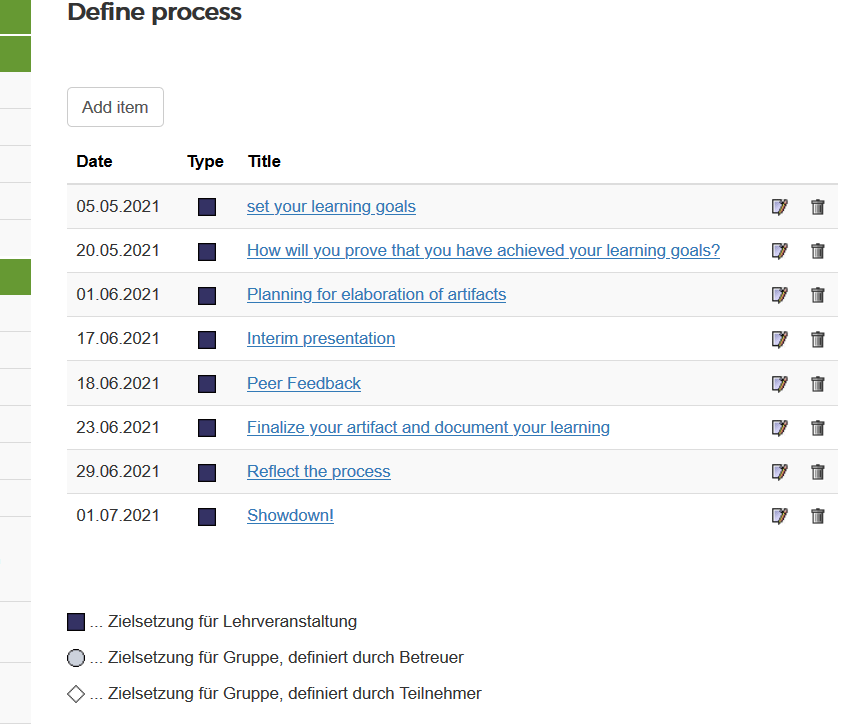
- Select "Add item“. An „item“ is a project aim or a step/milestone in the project. For each item, create a title, a date, a description and objectives. Save your entries with "Save".
- For each process step ("item") a separate coach can be added. For doing so, click on "Add Coach". This entry also needs to be saved with a click on "Save".
For each item (process step) which is created, additionaly a forum and a folder in the file storage with the name of the process step are created in the main course. Here, students can pose questions related to the project work beforehand. They can also sselect from a variety of information sources the information that is important to them in order to use it later for the processing of the problem.
For the definition of the learning process items, three types of process steps (items) Three types of process steps are available for the definition of the learning process, each with its own symbol (which depends on who has defined the item).
| Aim for the course: |
For dates and events that are valid for all groups and of course-wide significance (e.g. plenary presentations). | |
Aim for the group, defined by the coach: |
For dates and events that are defined by a group coach for a certain group. They are only relevant for this group (e.g. interim report, ...). |
|
Aim for the group, defined by member/s: |
For dates and events that are defined by the group members on their own. This allows them to determine and document the path to solving the problem themselves. |
- Example for a working process, consisting of aims for a course (Example 1).
- Example for a working process, consisting of aims for a group and for a course (Example 2).
To edit the process step items, click on the symbol "edit item" to make changes in the defined title, the date or the objectives.
Process steps can be created at any time, even, if the work of the group has started already. This is especially helpful, if groups define their learning process step by step in order to counteract any overload at the beginning of their work.
If you click in the left side menu at the application "Problem Based Learning", you get to an overview table of all groups and their status of working on their project. (see: Screenshot "Status of Project Work").
As a teacher, where do I see the status of process progress?
At any time, you have the option of viewing the process progress of the individual groups at a glance.
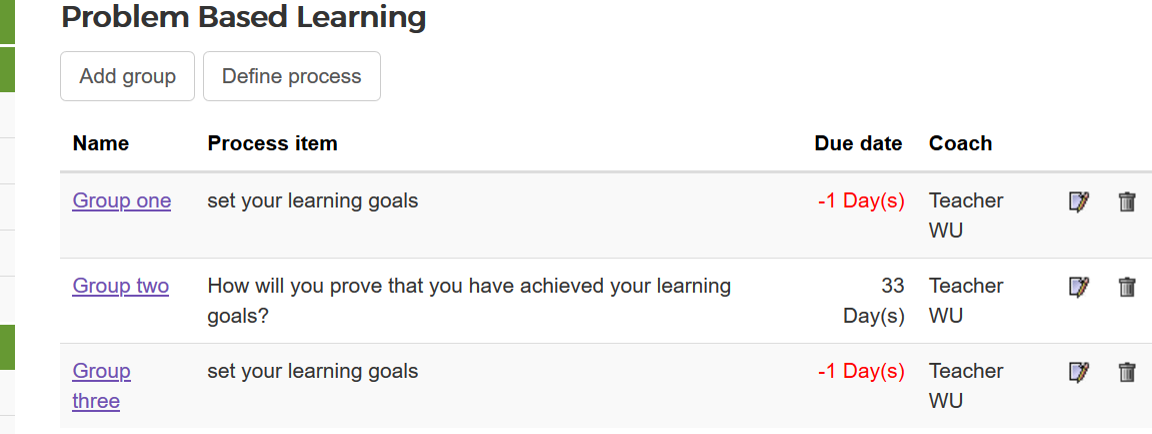
- In the left side menu, click on the application "Problem Based Learning" to get directly to the overview table of all groups and their status of project work.
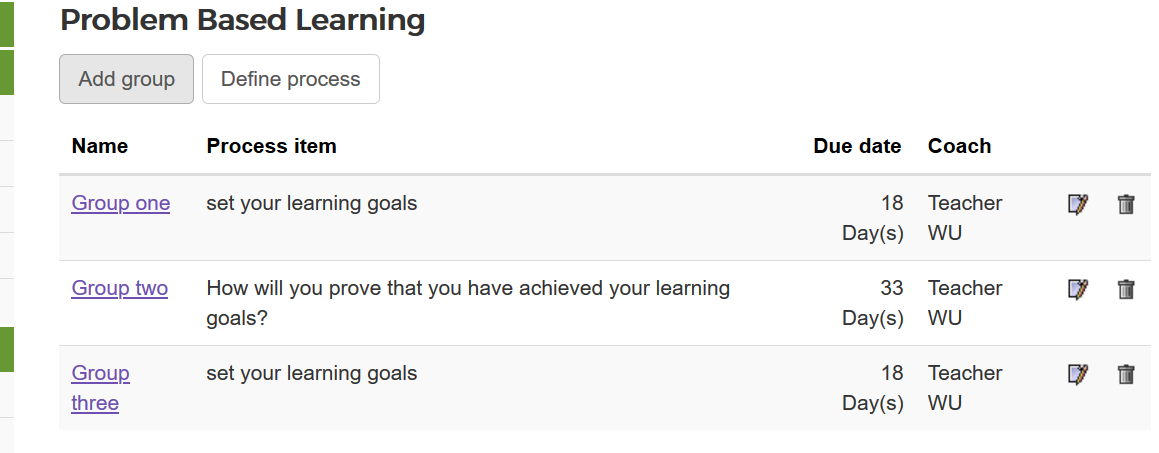
At Process item the individual next process step is displayed as well as the deadline. If the due date of a process step has passed without the status being changed by you to "closed", the due date is shown as a minus balance in the overview. (see: Screenshot "Due date passed").
By clicking on the name links of the individual PBL groups, you get directly into the working space of the group (visible by the blue environment instead of the green one of the course). Another way to get into this PBL group working space would be via the Portlet "Memberships" at the MyLEARN homepage (header "My Problem Based Learning").
What can students/teachers do per process step?
Students only see the groups of Problem Based Learning in which they are members. They can get to their group environment in two ways:
- from the MyLEARN homepage via the Portlet "Memberships" in the area "My Problem Based Learning".
- from the community environment, in the left side menu at "Problem Based Learning".
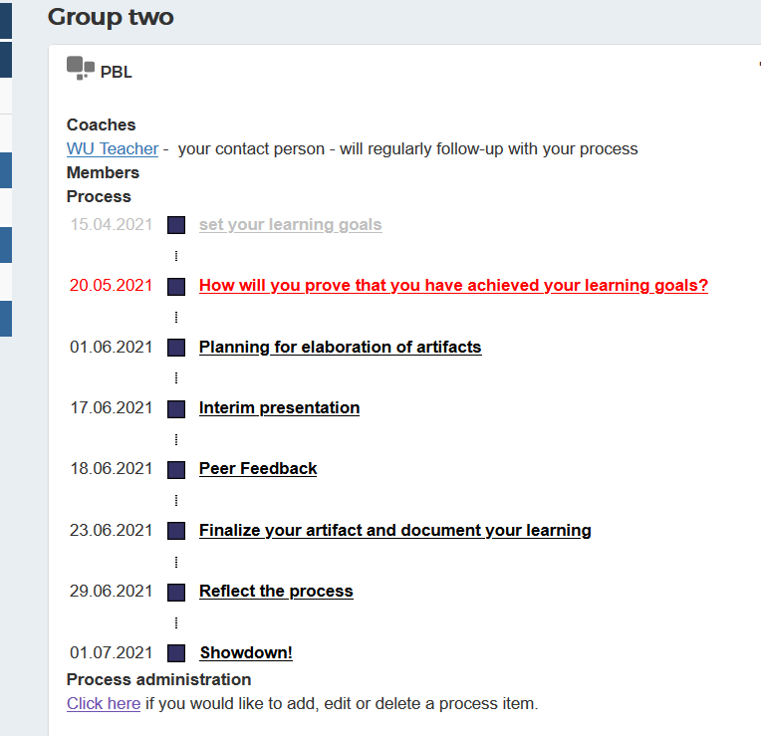
The community is characterized by a blue appearance (instead of the green course environment - see: Screenshot "PBL homepage"). If you are directly in the community environment, you will see the PBL-Portlet after clicking on "Home". It displays information about the coaching/support, the participants and the process steps. The next step/item (related to the date) is highlighted in red. Process steps that are closed already are grayed out (see: Screenshot "PBL-Portlet").
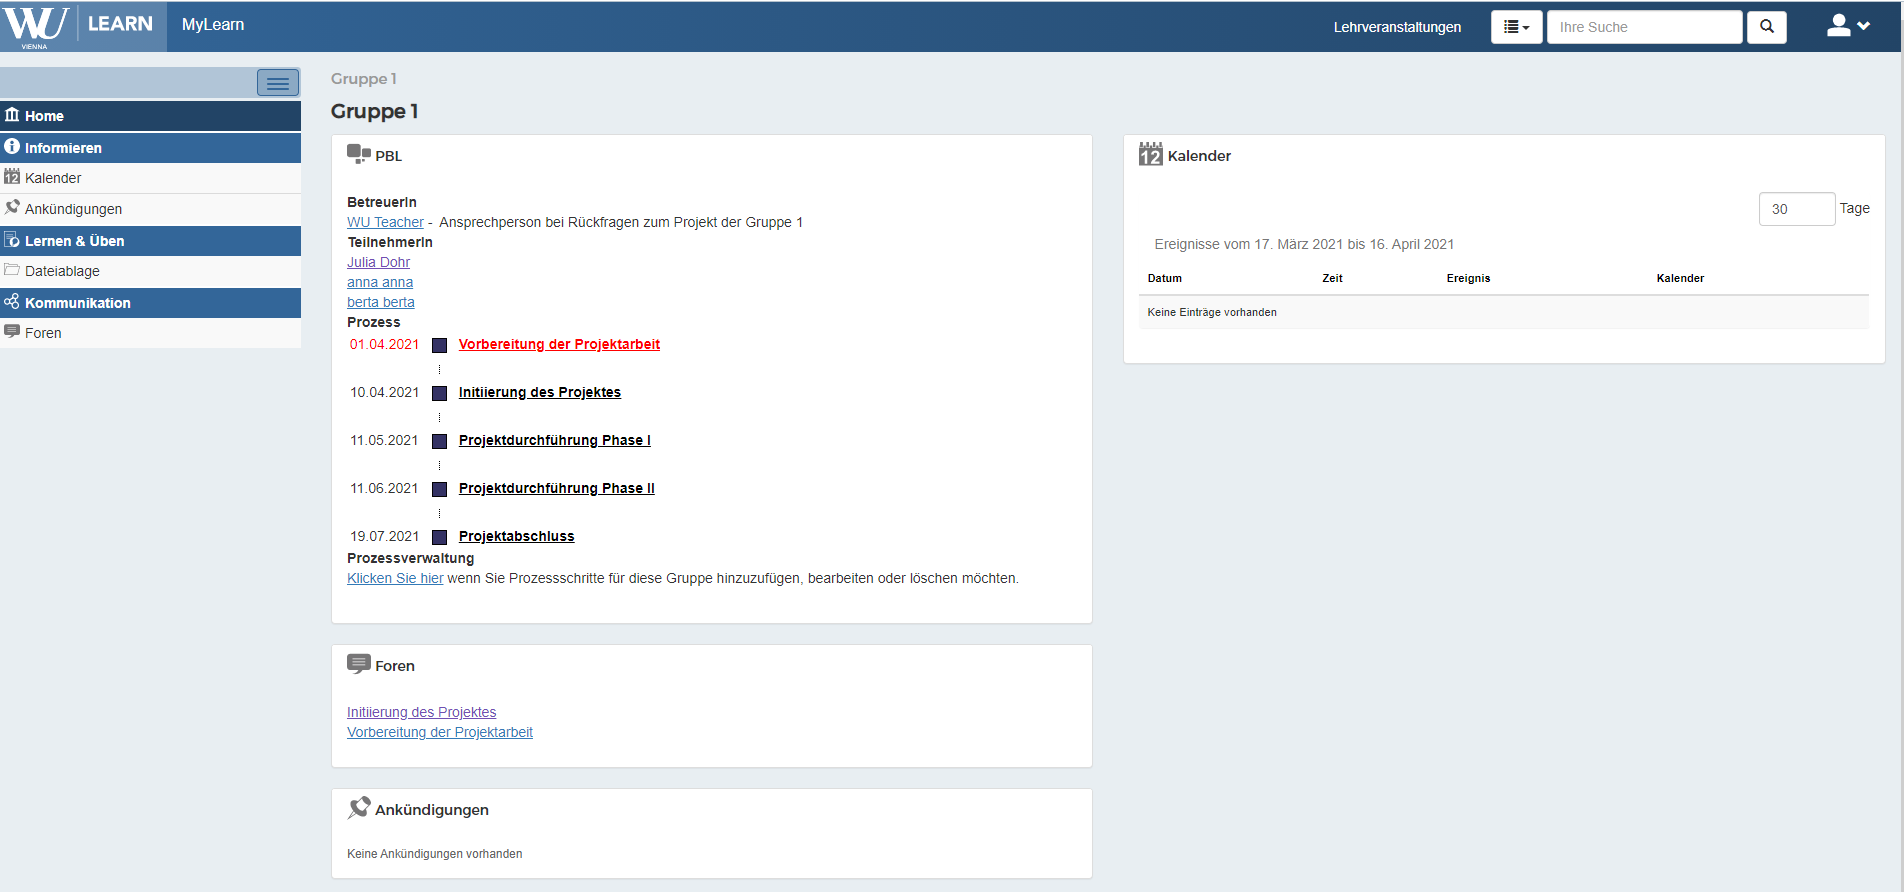
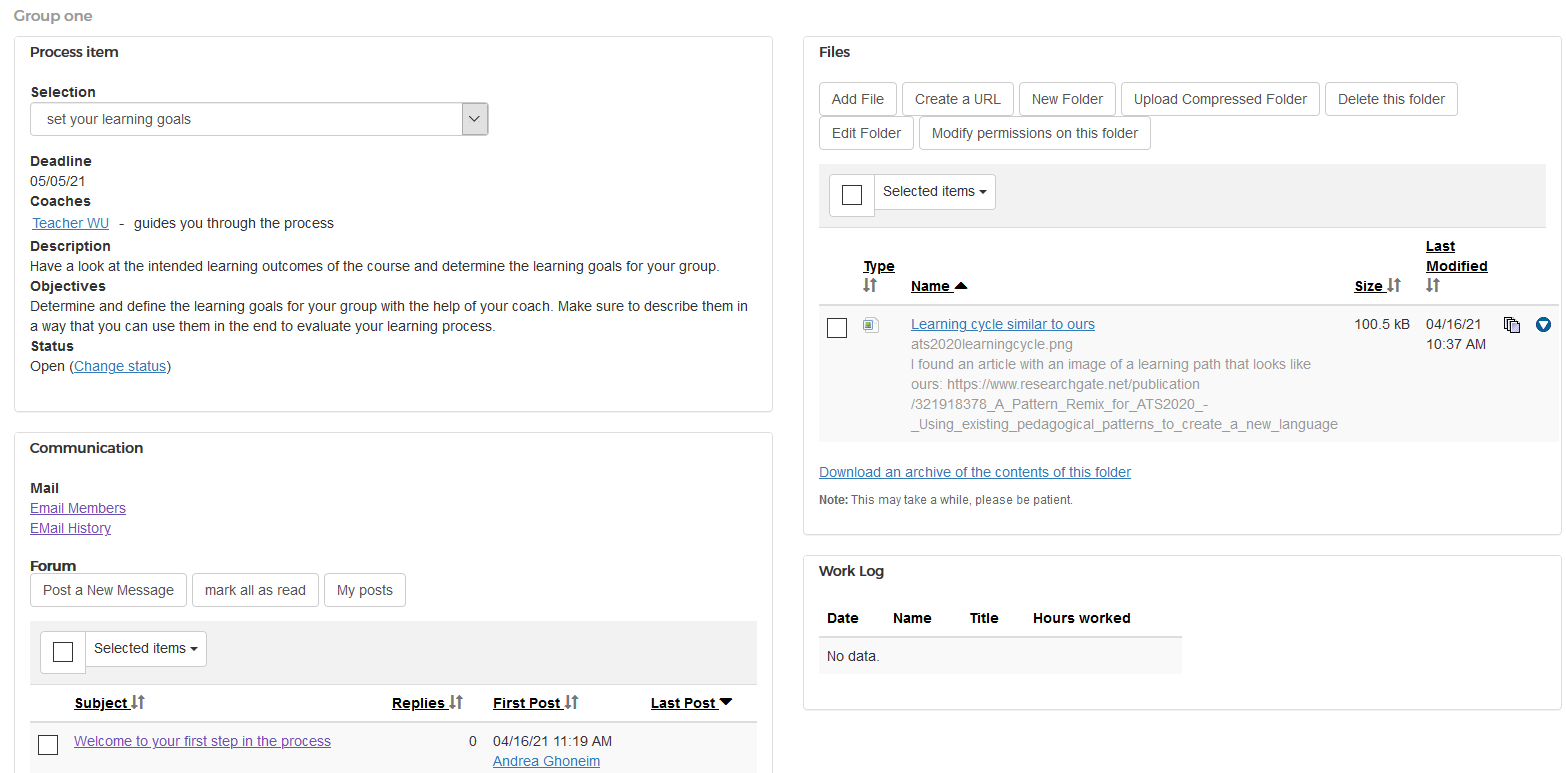
With a click on the link of a process step/item you see the more detailed description of the process step, and you are in an area in which the content for the process step can be elaborated (see: Screenshot "Working area for a process step/process item").
Within a process item, the following options are available:
- Set status to open/closed. A closed process step/item ist displayed to all groups as grayed out
- Send group mails or mails to single members to students at the level of the PBL group
- Add forum posts in the forum of the process step. For each process step, in the PBL environment automatically a forum with the name of the process step is created.
- Upload files, folders or URL for each process step to share them with other group members or the coach. In the PBL environment, a folder in the file storage is created. It has the same name as the process step/item.
- Add entries to the "Work Log". Work logs are short entries what students did how long in the framework of their project work. Work logs should give the group coach a better insight into the individual performance of the group members. The aim is to assess groups/students not only on the basis of their final result, but also on the basis of their participation in the joint work. With a click on "New Entry", students get to the entry field. Here, they enter the date and the duration of work and can optionally add a description (see: Screenshot "Create Work Log"). The individual group member can only add entries for her-/himself and can only delete or edit his/her own entries. All entries are visible for all group members, though. The coaches cannot make entries in the work log, but they see all entries structured by group member and date.
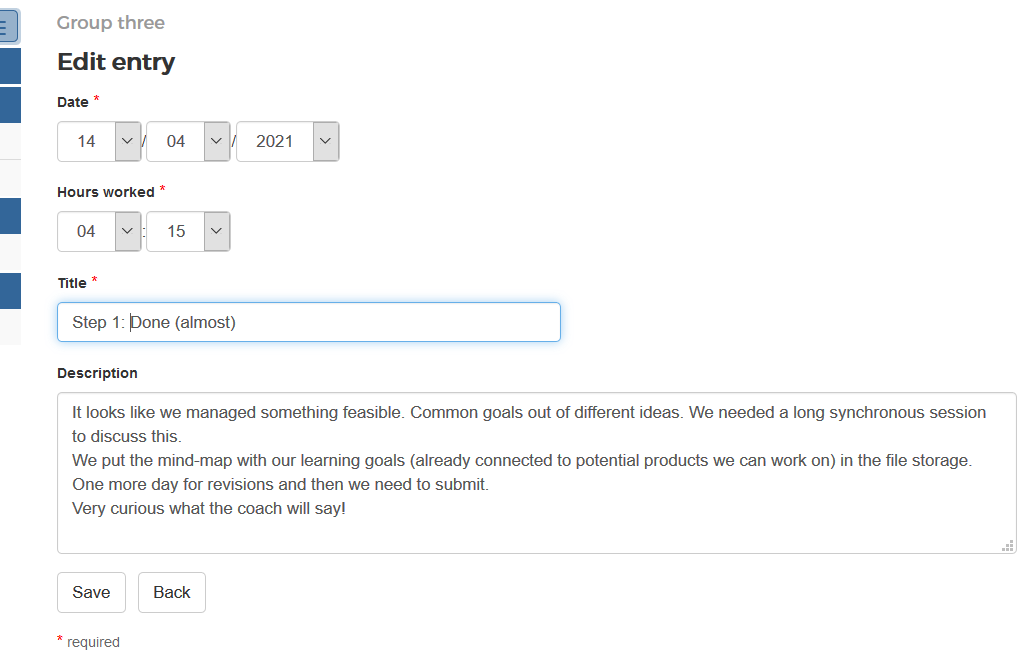
What would be potential supervision steps of a group coach?
Potential supervision steps of a group coach in the environment of Problem Based Learning:
- Communication with students via sending group and individual e-mails (directly from the environment) or communication with students via the forum.
- View all files submitted and the work logs
- Upload of files, folders and URL
- Add further process items (process steps)
- Change the status (of a process item) from "Open" to "Closed" as soon as this process step was finalized according to the target definition.
What would be potential usage scenarios?
Potential usage scenarios are - especially in combination with the regular groups in the course environment:
- Use of the work log feature. Via the work logs, participation of individual students in group work can be derived. Use this as a supplement of the regular group work area on course level or as an alternative to a peer rating.
- Use of the PBL working area per process step (process item). If there are several process steps, support can be provided in a detailed way and with pinpoint accuracy. The list of all working steps in the PBL portlet provides structure, even for bigger work packages, and enhances the transparency of assignments. In the framework of problem based learning, you can assign partial scores to groups. The final product can be submitted via the course environment as a "regular" group assignment.
- Exploit the full potential of Problem Based Work. Set only some project aims (as process items) in the beginning, and let students develop further project aims and project milestones on their own. Offer optional support for developing project milestones. Facilitate student learning.