Learning activities
The learning activities application lets you provide different study materials to users, e.g. online lecture notes, sample questions in multiple choice, single choice, or open format, study modules, and sample exams.
General
How can I create learning activities?
Learning activities allow you to support your students’ progress by providing them with study materials that are well-structured for efficient studying.
- Activate the “Learning activities” application
- In the menu bar, click on “New” and select the appropriate item from the drop-down list
- Fill in all the required fields and the relevant optional fields and click “Save”
The following learning activity items are available:
| Folder | This allows you to create a folder for structuring your content. |
| Glossary |
You can create a glossary for your students, e.g. to explain technical terms. |
| Pool folder | This item allows you to create a pool of questions from where individual questions can then be drawn at random. |
| Study module | Three types of study modules are available to you to structure content for your students. |
| Divider | Dividers work like sub-headlines and allow you to structure the content of a folder or a study module. |
| Content | This item allows you to create attractive content pages for your students, including text, pictures, tables, videos, and audio elements. |
| Download | You can make individual files or ZIP folders available for download to your students, e.g. PowerPoint slides or PDF files. |
| Multiple choice question & Single choice question | You can use multiple choice or single choice questions to create graded tests or give your students the opportunity to test their knowledge independently. |
| Cloze | This item allows you to create questions where your students have to fill in the blanks. You can choose between drop-down blanks, free text blanks, or answer options to select from. |
| Assignment | This item allows you to create activities where your students have to enter a sentence to answer a question or complete complex exercises and upload their results. Open assignments can be used for a wide variety of purposes. Assignements can be assigned either to all, individual participants or to groups. |
| Combined question | This feature allows you to combine up to four types of questions into a combined question. You can combine single choice, multiple choice, and cloze questions. As a teacher, you grade the combined question as a whole, not the individual questions that it includes. |
| Proxy | This item lets you create randomized questions and combine them with an existing pool of questions to reduce the likelihood that different students get the same question. |
| Sample exam | This feature allows you to create a sample exam to simulate a real-life written exam online, including multiple choice, single choice, cloze, and combined questions. |
| Peer Review | Set up digitally supported peer feedback for individual students and student groups. This can also be configured with the setting "anonymous" and optional additional queries. |
| Peer Rating | Each group member provides information on how he / she evaluates the work of each member of their own group. Choose between an overall rating that students have to share between all members of a group and an max rating per group member. |
There is no limit to the number of learning activities you can provide to your students. Once you’ve created a learning activity, please don’t forget to publish it, by clicking on the green box  , so that your students can see it.
How can I create an assignment?
Tasks that require students to submit either a file submission or textbox response can be created and processed in the section of learning activities under "assignment".
- Click on “Learning activities” in the left side menu.
- Click on “New” in the menu bar and select “Assignment” from the drop-down list.
- Choose a title and a short name.
- Assignit to: All members, Selected groups or Selected members.
In order to assign the "Assignment" to individual groups, you need to create groups in the group administration tool. - Specify the content of the task and add additional downloads or sample solutions if necessary.
IMPORTANT: By default, the Exercise tab is preset for every learning activity, which means that submissions by students are not transmitted to lecturers. If you want to access and evaluate the students' answers and submissions. - Don`t forget to click on the Assignment tab.
- Choose the submission type (file upload or text input), the grading mode and the grading release mode.
Assignments with grading mode “max. points” can be created as a partial score in the gradebook by ticking the checkbox or can later be imported into the gradebook. - Define a time limit (timer) and an edit time period if necessary. The edit timedefines the time frame in which the task can be processed and submitted (start and end). The end date will also be displayed in the students’ to-do lists in order to submit the assignment on time.
- Select if students should be allowed to save a draft of their submissions, e.g.,to interrupt processing and continue working on it later.
- Click on “Save”.
The “Assignment” is now displayed on the overview page of the learning activities.
Newly created learning activities are initially HIDDEN and only visible to you as the course admin (recognizable by the red box and the greyed-out display). In order for students to be able to access the “Assignment” at the beginning of the edit period, you need to RELEASE it (click on the red box , which will turn green
). As long as the edit time hasn’t started yet, students will only see the title of the assignment, but they cannot see any details on the content. If you haven’t specified a start time, students can access the assignment as soon as you have released it.
Note:
- You can add material for download, which is necessary for elaborating the assignment (e.g. papers/articles, case descriptions, laws and standards, R-Data, Excel spreadsheets etc.
- You can add a sample solution if you want that students get automatically information about the correct elaboration after the grades are released. In the field for the sample solution, you can enter Text and/or embed pictures and audio or video files.
- If you offer a file for download, keep in mind that students have to be able to open, save and upload the file with the software on their home devices. Announce the requirements for participation in this online exam to the students in good time and provide the students with a comparable file in advance so that they can test whether they can open and edit the data type on their computer.
As a teacher, how can I change to the students’ view?
As a teacher, you can switch back and forth between the teacher’s view and the students’ view. When edit mode is turned off, you see the MyLEARN interface as your students see it.
- Click the “edit on” button in the upper right-hand corner.
- You’ve now switched to the students’ view.
The button indicates the view you’re currently using.
| Edit off | Edit mode is currently turned off. By clicking, you can activate edit mode. When edit mode is turned off, the drop-down lists “New” and “Clipboard” are not shown in the menu bar. |
| Edit on | Edit mode is currently turned on. By clicking, you can deactivate edit mode. When edit mode is turned on, you can see the drop-down lists “New” and “Clipboard” in the menu bar. |
Creating and editing content is only possible when edit mode is turned on.
In the learning activities, what is the difference between exercises and assignments?
You can designate every learning activity either as an assignment or as an exercise.
| Assignment | Activities designated as assignments let you define a grading mode. Teachers can view the students’ answers, grade them, or give feedback. Assignments can only be completed once, and they are automatically highlighted as to-do items for the students. |
| Exercise | For activities designated as exercises, it is not possible to define a grading mode. These exercises are only intended to help students practice their skills. Teachers cannot view the students’ answers and submissions. You can decide whether an exercise can be done several times over or only once. Exercises are not automatically highlighted as to-do items. |
How do I select and define edit time (processing period) and timer (time limit)?
The Edit Time defines on the basis of starting time and end time in which period of time an exam or single questions can be processed or started by the students. The students have to submit the exam or the questions before the set end time. If you have set the end time as 12:00, the edit time for students already ends at 11:59:59.
The Time Limit (timer) defines by minutes how much time students have to work on an assignment. As soon as students have startet the assignment, a countdown starts running and shows the remaining minutes. Within this period of time the students can submit the assignment.
If you set an edit time and a time limit in the same time, the deadline for the submission is based on the time limit. Therefore, it is recommended not to set the same time for edit time and time limit, as shown in the following example:
- Edit time: 01.11.2020 11:00 AM - 01.11.2020 12:00 PM
- Time limit (timer): 60 minutes
- In this case, students only have 59 minutes instead of 60 minutes time to process and submit the assignment.
The edit time should be entered as a longer period than the time as the following example shows:
- Edit time: 01.11.2020 11:00 AM - 01.11.2020 12:05 PM
- Time limit (timer): 60 minutes
- In this case, students have 60 minutes time to work on the assignment, no matter, if they start at 11 AM or at 11:02 AM.
How can I turn an exercise into an assignment?
In “edit on” mode, you can change an activity’s status to convert it into an assignment or exercise.
- In the menu on the left-hand side of the screen, click on “Learning activities”
- Click on the appropriate activity (e.g. an existing multiple choice question)
- In the menu bar, click on “This page…” and select “Edit” from the drop-down list
- Click on “Exercise” if you’d like to designate the activity as an exercise
- Click on “Assignment” if you’d like to designate the activity as an assignment
- Enter all the further settings
- Click on “Save” to save your setting.
How can I add an internal link to learning activities?
It is possible to cross-link materials internally within a community, for instance to show students connections and interrelations between different topics and materials.
- In the menu bar of the relevant learning activity, click on “This page…” and select “Edit” from the drop-down list.
- Click on the content field and, in the editor, click the icon “Insert internal link”
 .
. - Use the search function to find the relevant content or click on the relevant content to which you would like to link.
- In the “Link label” field, you’ll see the name of the link that you’re about to create. You can edit the link name, if required.
- Optionally, you can also enter a “Tooltip” text.
- In the drop-down list, select visualization mode.
- Click “OK”.
- Click on “save”.
By clicking on the link text on the target page, the students can go back to the original page.
How can I customize the scoring for a specific type of question?
The grading scheme defines how a specific type of question is to be graded. You can adjust and customize the scoring for single choice, multiple choice, and cloze questions individually for every course and every course repository in the settings profile. These settings will be applied to all activities that use the respective question type.
- In the menu on the left-hand side of the screen, click on “Learning activities”
- In the menu bar, click on “Learning activities” and select “Einstellungsprofile” (settings profiles) from the drop-down list
- In the “Shortname” column, click on “en:parameter_page1” in the line that corresponds to the appropriate course or course repository
- In the drop-down lists for the different question types, select the scoring you’d like to use
- Click “OK”
The scoring scheme set in a course repository is not automatically transferred to the courses connected to the course repository. These settings are only inherited from the course repository if the “eye” icon has been activated. Only then will the grading scheme set for a course repository be displayed automatically in the settings profiles of linked courses.
Which grading mode do I have to select for learning activities to be able to transfer them to the grade book?
Only learning activities designated as assignments and graded on a “max. points” basis can be transferred to the gradebook.
- In the left-hand side menu, click on “Learning activities”
- Click on the appropriate activity (e.g. an existing multiple choice question)
- In the menu bar, click on “This page…” and select “Edit” from the drop-down list
- Click on “Assignment”
- In the drop-down list, select the “max. points” grading mode
- Enter the maximum number of points to be earned
- Select the appropriate grade release settings from the drop-down list
- Enter all the further settings
- Click on “Save” to save your settings
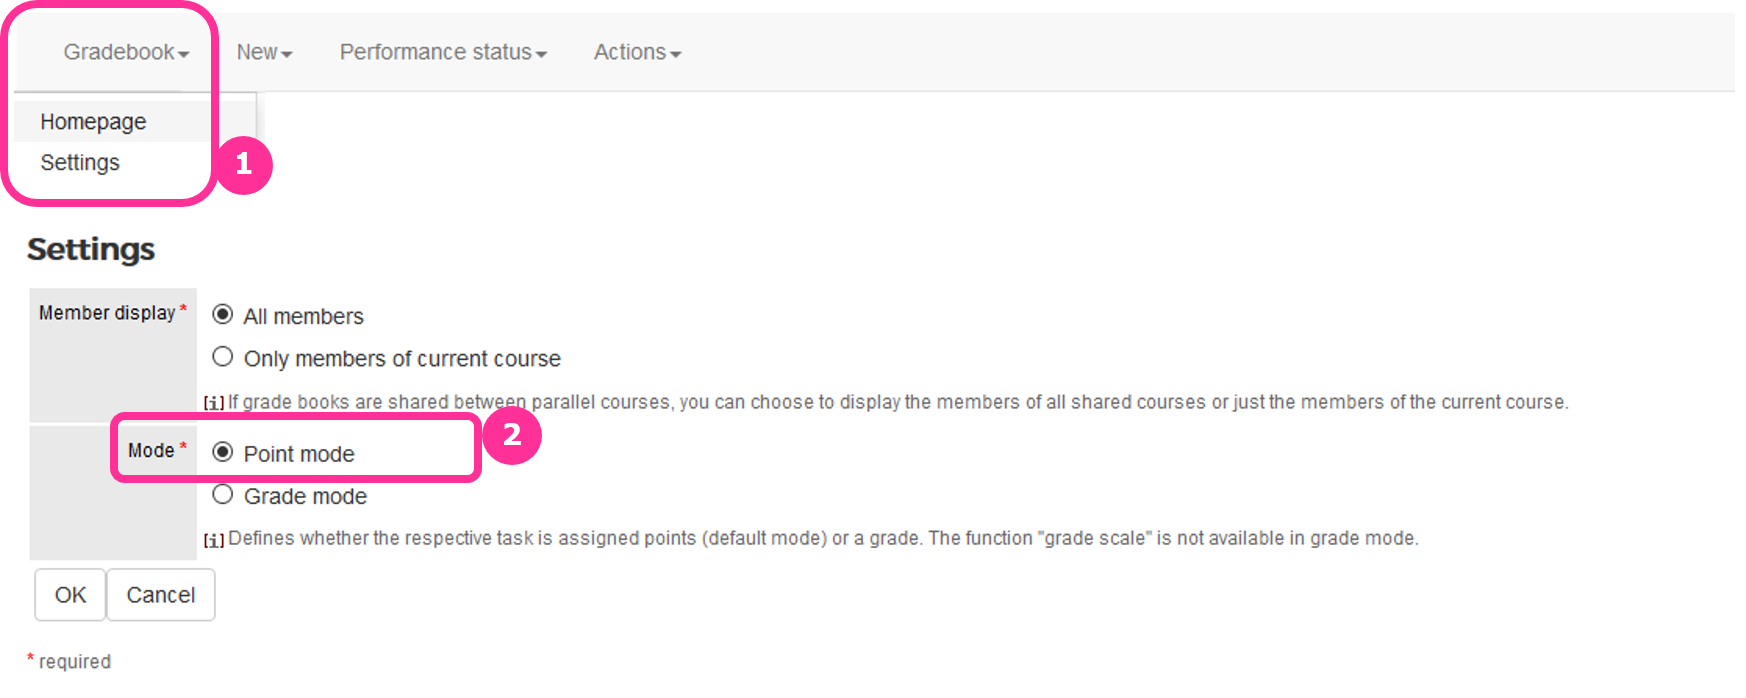
If you’re planning to transfer grades to the grade book automatically from the “learning activities” or “assignment” applications, it’s best to keep the default settings in the grade book, i.e. the "points mode " (Screenshot).
How can I view a results diagram of the submitted answers?
For excercises in single-response and multiple-response format, you can display a results diagram of the submitted answers.
- In the menu bar of the learning activity in question, click on “Actions” and select “Results diagram” from the drop-down list.
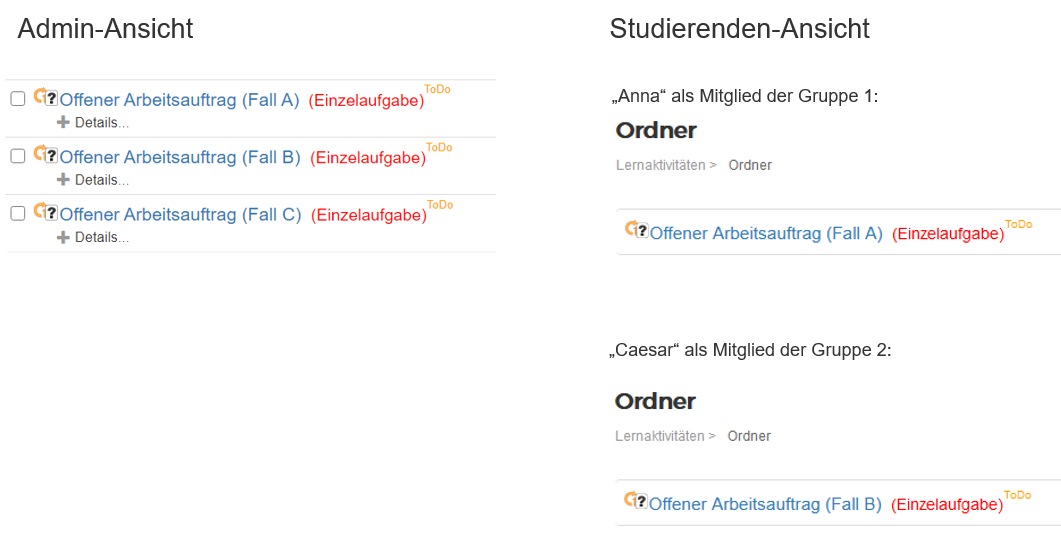
The tasks "sample exam" and "assignment" can also be assigned to selected members. In contrast to the assignment to selected groups, this task is then displayed as an individual assignment  , i.e. students work and submit these excercises as individuals and not as a member of a group. Students will also individually receive grades for it. Only selected students will see this task. All unselected students will not see this task in their ToDo list or in the course (cf. Screenshot "Sichtbarkeit der Aufgabe").
To assign a task to selected members, you have two options::
1. Option: Assign students manually via "Selected members".
- In the left-hand side menu, click on “Learning activities”
- Click on the appropriate activity (Sample Exam or Assignment)
- In the menu bar, click on “This page…” and select “Edit” from the drop-down list
- Choose "Selected members" beneath "To whom should this task be assigned?". All course participants who have the membership status "Student" or "Member" are now displayed in alphabetical order.
- Check each student individually and then confirm your selection with "Save".
2. Option: Select several members via "Group-based selection" as a bulk-action.
- In the left-hand side menu, click on “Learning activities”
- Click on the appropriate activity (Sample Exam or Assignment)
- In the menu bar, click on “This page…” and select “Edit” from the drop-down list
- Choose "Selected members" beneath "To whom should this task be assigned?". All groups that have been created in the course are displayed in alphabetical order.
- Check one of the groups and confirm your selection with "Save".
Notes on group-based selection:
The "Group-based selection" is displayed as soon as there are groups in the course (cf. Screenshot "Gruppenbasierte Auswahl"). If you want all members of an already existing group to work on this task individually, then use the group-based selection option and select the group. However, if you want to create your own group (e.g. also randomly thrown together) for the assignment of the task, then proceed as follows:
- Go to the group administration under "Administrate" and click on the link to open the group administration.
- Select "New" and "Automatic" in the menu bar to create new groups for assigning tasks.
- Select "By number of groups" as the creation mode, "closed" as join policy and enter a value for the number of groups, e.g. 3.
- Do not release these groups. Students do not see that they are members of this group (cf. Screenshot "Groups").
- In the group-based selection, select the group whose members you want to individually assign to this task (see Beispielvideo). By selecting the group, the checkmarks are now set for the corresponding members of the current group.
Proceed in this way also if you are not yet presented with an option for a group-based selection.
Important: The group-based selection is only a support for the initial assignment of a task. The selection is not synchronized with the group, i.e. subsequent changes to the assignment of members to a group are not mirrored in changes to the assignment of members of a task. In such a case, change the assignment to "All members" and click "Save". Now adjust the membership in the group before going back to the task settings. Change the assignment back to "Selected members". Select the (now adjusted) group again. Alternatively, you can manually add or remove assignments directly in the list of selected members. Save your changes.
Possible application scenarios for group-based selection
- the allocation of distance exams to BeAble students with a time extension.
- the allocation of A, B, C assignments or exams to different groups of students in a course.
- the allocation of assignments or exams to selected students as part of late or replacement dates.
- the allocation of recurrent assignments to the same set of students.
Copy and transfer regularly
How can I copy my materials to other courses?
You can use the clipboard to copy and paste or cut and paste learning activities within a community or between communities, or to set up a regular transfer.
- In the left-hand side menu, click on “Learning activities”.
- Tick the appropriate checkbox(es)
 to select one or several activities.
 - Click on the button “Selected items”.
- In the drop-down menu, select “Add to clipboard”.
- Go to the place where you would like to insert the content.
- In the clipboard, change the shortname of the item if you want to insert it as a copy on the same level as the originat item.
- In the clipboard, select “Insert content here...”.
- Select “copy”.
- Tick the checkbox(es) to select the appropriate content.
- Click “OK” to confirm.
Activities available for transferring content via the clipboard:
| Copy | The content remains unchanged at the original location and a copy is inserted at the destination. |
| Move | The content is deleted from the original location and pasted at the destination. |
| Transfer regularly | The content remains unchanged at the original location and is pasted to the destination and synchronized automatically if you make any changes to the original content. |
How can I transfer materials to multiple courses?
It is possible to transfer and sync materials from a course repository to specific courses automatically.
- In the left-hand side menu, click on “Learning activities”.
- In the menu bar, click on “Learning activities” and select “Transfer regularly to courses: Administration” from the drop-down list.
- Click on the appropriate semester for the respective course.
- Tick the checkbox(es) to select the target course(s) for the regular transfer.
- Click the button "Start regular transfer of materials to courses".
To transfer only some selected materials, use the regular transfer option in the clipboard.
How can I archive transfer of materials to the old courses?
Before preparing the materials for the new semester please archive the transfer of materials to the old courses. Thereafter you can regularly transfer materials to the courses of the upcoming semester.
- In the left-hand side menu, click on “Learning activities”.
- In the menu bar, click on “Learning activities” and select “Transfer regularly to courses: Administration” from the drop-down list.
- Click on the appropriate semester for the respective course.
- Click the button „Archive transfer of materials to courses“.
All courses in which materials are currently transferred to are then connected to this copy in the archive and not to the actual content in the course repository any more. The learning materials in the course repository are not effected by this operation. After archiving changes to the contents in the course repository are not transferred to the former courses any more but only in those courses for which you start to regularly transfer them.
Sample exam, study modules, proxy questions, cloze, peer review and peer rating
How can I create a sample exam?
By creating a sample exam for your students, you can give them the opportunity to practice writing real-life exams. You can include multiple choice, single choice, cloze, and combined questions in your sample exams and specify an exam period during which the students have to complete the exam. For grading purposes, you need to weight the individual questions. You can create sample exams with or without a grading scale.
Creating a sample exam with a grading scale:
-
In the menu bar under “Learning activities,” click on “Learning activities” and select “Grading scale” from the drop-down list.
-
In the menu bar, click on “New” and then on “Grading scale”.
-
Fill in all the required fields and the relevant optional fields and click “Ok” to confirm.
-
In the menu bar under “Learning activities,” click on “New” and select “Sample Exam” from the drop-down list.
-
Fill in all the required fields.
-
Select your pre-defined grading scale or grading key and decide whether you’d like to create the sample exam as an exercise or an assignment.
- If you've selected "Assignment":
- Decide whether the list of questions should be hidden. The default setting is "no".
- Decide whether the re-editing of questions should be allowed. The default setting is "Yes."
-
Define a grading mode. Please note that only the setting "max. Points" can be transferred to the grade book.
-
Define a release mode for the grades. Select "publish manually" if you do not want students to see your results immediately after submitting the exam.
-
Fill in the additional required fields. Timer: Students will get the information how much time is left for their exam as soon as they started the exam.
A fixed starting and end time guarantees that students can only work on the exam at a defined day and a defined time. -
Click on “Save” to save your data.
-
Publish the sample exam.
-
You can use the clipboard to add existing questions or you can enter new questions directly within the sample exam. To enter questions directly, go to “Learning activities,” click “New” in the menu bar, and select the appropriate activity from the drop-down list.
-
Weight the individual questions.
You can add as many questions as you like to your sample exam. This allows you to conduct a real exam or to simulate a real-life exam online as realistically as possible.
Note:
Choose the following settings for a written online exam, and click on "Save" afterwards:
- Shuffle questions > yes
- Advanced settings > assignment
- Hide list of questions > yes
- Allow editing of questions > No
- Grading mode > max. points (and: enter the points)
- How many minutes should be available…* > (entry in minutes)
- Starting time and end time** > date/time for start and end of written exam
- Release grading > publish manually
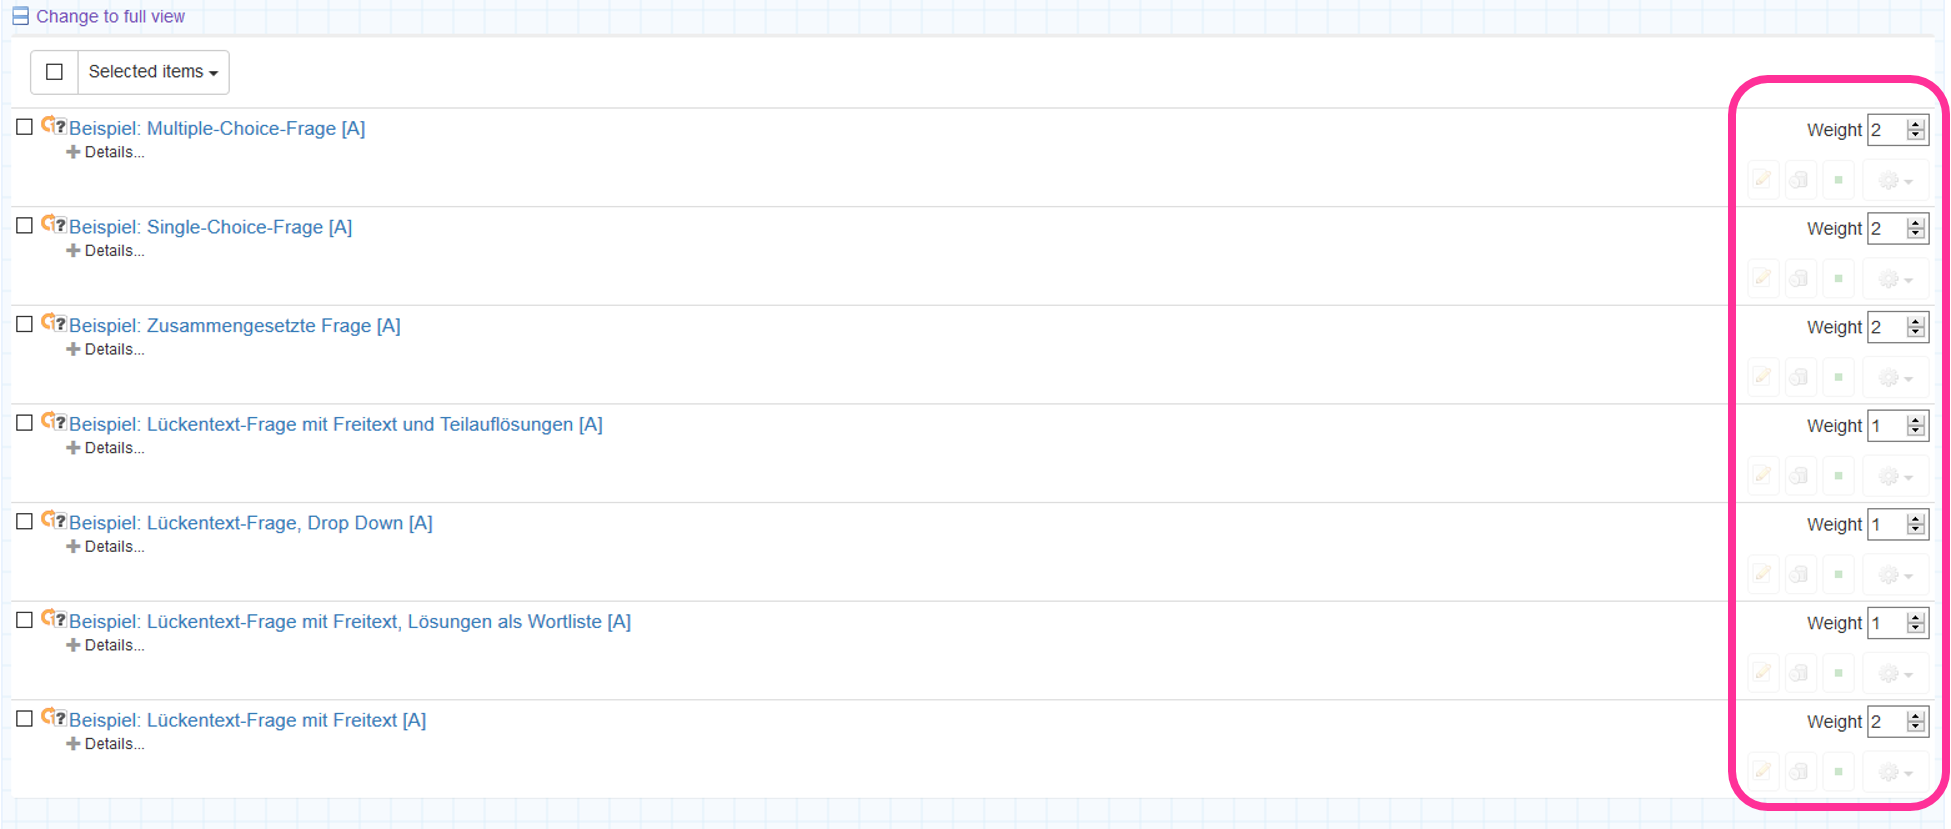
How can I change the weighting of individual questions?
You can weight individual questions differently in a sample exam.
- When you create a sample exam question, the field “Weighting” will be displayed at the end of the question. This field allows you to specify the weight given to the respective question.
- Within the sample exam, you can use a slider to change the weighting of the questions (Screenshot).
There are two ways of weighting questions:
| Points | If you would like to weight your questions using points, please simply add the appropriate number of points for each question. For a sample exam with a total of 10 points and five questions, you could for example make each of your questions worth 2 points, which corresponds to an equal weighting of 1 for each question. The students’ grades are then calculated on the basis of the predefined grading scale (5-level grading scale). |
| Percentages | You can also weight questions using percentages. For example: For a sample exam with a total score of 100% and five questions, you could for example give every question an equal weight of 20%. However, the weighting can also be distributed in any other way that is suitable, depending on the importance and complexity of the individual questions. The exam results will be displayed to the students in the form of percentages. The students’ grades are then calculated on the basis of the predefined grading scale (5-level grading scale). |
You can add as many questions as you like to your sample exam. This allows you to simulate a real-life exam online as realistically as possible.
How can I create proxy questions?
With the proxy question feature, the students get a question that is drawn at random from a pool of predefined questions (pool folder). To create a proxy question, you first need to set up a pool folder.
- In the left-hand side menu, click on “Learning activities”
- In the menu bar under “Learning activities,” click on “Learning activities” and select "Pool folder” from the drop-down list
- Fill in all the required fields
- Configure any of the further settings you’d like to make
- Click on “Save” to save your data
- Click on the folder “Pool folder”
- Now start adding questions to the pool folder (e.g. multiple choice questions). You can either create them directly within the pool folder or copy and paste them into the pool folder using the clipboard.
Important! Please make sure that you have properly published all the questions in the pool folder. Any unpublished questions in a pool folder will not be used for your proxy questions.
The next step is to create a proxy question at that position in your learning activities where you would like to offer your students a question randomly drawn from the pool folder. In the form, you can now select one or more pool folders. Only those pool folders will be shown that contain at least one active question.
- Click the folder or study module where you would like to add the proxy question.
- In the menu bar, click on “New” and select “Proxy” from the drop-down list
- Fill in all the required fields
- Enter all the further settings
- Select one or more pool folders
- Click on “Save” to save your settings
- Publish the proxy question
Important! If you copy proxy questions and question pools from one community to another, the assignment of the question pools to the proxy questions will disappear. Make sure that you re-enter this assignment correctly in each proxy question.
Please note:
- If you add several proxy questions that point to the same pool folder, it is possible that students may get the same question several times. Therefore, make sure that the assignment to question pools within a sample exam / learning module is always made selectively.
- It is possible that different students may get the same question. The more questions there are in a pool folder, the more likely it is that everyone gets a different question.
The students will not see the short name of the selected question in their history, which makes it more difficult for them to discuss the questions among themselves. When a student clicks on a proxy question, he or she will see a question randomly drawn from the pool folder. Proxy questions can only be answered once. If re-editing is chosen in a Sample Exam students will always see the originally allocated question from the question pool, also if navigating back.
How can I create study modules?
You can structure learning activities in many different ways, for example based on topics or class units.
- You can structure your contents by topic and assign these topics to the following phases: Topic, wrap-up and assessment.
- If you follow a class-based approach and would like to publish study materials automatically “before and after class,” you can use the "before class - in class - after class" template.
- Study materials that are sequenced and build on each other can be structured with the “strict sequencing” template.
You can also combine modules. You can for example define a fixed, linear path within a package from the "before class - in class - after class" study module by integrating the “strict sequencing” module.
- In the left-hand side menu, click on “Learning activities”
- In the menu bar, click on “New” and select “study module” from the drop-down list
- Select the appropriate study module
- Configure the settings in the respective study module as required and click on “Save” to save your settings
- Publish the activity and/or the study module
There are 3 templates for study modules:
| Topic - wrap-up - assessment | The "topic - wrap-up - assessment" template is well suited for phases of independent study. It includes a proposed module structure and allows you to assign learning activities directly to three phases: topic, wrap-up, and assessment. Students can use the continue and back buttons to navigate freely through the study module. You can also change the template headlines. |
| before class - in class - after class | The " before class - in class - after class" template is particularly suited for courses where students are required to prepare for individual class units and to complete assignments after class. To implement this sequence, you can assign a folder to the date of a class and define a publishing schedule for the study materials. The materials can be published before class, during the class, and after class. You can use a drop-down menu to assign the different learning activities included in the folder to the respective phases so that they are published at the predefined times. The learning activities are displayed to the students in the form of a to-do list. |
| strict sequencing | The “strict sequencing” template is particularly suited for materials that build on each other in a specific sequence. This template defines a sequence that students have to follow when working on the materials. Students can only access the second activity once they have completed the first one, and so forth. The sequenced activities are listed below each other on a single page. |
These study modules help you to structure your study materials for your students. You can use dividers to structure your content visually as well.
Things to keep in mind when publishing study modules:
- If you have defined a starting date and time for the study module, you only have to publish the study module. It is not necessary to manually publish every single learning activity contained in the module, as the activities are published automatically along with the entire module.
- If you have not defined a starting date and time for the study module, please publish the study module as well as all the individual learning activities it contains.
- Please note that the individual learning activities included in "before class - in class - after class” and "topic - wrap-up - assessment” must not be published, but the template itself has to be published. This means that when you’re adding further folders to the study module, you have to make sure that the activities included in the folders have already been published. Otherwise, only the folders themselves will be published, without their contents.
How can I create cloze questions?
A cloze question can be used to create exercises/tasks where students either have to write their answer in a text box (text) or choose from a simple single-choice selection list (dropdown).
To create a cloze question, follow these steps:
- Click "Learning Activities" in the left side menu.
- Under Learning Activities, click on "New" in the menu bar and select "Cloze Question" from the drop-down list.
- Enter a title and a short description.
- Click in the field "Cloze" to enter the information and the gaps. Add a gap by clicking on the icon "Insert gap"
 in the menu and define the properties of the gap in the now opened dialogue window (see below).
You now have the following options:
- Optionally tick "Display all responses in each drop-down list" if you use distractors that fit all gaps well. This saves you having to repeatedly enter these incorrect answer alternatives in each of the created gaps with drop-down selection.
- Optionally tick "Show single characters when student clicks" if you are going to create the cloze question as an exercise and want to introduce a playful component. The frequency of clicking has no effect on the calculation of the assessment.
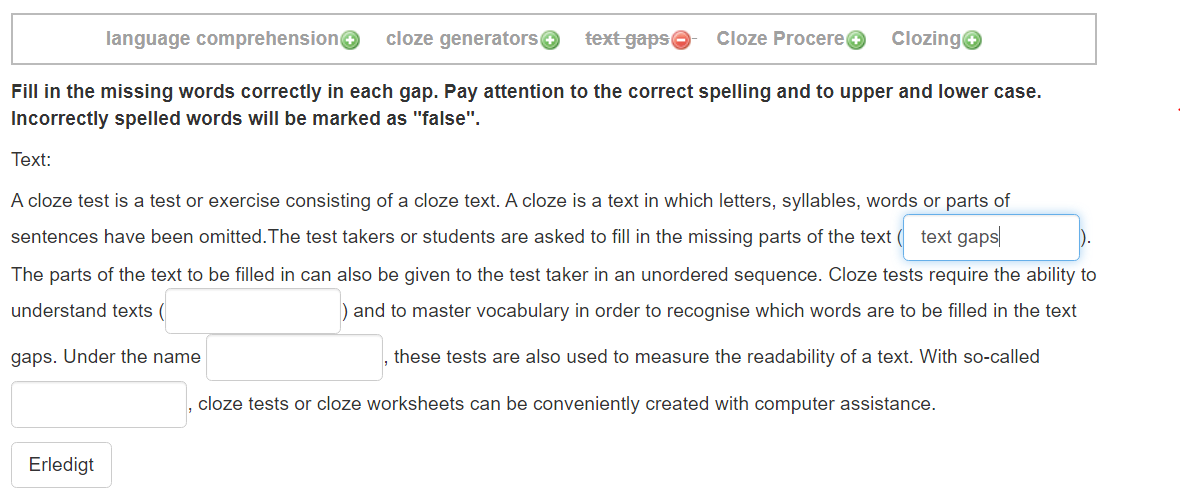
- Optionally tick "Create wordlist of all response options" if the correct choice of the contents of a predefined set of answer alternatives and not the spelling is important when writing in. Students have the option to cross out terms from the list with one click. This allows them to keep track of which answer alternatives have already been chosen and entered by them or which answer alternatives are not included in the shortlist of correct answer alternatives (see screenshot).
- Optionally enter a number in the field "Define standard length for all gaps". The size of each text gap is based on this number. However, students can also write longer content (numbers, terms, text content) in small text gaps. The uniform size of the text gaps is intended to counteract guessing.
- Enter optional feedback and choose whether the cloze question should be set up as an "exercise" or as an "assignment". Fill in all other mandatory fields.
Text
When selecting "Text", students have to correctly enter a certain number, a certain word or several certain words into a text field. To do this, follow the steps given:
- Select "Text" as the type.
- Enter all answer alternatives in the "Solution" fields and mark those that are correct. If you have selected that solutions of the open tasks should be combined into a word list, you can also enter distractors here. Do not mark these as "correct". Also take into account synonyms and common errors in spelling or capitalisation. An entry is considered "correct" if it matches one of the solutions marked as "correct".
You can define further settings:
- Optionally add a "hint for this gap" to this gap. The solution hint is displayed with a symbol directly above the text field. Clicking on the symbol opens the text field with the solution hint for this text gap.
- Optionally, add a "Feedback for this gap". After assessment approval, this feedback will be displayed at this gap.
Dropdown
When selecting "Dropdown", students choose the correct answer by dropdown selection from a range of answer alternatives. To do this, follow the steps given:
- Select "Dropdown" as the type.
- In the "Solution" fields, enter all answer alternatives that are to be displayed as dropdown selections in this gap. Mark only one of the solutions as "correct" and enter additional answer alternatives as distractors. Remember that students can only make one single selection per dropdown gap. A selection will be considered "correct" if it matches one of the solutions marked as "correct".
You can specify other settings:
- Optionally add a "hint for this gap" to this gap. The solution hint is displayed with a symbol directly above the text field. Clicking on the symbol opens the text field with the solution hint for this text gap.
- Optionally, add a "Feedback for this gap". After assessment approval, this feedback is displayed at this gap.
Within a cloze question, different gaps in different formats (text and dropdown) can also be combined. Thus you can use cloze questions e.g. for
- a query of arithmetic solutions,
- vocabulary and grammar tests,
- checking the correct spelling of technical terms and the correct application of technical concepts.
How can I create a peer review?
Instructions and more information about the peer review can be found here.
How can I create a peer rating?
Instructions and more information about the peer review can be found here.
Students' submissions
Where can I view my students’ submissions?
The “overview of assignments” feature helps teachers keep track of the assignments submitted by their students. You can use this feature to view all learning activities submitted by your students. The overview only lists completed learning activities that you have designated as “assignments.”
- In the left-hand side menu, click on “Learning activities”.
- In the menu bar, click on “Learning activities” and select “overview of assignments” from the drop-down list.
- In the “Title of assignments” column, find the assignment for which you’d like to view the students’ submissions,
- Go to the “Status” column for the appropriate assignment and click on the “submitted” number. You’ll see a table where you can manage the submissions.
- In the “Submitted” column, click on “Submission” to view detailed information on the students’ submissions.
On the submissions management page, the “submitted” field shows you all submitted assignments. The number shown in parenthesis tells you how many students have already completed and submitted the assignment. Once the assignments have been graded automatically or manually, you have to publish the grades and assessments so that your students can see them.
How can I grade assignments?
Assignments where the available answer options are predefined (multiple choice, single choice, and cloze questions) are assessed automatically by the system, but you can also add additional comments for your students or attach a feedback document. In the case of open assignments, you have to calculate the assessment yourself and enter it manually.
- In the left-hand side menu, click on “Learning activities”
- In the menu bar, click on “Learning activities” and select “overview of assignments” from the drop-down list
- In the “Title of assignments” column, find the assignment for which you’d like to view the students’ submissions
- Go to the “Status” column for the appropriate assignment and click on the “submitted” number, or click “Actions” and select “Access student submissions” from the drop-down list.
You’ll see a table where you can manage the submissions. The grades and assessments are entered in the “grading” column, either automatically by the system or manually.
There are several assessment options:
| Points | If you would like to assess the assignment by awarding points, please enter the points scored by the respective student. Tip: with ENTER on the keyboard the points are saved! |
| Comment | If you would like to send the student a comment or a brief explanation of your assessment, please add your message in the comment field. Tip: with CTRL + ENTER on the keyboard the comment is saved! |
| Feedback file |
There are several ways to upload your feedback as a feedback file:
|
There are three different options for publishing your assessments:
- To publish your assessment individually for each student, click the “Actions” column for the respective student and select “Publish feedback and sample answers” from the drop-down list.
- To publish your assessments for several students, tick the checkboxes on the left, go to “Selected items,” and select “Publish feedback and sample answers” from the drop-down list.
- To publish your assessments for all students simultaneously, click the button “Publish feedback and sample answers”.
How can I run a plagiarism check on seminar papers?
The plagiarism check assists teachers in assessing open assignments submitted by students.
- In the menu bar under “Learning activities,” click on “Learning activities” and select “overview of assignments” from the drop-down list
- Search for the appropriate assignment in the “Title of assignments” column
- When you’ve found the appropriate assignment, go to the “Status” column and click on the “submitted” number. You’ll see a table where you can manage the submissions.
- In the “Submitted” column, click on “send to plagiarism check.” A pop-up window will open where you have to acknowledge important legal information regarding the plagiarism check.
- Click on “send to plagiarism check” to start the check
- Once the plagiarism check is finished, click on “view details” to see the results in detail
Please note that the plagiarism check only works with .rtf, .doc, .docx, and .pdf text files that have at least 1,000 characters (excluding spaces). Please brief your students on the correct file formats.
The plagiarism check will take a few minutes. Once the check is complete, the results will be displayed to you in in a table. You can click on “view details” to see the detailed results in the iThenticate web window. In the bottom-right corner, you’ll see three icons that let you select various settings and viewing options:
 „view sources“ = overview of all sources and results
 “view/edit filters and sources“ = filters and sources
 „view/edit excluded sources“ = deselect individual sources
You can return the submission to students for revision. In this case, all contents of the submission are retained and students can then edit (modify or add to) these contents again. To return a submission for a revised resubmission, proceed as follows:
- Click "Learning activities" in the left side menu.
- Click on "Learning activities" in the menu bar and select "Overview of assignments" in the drop-down list.
- In the "Title of assignments" column, find the assignment from which you want to view the submissions.
- For that assignment, click the number for "Submitted" in the "Status" column or click on "Access student submissions" in the "Actions" drop-down list.
- Locate the row of the student(s) from whom you would like to return the submission.
- Write a comment in the comment field if needed and optionally upload a feedback file as well. The comment and feedback file will be displayed to the student on the assignment after the submission is returned.
- Click "Return for resubmission" in the "Actions" column in the drop-down list of the selected student.
- If you want to return multiple submissions for revision at the same time, select all or selected submissions and choose "Return for resubmission" (a bulk action) in "Selected items".
If you have returned a submission for resubmission, then:
- you can see the information about the return and the comment in the "Details" column under "Not submitted". You can also set an extension directly here. An extension must be set if the processing time of the assignment is about to expire or has already expired.
- students see on the overview page of the respective assignment the information that this assignment has been returned to them for resubmission and the comment, if you have entered a comment. After restarting the assignment, students will also see the feedback file, should you have attached one.
What happens in case of a return for resubmission?
| SC, MC, Cloze with drop-down | All selected answer alternatives are displayed. The order of the answer alternatives remains the same. The answers can be changed. |
| Cloze with text input | The text entered in the gap is displayed and can be modified again. |
| Sample exam | The entries in the sample exam are displayed and can be changed. All settings remain the same (order of questions in randomized display, display of the question list. Note: So far, all questions can be modified and re-edited. Even if the re-edit of questions is formally not allowed (as of June 29, 2021). |
| Proxy from a Poolfolder | The question randomly drawn from the poolfolder is displayed again in the proxy question with all previous entries. The answers can be changed. |
| Assignment with text input | The text input is displayed and can be deleted, modified or added. |
| Assignment with file upload | The submitted file is displayed and can be recalled and edited or deleted and replaced. |
If an assignment was edited and resubmitted after it was returned, then:
- you can see all the information about the resubmission and your comment under "Submitted" and in the "Submission" column. When submitting an (question type) Assignment, all previous file and text versions are also displayed under
- students see all information about the resubmission on the overview page of the respective assignment. When submitting an (question type) Assignment, all previous file and text versions are also displayed.
You can reset the submission to students. This deletes all contents of the submission and students can restart the assignment. To reset a submission, follow the steps below:
- Click "Learning activities" in the left side menu.
- Click on "Learning activities" in the menu bar and select "Overview of assignments" in the drop-down list.
- In the "Title of assignments" column, find the assignment from which you want to view the submissions.
- For that assignment, click the number for "Submitted" in the "Status" column or click on "Access student submissions" in the "Actions" drop-down list.
- Locate the row of the student(s) from whom you would like to return the submission.
- Write a comment in the comment field if needed and optionally upload a feedback file as well. The comment and feedback file will be displayed to the student on the assignment after the submission is returned.
- Click "Reset this submission" in the "Actions" column in the drop-down list of the selected student.
- If you want to return multiple submissions for revision at the same time, select all or selected submissions and choose "Reset this submission" (a bulk action) in "Selected items".
If you have reset a submission, then:
- you can see the information about the return and the comment in the "Details" column under "Not submitted". You can also set an extension directly here. An extension must be set if the processing time of the assignment is about to expire or has already expired.
- students see on the overview page of the respective assignment the information that this assignment has been returned to them for resubmission and the comment, if you have entered a comment.
What happens in case of a reset?
| SC, MC, Cloze with drop-down | No answer alternatives are selected. The assignment must be restarted. If selected, the order of the answer alternatives is shuffled again. |
| Cloze with text input | The gaps are empty. The assignment must be restarted and the gaps must be filled again. |
| Sample Exam | The Sample Exam is restarted and no answer selections are preserved. If selected, all questions are newly shuffled. |
| Proxy from a Poolfolder | A new question is randomly drawn into the proxy question from the poolfolder. |
| Assignment with test input | The assigment must be restarted. Any previous text input is removed. |
| Assignment with file upload | The assigment must be restarted. Any previously submitted file is removed. |
If an assignment was submitted after it was reset, then:
- you can see all the information about the resubmission and your comment under "Submitted" and in the "Submission" column. When submitting an (question type) Assignment, all previous file and text versions are also displayed under
- students see all information about the resubmission on the overview page of the respective assignment. When submitting an (question type) Assignment, all previous file and text versions are also displayed.
You can set a grace period for a submission. This feature is often used when a teacher returns an assignment to a student for revision and the original submission deadline has already passed.
- In the left-hand side menu, click on “Learning activities”.
- In the menu bar, click on “Learning activities” and select “overview of assignments” from the drop-down list.
- In the “Title of assignments” column, find the assignment for which you’d like to view the students’ submissions.
- Go to the “Status” column for the appropriate assignment and click on the “not submitted” number.
- Find the line that corresponds to the student for whom you’d like to set a grace period.
- In the “Actions” column, select “set extension” from the drop-down list.
- Enter the ending date and time of the grace period and click on “set extension”.
How to set a grace period for multiple students at the same time:
- Tick the checkboxes left of the respective names.
- Under “Selected items,” select “set extension” from the drop-down list.
You can only set grace periods for assignments for which a grading period was defined and where the submission status is displayed as “not submitted” in the “overview of assignments” table. If you have set a grace period, the respective student(s) will be notified on their overview page and via email.
Troubleshooting
Why can’t my students see the materials?
The materials you create are only displayed to your students once you have released them.
There are two options you can use for releasing content:
Go to the overview page that lists all learning activities:
- Click on the
 icon, or
 - Click on the cogwheel icon and select “Release” from the drop-down list.
Go to the relevant learning activity:
- In the menu bar of the learning activity, click on “This page…”.
- Select “Release” from the drop-down list.
Every new learning activity you create remains unpublished and therefore inaccessible to your students until you release it.
You can also release multiple learning activities at the same time:
- Tick the checkboxes to select the appropriate learning activities.
- Click on the “Select item” drop-down list and select “Release”.
I have moved tasks to another folder, now the student submissions are gone.
It is emphatically pointed out that the postponement of assignments that have already been released and where student submissions already exist may not be postponed! It generally applies that assignments that have already been released and handed in by students are not to be changed, both in terms of content and logistically. Subsequent changes or postponements may lead to problems and the loss of submissions.
Students submitted an empty assignment. What can I do?
As the administrator of an online exam environment, you can return a submission for resubmission. Instructions how to do this can be found via the MyLEARN-Guide at "How can I return submissions to individual students for revision".
If the deadline for submission has already been reached and the assignment is officially closed, the system automatically informs the administrator to set an extension for a resubmission of the assignment.
Does the system save student assignments automatically after the time has expired?
Depending on the learning activity, the system behaves in different ways:
Sample Exam with closed-ended question types:
- If students click on the buttons "Next" or "Submit" after the time expires, only those inputs are submitted that are saved or submitted within the time limit.
- The status of the submission is "submitted". In the submission field, there is the additional information "late submission".
- If "Submit" or "Continue" was not clicked at all, all replies that were saved or sent within the time limit are automatically submitted by the system.
- The status of the submission is "submitted", with the additional information "Automated submission by the system".
Grading of the Sample Exam is based on the points for submitted answers. All replies which were not submitted are counted as negative.
Assignment with option "Save as Draft":
- If the button "submit" is clicked after the expiration of the time limit, the saved draft is submitted.
- The status of the submission is "submitted". In the submission field, there is the additional information "late submission".
- If the button "submit" is not clicked AFTER the expiration of the time limit, the saved draft is submitted.
- The status of the submission is "submitted", with the additional information "Automated submission by the system".
In the overview of assignments, you can see the submission (text or file upload) in the state of the last saving as a draft before the time limit had expired.
Assignment without option "Save as Draft":
- If the button "submit" is clicked after the expiration of the time limit (Timer), the answers and assignments are discarded and no answer is submitted.
- The status of the assignment is "submitted" and the assignment can be graded. However, there is no submission file or answer available.
- If the button "submit" is not clicked after the expiration of the time limit (Timer), the answers and assignments are discarded and no answer is submitted.
- The status of the assignment is "submitted", with the additional information "Submission type: automated submission by the system". The assignment can be graded, but no submissions are available.
Why can't students go back to another question on the sample exam?
If you selected "Alllow editing of questions: no", students cannot go back to a question. When starting the Sample Exam they will receive the following information: "In this exam it is not allowed to re edit a question again." Therefore, it is important that students choose answers for each question. If they do not choose an answer, the choice will be empty - and there is no way to change this.
Students cannot go back using their web browser, either. If they click on "back" by mistake, they mus use the "Go forward" arrow of their browser to return to the exam question and to continue working on the exam.